Fred W B
|
| posted on 18/4/06 at 02:30 PM |

|
|
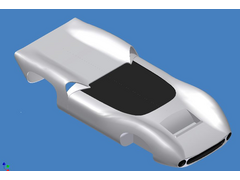
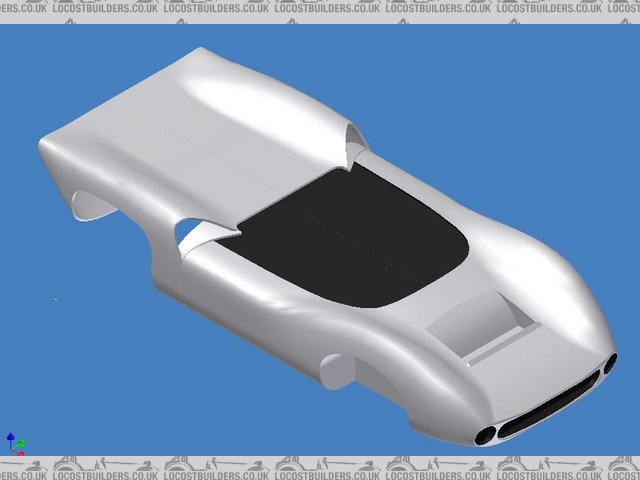
Bodywork for CANAMSA
You guys may have noticed that I have not posted any progress updates on my project for a while. That is because, on top of some domestic projects
getting in the way, significant progress has been made on a desk and in a computer, and not in the garage.
I posted previously (a long time ago) that I had purchased a 1:18 scale model of a Lola T70 Spyder, and that someone had undertook to measure it up
for me on a 3 axis digital machine, "when he gets a chance". Problem is that he never did, so after over a year of waiting I went and got
the model back.
In order to measure it myself, I made up a simple 3 axis measuring jig from alloy channel section and flat, steel rules, a straight edge and a digital
vernier. Then with the aid of a colleague Andrew, I measured the offset of the body surface from the datum base at every point on a 5 mm x 5 mm grid,
and recorded the measurements on a large piece of paper
Andrew then used this data and many reference photo's to draw the body surface in Inventor - One sentence that describes many hours of work.
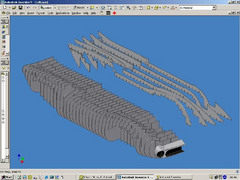
Now we are using that data to produce drawings of many flat body sections (stations every 100 mm in the length) and some longitudinal stringers to
position them, in DXF file format.
These will then be cut out on a CNC router from 8 mm plywood sheet, in order to start building the body plug. The router can handle 8' x 4'
sheets.
I had promised myself that I would wait until I had pictures of the buck in construction before posting on my body progress, but I wanted something
auspicious to be my 500th post.
Please see photo and screen shots below. The ribs screenshot I show is not yet complete.
Cheers
Fred W B
donahue 70
[Edited on 18/4/06 by Fred W B]
|
|
|
|
|
Fred W B
|
| posted on 18/4/06 at 02:32 PM |
|
|
[img][/img]
|
|
|
Fred W B
|
| posted on 18/4/06 at 02:33 PM |
|
|
body2
|
|
|
Fred W B
|
| posted on 18/4/06 at 02:35 PM |
|
|
[img][/img]
|
|
|
emsfactory
|
| posted on 18/4/06 at 02:55 PM |
|
|
That is very cool.
|
|
|
RazMan
|
| posted on 18/4/06 at 03:58 PM |
|
|
Huge respect to you Fred - the collation of all those measurements must have taken loads of time to do.
Judging from the ribs pic you have been very thorough too

Cheers,
Raz
When thinking outside the box doesn't work any more, it's time to build a new box
|
|
|
Krismc
|
| posted on 18/4/06 at 06:19 PM |
|
|
wow good luck with rest of project!
Built, Ivaed, Drove and now Sold - 2011 MNR VORTX RT+ 2000cc Zetec on R1 Throttle boddies.
|
|
|
liam.mccaffrey
|
| posted on 18/4/06 at 07:05 PM |
|
|
muchos repect
Build Blog
Build Photo Album
|
|
|
jimmyjoebob
|
| posted on 18/4/06 at 08:05 PM |
|
|
Looks awesome - You have way more patience than me!
As a complete aside, Gardner Douglas are now selling a Lola T70 spyder kit in the UK.
When you have made your own moulds, are you planning to make a few more to sell?
If at first you don't succeed, hide all evidence you ever tried!
|
|
|
C10CoryM
|
| posted on 18/4/06 at 10:18 PM |
|
|
Looking good. Ive played with 3D programs so I know how much work that is. When I went to the monterey historics last year I met up with a guy from
another forum who races a 1965 T70. (Yes I sat in it and made vroom vroom noises  ) )
Anyhow, he may be willing to help you on some points. He is pretty busy though so may not be able to.
His website is here:
http://www.pozziracing.com/
Cheers.
"Our watchword evermore shall be: The Maple Leaf Forever!"
|
|
|
Fred W B
|
| posted on 19/4/06 at 11:04 AM |
|
|
Hi guys, thanks for responses, and in particular C10CoryM for the very useful Link.
At this stage I am not planning to build more than one car, but you never know?
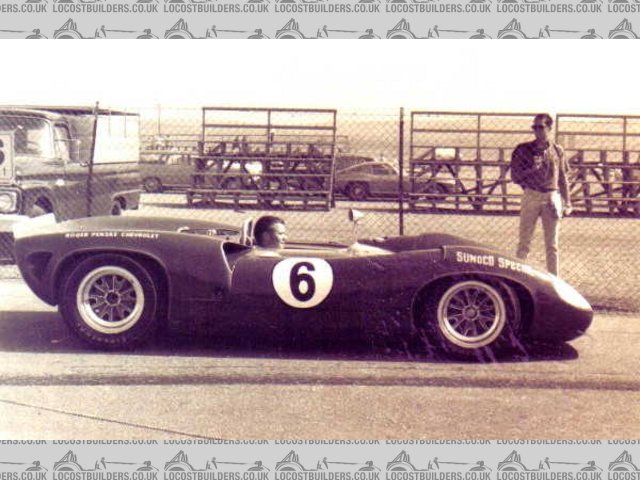
The link has helped explain something that has puzzled us, that being what should the rad exit duct (on top of the nose) and the body shape surronding
the front brake air duct/driving light openings look like. Turns out there were mark 1 and mark 2 versions. The mark 1 has a small square rad exit
duct- see scale model above, with "flat" round brake air duct/driving light openings - see light blue car, while mark 2 had a wider tapered
rad duct, with brake air duct/driving light openings that seem to be more oval, and follow a smoother nose shape than the mark 1 - see mono picture .
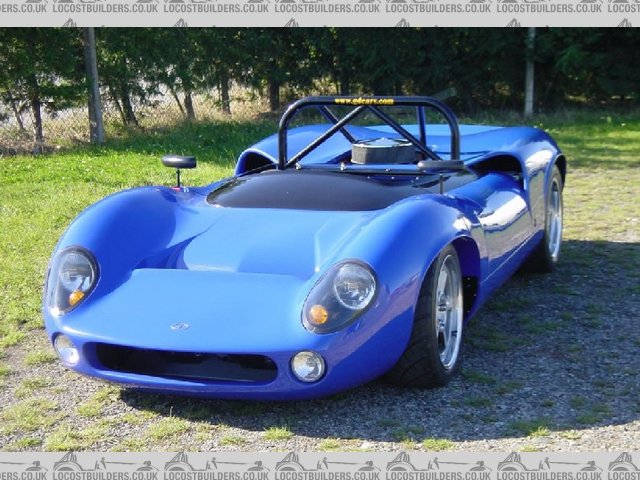
The GD replica 70 seems to use a mark 2 style rad duct, with mark 1 style driving light openings - see dark blue car.
Originally I had not intended to attemp an exact replica, to stop any pedantic's telling me I have this and that detail wrong but now that I am
going to all this trouble, it seems a pity not to get it as right as I can.
So which one do I follow? I prefer the mark 1 rad exit duct, and the mark 2 brake air duct/driving light openings. I suppose I could do it that way,
and call the car shape a tribute to a T70 spyder. Then again, presumably the nose was modified because of cooling problems. Currently our model is a
mark 1.
How did people do this sort of thing before the internet??
Regards
Fred W B
[img][/img]
|
|
|
Fred W B
|
| posted on 19/4/06 at 11:08 AM |
|
|
[img][/img]
|
|
|
Fred W B
|
| posted on 19/4/06 at 11:10 AM |
|
|
gd 70
|
|
|
jimmyjoebob
|
| posted on 21/4/06 at 07:55 AM |
|
|
Lola T70 has to be one of my favourite racing cars. What weight will yours be? Power to weight?
If at first you don't succeed, hide all evidence you ever tried!
|
|
|
Fred W B
|
| posted on 21/4/06 at 11:26 AM |
|
|
The targets would be 750kg (or less?) and 250 HP (eventually)
Cheers
Fred W B
|
|
|
Browser
|
| posted on 24/4/06 at 10:45 AM |
|
|
Awestruck at your dedication and cleverness
When ya gonna build a Porsche 917/30 rep?
Or maybe a Chaparral 2E?
|
|
|
sgraber
|
| posted on 25/4/06 at 07:29 PM |
|
|
Hi Fred, Glad to see someone else taking up the task! Your work looks awesome!
I'm sure you have the process well in hand and therefore my suggestions may seem redundant. I'll post them for the benefit of others just
casually looking in on your project.
If you recall I did the same cross-section thing with my 3D model (except it's my own original design) and then went to cad drawings which were
taped to the wood sheets and cut with a jigsaw. I used 22 ribs along the length and interpolated the curvature. I don't know if you will need as
many ribs as you have shown?
You will want to have as solid a substructure as possible. I have found my 2x4 structure woefully inadequate. And whatever you do, don't use
styrofoam and drywall plaster!  When you get out to the plug surfacing stage and are at a mirror finish, if your substructure is not rock solid,
the mirror surface may appear to 'crawl' and move from day to day depending on humidity and temperature. So try to keep it in a
temperature controlled environment. Specifically at these final stages. When you get out to the plug surfacing stage and are at a mirror finish, if your substructure is not rock solid,
the mirror surface may appear to 'crawl' and move from day to day depending on humidity and temperature. So try to keep it in a
temperature controlled environment. Specifically at these final stages.
Once again, Incredible progress you have made and I am now even more proud of you!
Graber
Steve Graber
http://www.grabercars.com/
"Quickness through lightness"
|
|
|
Fred W B
|
| posted on 4/5/06 at 11:19 AM |
|
|
Hay Steve.
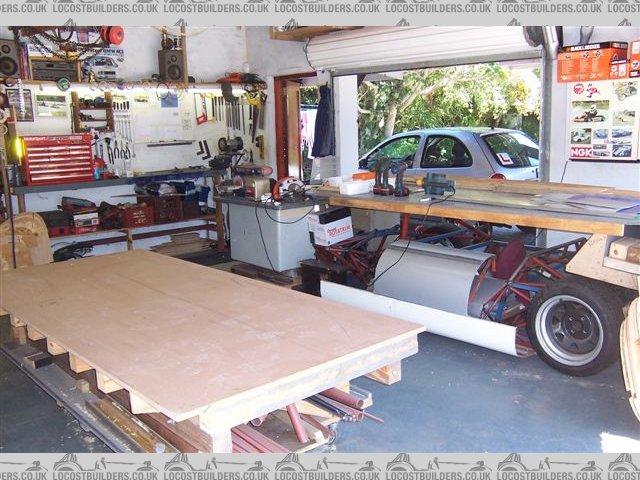
Thanks for the kind words. I have learnt a lot from following your progress.
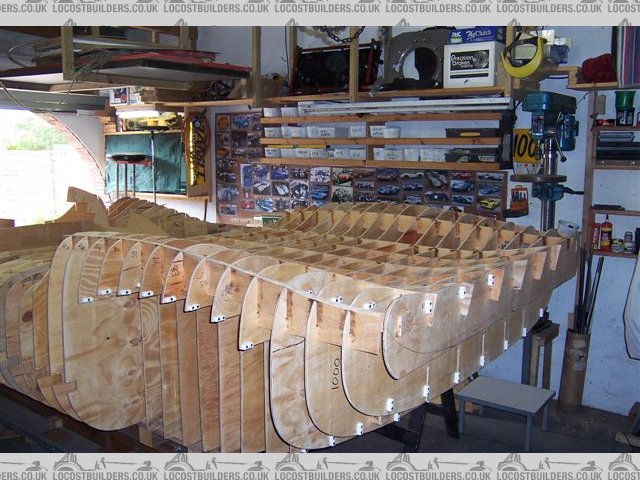
I have had a conversation with the boss of one of my companies GRP suppliers, and he also reccommends gluing and screwing the buck framework together
in order to make it as rigid as possible. As we cut the 8 mm plywood stations and ribs we will include matching groves so they will hopefully slot
together jigsaw fashion. Below is half of the more or less complete set. It does look like a hell of a lot of wood, but I am hoping that going to all
this trouble to produce a good framework with profiles that are exactly what I want will reduce the surfacing pain somewhat. We won't cut all the
wood shown in the cockpit area.
Cheers
Fred W B
GG
[Edited on 4/5/06 by Fred W B]
|
|
|
Fred W B
|
| posted on 12/5/06 at 06:07 AM |
|
|
Just had the first trial station panel cut, to see if the CAD program talks to the CNC router okay. Came out pretty much perfect, just got to add a
centre line reference. This is a transverse station on the front axle line, through the front wheel arches and rad duct.
Looks like I'm off to buy a pile of plywood.
Cheers
Fred W B
[img][/img]
|
|
|
Dutchman
|
| posted on 12/5/06 at 11:03 AM |
|
|
I found a guy in my country that is doing anythig from plexiglass/lexan so if U could not find the headlight covers know that it can be made.
the pics of what is he dooing are here
Tarzan English with foreign accent!
|
|
|
Fred W B
|
| posted on 30/5/06 at 07:05 PM |
|
|
90 square meters of 8 mm plywood loaded for delivery to the router guy.
The plywood is recycled from packing crates used to send stuff from GM Brazil to a GM plant here in Port Elizabeth.
Cheers
Fred W B
[img][/img]
|
|
|
Trev D
|
| posted on 30/5/06 at 09:08 PM |
|
|
Hi Fred I could make you an all aluminium body on the buck you are making. I think the car you have chosen is wonderful it is right up my street.
The best of luck with your build keep us all posted on your progress.
Regards
Trev
|
|
|
Fred W B
|
| posted on 11/2/07 at 11:44 AM |
|
|
Believe it or not, some progress to report.
I cleared the decks in the workshop and
screwed a length of tube to the new base board for the centre reference.
buck start
 
buck table
[Edited on 11/2/07 by Fred W B]
|
|
|
Fred W B
|
| posted on 11/2/07 at 11:53 AM |
|
|
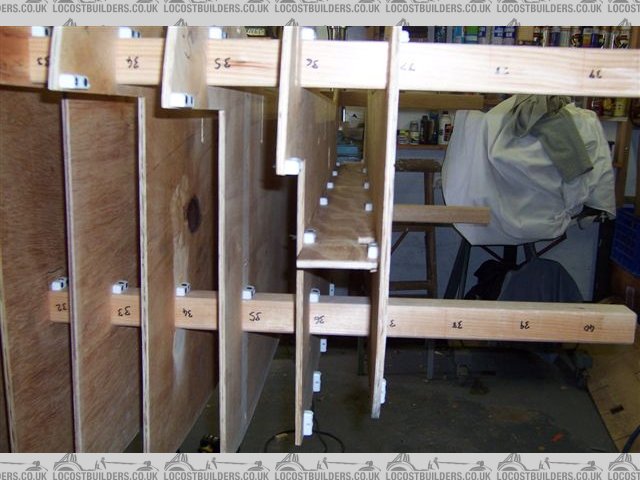
Set a station that coincided with the end of the table vertical, then contined to position stations at 100 mm centres.
Logitudinal "skewers" planned straight and to size to fit holes cut into stations
Every 5 opening gets a transverse stiffener
 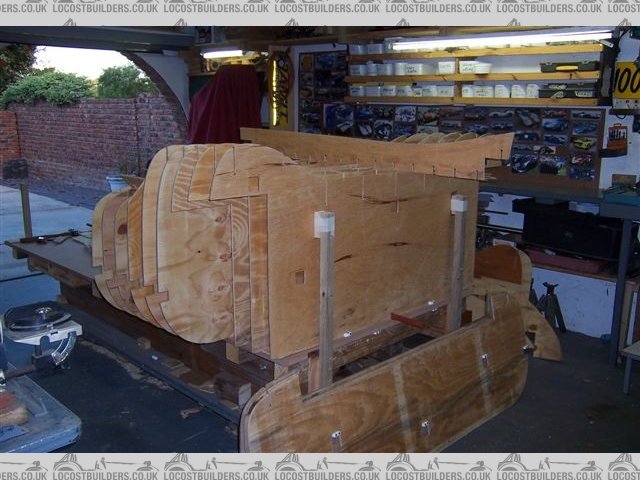
buck step 1
[img][/img]
stiffener
[Edited on 11/2/07 by Fred W B]
|
|
|
Fred W B
|
| posted on 11/2/07 at 12:17 PM |
|
|
Rear section of buck framework almost complete
 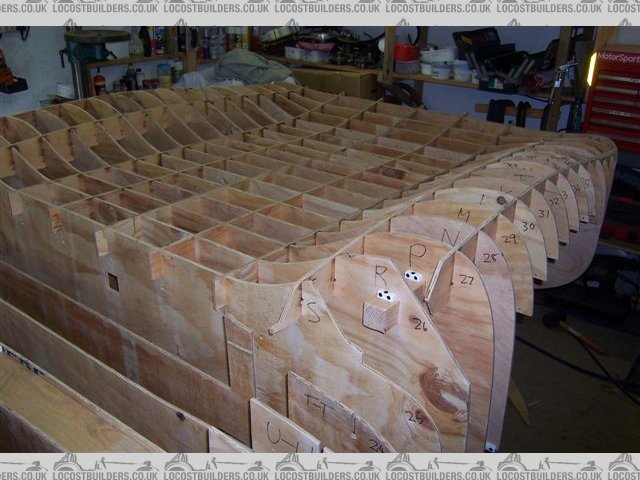
buck feb 2
buck feb
[Edited on 11/2/07 by Fred W B]
|
|
|