doughie
|
 posted on 6/1/07 at 04:31 PM posted on 6/1/07 at 04:31 PM |

|
|
fornt suspension bracket position
have searched the site (lots of informative stuff and pics)
am looking to site the brackets correctly (locost with tina front hubs)
the book says get a mate to hold the suspension arms and tack on...
but i think there may be more to it than that so looking to gather information and knowledge - what do i need to make sure of and are there any tricky
bits to this??
i have cut and replaced sections of LA and LB and am going to cut FU1 and 2 out so its hopfully going to be from scratch...
in advance, all help appreciated; thanks for reading...
|
|
|
|
|
big_wasa
|
| posted on 6/1/07 at 04:41 PM |
|
|
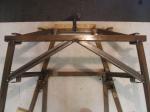
Make a Jig to hold all four brakets at the correct spacings. Make sure it is parallel to the center line of the chassis. Tac them to the chassis.
This imho is the best way to find the position for F1, F2.
regards
 
|
|
|
big_wasa
|
| posted on 6/1/07 at 04:42 PM |
|
|
pic 2
|
|
|
doughie
|
| posted on 6/1/07 at 04:53 PM |
|
|
cheers big-wasa, thats just what i was looking for
what measurements are needed to make sure all the brackets are in the right place? (using gts bones - beleive their not adjusted to get correct
camber????)
|
|
|
big_wasa
|
| posted on 6/1/07 at 05:07 PM |
|
|
You will not get the 6 deg of castor as in my pic because the brackets will end up over hanging the chassis by an unsafe margin.
Make sure the brackets are spaced so that you will get your bones in them. Then try and get the top mounts as far back as you can whilst having proper
surport on the chassis.
Best you will get is the top bone being 10-15mm behind the center of the bottom bone.
Some people make two jigs and then cross brace them so that you set all four brackets in one go and perfectly parallel to the center line of the
chassis.
|
|
|
big_wasa
|
| posted on 6/1/07 at 05:09 PM |
|
|
Not mine. Found on here 
|
|
|
Peteff
|
| posted on 6/1/07 at 05:10 PM |
|
|
Watch where you put the fu tubes so you can still get a nut on the bottom rear bracket or put the bolt in from the front and have to cut it to get it
out (as if anybody would do that)  . It was a long time ago and there were no forums (that's my excuse anyway) . It was a long time ago and there were no forums (that's my excuse anyway)
yours, Pete
I went into the RSPCA office the other day. It was so small you could hardly swing a cat in there.
|
|
|
big_wasa
|
| posted on 6/1/07 at 05:30 PM |
|
|
pic3
|
|
|
doughie
|
| posted on 6/1/07 at 05:57 PM |
|
|
cheers, will do a mock up and see what happens - will try to get some pics on here to show you
p.s. thats some tidy welding you got there BW
|
|
|
StevenB
|
| posted on 7/1/07 at 02:01 AM |
|
|
B_w,
any chance you can describe roughly where in the vertical plane
the shock mounts will fall relative to the top and bottom red dots?
ie for the top...centred on the top red dot on the under side
of the top chassis tube etc
cheers
s
*
|
|
|
Mark Allanson
|
| posted on 7/1/07 at 07:43 PM |
|
|
I did mine in a very similar manner, I made the brackets symetrical and redesigned the upper wishbones to give the castor, the brackets sit nicely on
the chassis, and I have more than enough self centring
Rescued attachment Wishbone Jig.gif
If you can keep you head, whilst all others around you are losing theirs, you are not fully aware of the situation
|
|
|
Bob C
|
| posted on 7/1/07 at 08:04 PM |
|
|
I think my system's better than any of these..... :^)
Bob
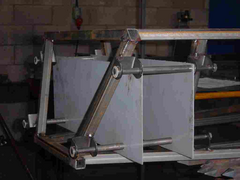 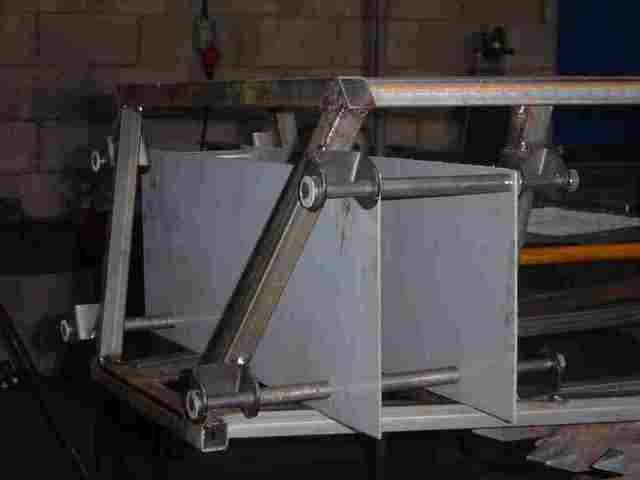
Rescued attachment frsusjig.jpg
|
|
|
Mark Allanson
|
| posted on 7/1/07 at 08:18 PM |
|
|
Bob, excellent longditudinal location, but how does your jig set the distances between the upper and lower brackets? and the exact mirror on the other
side of the car?
If you can keep you head, whilst all others around you are losing theirs, you are not fully aware of the situation
|
|
|
Bob C
|
| posted on 7/1/07 at 08:41 PM |
|
|
Yo mark - maybe it's not so clear on the photo - there are peices of tube cut to appropriate lengths (including a 10mm piece I could move in
front or behind to optionally give me extra caster ....) 12mm rod with a threaded end holds everything in place & runs through the tubes. The
plates are marked out clamped & drilled together. There's an extra small "gunsight" hole bottom middle to make sure it all lines
up with the car centre line.
And I have the jig in my shed if anyone wants to come & borrow it....
Bob
|
|
|
Bob C
|
| posted on 7/1/07 at 08:47 PM |
|
|
Just re-read you post mark - that's set by the positions of the 12mm holes on the plates - it just needs careful marking & reasonable
tolerances.
Note I used this jig to position not just the brackets but also the FU tubes and the upright Lx too
Bob
|
|
|
doughie
|
| posted on 7/1/07 at 09:02 PM |
|
|
cheers, wish i was using mx5 uprights!!
Mark, like the animated photos
|
|
|
Mark Allanson
|
| posted on 7/1/07 at 09:50 PM |
|
|
Still got the jig rusting away in my garage!
If you can keep you head, whilst all others around you are losing theirs, you are not fully aware of the situation
|
|
|
Nisseven
|
| posted on 9/1/07 at 09:29 AM |
|
|
A version of Marks jig is exactly how I planned to do it, as it locates everything exactly to a centre line where it should be.
This is not meant to be a critisism of Mark but I noticed in the photo that the chassis was still only tacked to gether. Do you think that you should
fully weld the chassis first so that any distortion can be dealt with by the final positioning of the suspension brackets?
Bruce
|
|
|
Bob C
|
| posted on 9/1/07 at 01:28 PM |
|
|
it's chicken & egg Bruce - if you weld up the chassis you will find it's in the wrong place to get the wishbone pivots right.
I had to move all 4 uprights.
My chassis didn't move a lot after it was tacked
Bob
|
|
|
Nisseven
|
| posted on 10/1/07 at 09:55 AM |
|
|
Hi Bob,
Yes I understandwhat you say regarding the position of the chassis members the brackets are mounted to and this is a problem because of the
"U" shaped brackets used. For this reason I am making brackets which are essentially flat plates welded to the sides of the chassis
members, which gives me the advantage of positioning them very accurately. I think that they will look good to. I am close to that stage now and will
post some photos when I have done them to see what you think.
Bruce
|
|
|
Nisseven
|
| posted on 10/1/07 at 10:09 AM |
|
|
Sorry Bob, In an earlier post I was refering to Marks jig when it was yours that I thought the best. As I said I intend to make one the same except
that it will not be able to be two flat sheets like that as I have diagonal bracing in the way, but the principal will be the same.
Bruce
|
|
|
James
|
| posted on 11/1/07 at 04:25 PM |
|
|
Pics of how I did mine:
http://www.locostbuilders.co.uk/photos.php?action=gal&user=James&folder=Bracket%20Jig
Hope it's of some use.
Cheers,
James
------------------------------------------------------------------------------------------------------------
"The fight is won or lost far away from witnesses, behind the lines, in the gym and out there on the road, long before I dance under those lights."
- Muhammad Ali
|
|
|