thomas4age
|
| posted on 2/1/08 at 06:45 AM |

|
|
Hey I have that idler pulley on my 16v aswell, and is has a spring in it and a bolt.
hmmm maybe I'll get some zetec idler bearings of the breakers to mock something up...
grtz Thomas
If Lucas made guns, Wars wouldn't start either.
|
|
|
|
|
thomas4age
|
| posted on 26/2/08 at 02:47 PM |
|
|
hey all
Some time spend in the garage again this week, a bunch of little things taken care of, and a few big problems solved.
I have finaly got hold of some tubes that take the laminova cores, with a little help from an englishman in australia they even got over here in
holland.
here´s one with the intercooler core inside, the fit is very tight as it´s supposed, the gap inbetween the tube wall and the fins is less than 0.04mm
took a year searching but I knew this ID tube would be availeble somewhere. it's listed as a scaffold tube......
 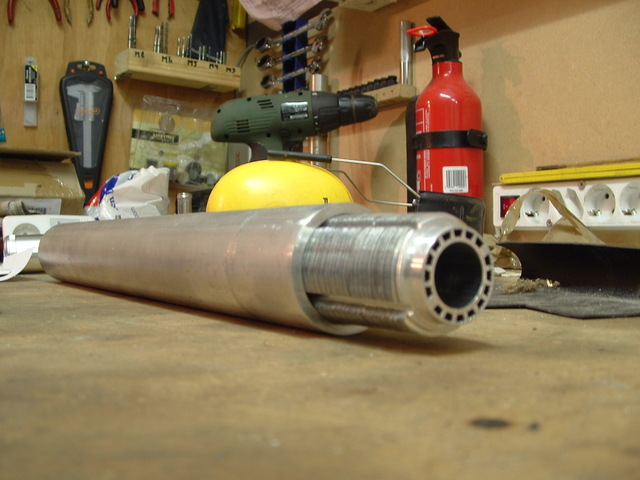
laminova cores in tubes YES!!!
also the I decided on the route of the belt driving the chargers and the alternator and I had to make a piece on the lathe that would carry an extra
support pulley, and a few small alloy spacers for the left hand SC mount and the alternator, having a lathe is very very nice when making all pulleys
line up, measure up what you need, turn and it fits right away
here's 2 simple spacers
 
T6 alloy bushes from lathe
the support pulley carrier took al little more measuring, the carrier also protudes into a 12mm hole drilled in the engine bracket, so the pulley is
supported buy the carier and the bolt is used to tighten it up. it should be strong enough, the steps on the outer end are made so that the bearing
inside the pulley fits tight on the carier. the thread in the head was M10 x 1.25 so a piece of threaded rod was bought ( expensive stuff....) got
the bolts for free though. expensive stuff....) got
the bolts for free though.
 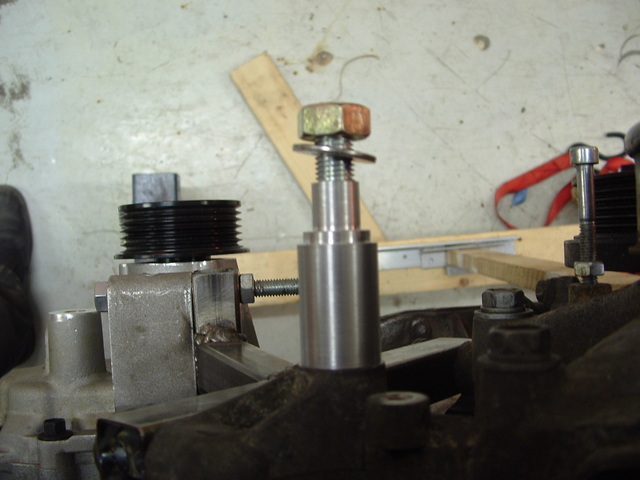
T6 alloy support pulley carrier
here the pully is fitted
 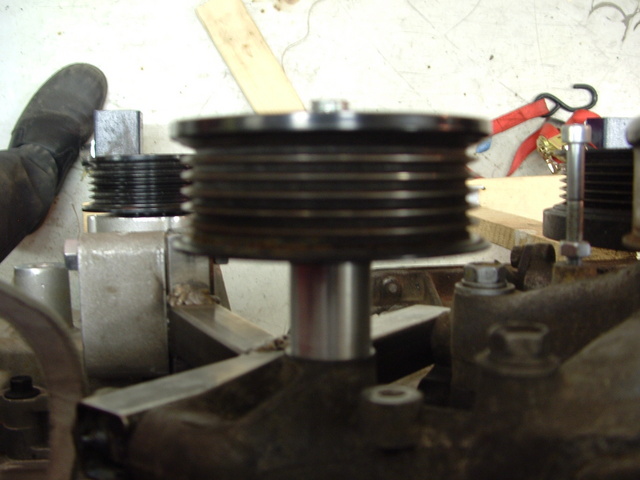
support pulley mounted
I also had to make a new alternator bracket, the alt don't need to swivel because the 1uz has a very clever pulley tensioner somewhere else, so
it can be mounted solid.
the alt upper mount is bolted down into the engine it self the lower bracket is only there to stop it from turning on the upper bolt hole.
 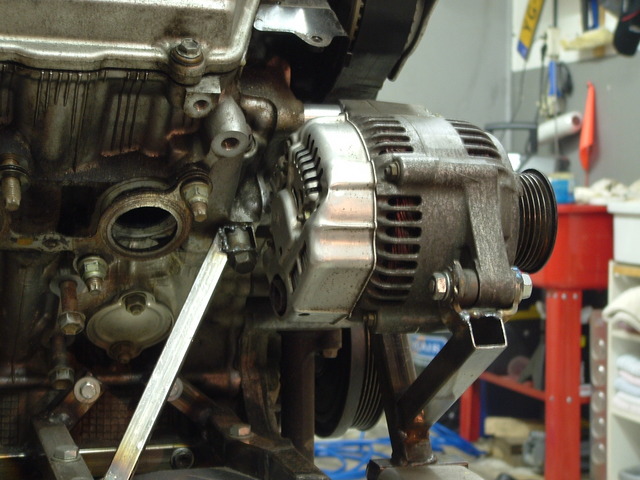
new alternator mount
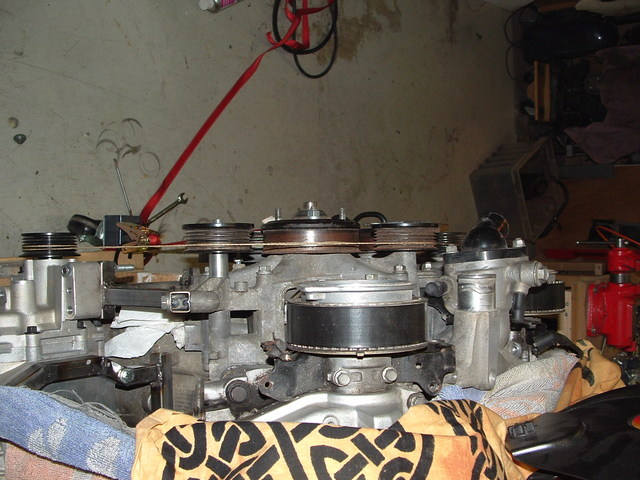
once that was done I could finaly measure up the length of the new belt that I need, I did that with the tensioner held down with a
"spanband"(don't know in english) and a piece of rope, it measures 261cm with tensioner held down and 266 with tensioner slackend.
that's about 103" of belt to order from gates
the route with tensioner held down
 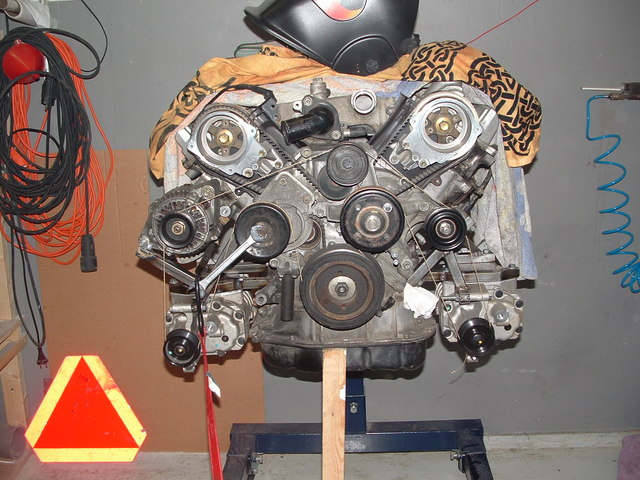
belt run with tensioner
the allingment of the pulley's is about spot on, I can measure a 0.2mm run out at on the outer edge of the right hand SC pulley using the laser,
I think that's about as close as I can get it using only a hacksaw, 3euro laser pointer (stripe) and digital calipers and a second hand 18yo
cebora mig welder.
belt lines up 99,9%
so on with the intake manifold and intercoolers.........
hmm Question: I need to weld alloy now.....
time to buy a tig welder?
or have someone do it for me?
it must be neat because it's the first thing you'll see when to bonnet opens.
Grtz Thomas
If Lucas made guns, Wars wouldn't start either.
|
|
|
thomas4age
|
| posted on 10/3/08 at 09:19 PM |
|
|
well the transmission is also sorted, not your average lo-cost item but it wasn't to expensive at all. (twice as cheap as I had in mind actually)
goes to show they can still be found if you look hard/long enough
a Porsche G50-03 from a 38K miles wrecked 911 3.6L 964 chassis,
I'm very happy because I would have thought this was gonna cost the earth,
I allready sold the UN1 box I had, will be going into a GT40 soon (doesn't fit the GD chassis)
piccie time
ok I know it needs a good cleaning session any tips on that btw???
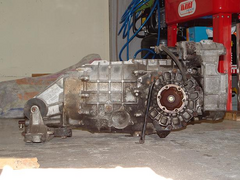 
porsche G50-03
UN1 and G50 side by side the piccie is a bit off btw because the G50 is larger than the Un1 but it doesn't show. (top is G50 btw)
[img][/img]
dimension piccies are in my album for anyone who wants them.
CLICKY ME
happy man now, the most expensive part other than the kit itself is in the garage!
ps i've heard that a rover V8 presure plate fits a G50 splins input shaft..... true???
Grtz Thomas
[Edited on 10/3/08 by thomas4age]
[Edited on 10/3/08 by thomas4age]
If Lucas made guns, Wars wouldn't start either.
|
|
|
Benzine
|
| posted on 10/3/08 at 10:28 PM |
|
|
Looking good 
quote:
Originally posted by thomas4age
ok I know it needs a good cleaning session any tips on that btw???
I've recently cleaned up a gearbox and engine. I used 3-in-1 degreaser, pressure washer and a dremel. Came up like new
|
|
|
bimbleuk
|
| posted on 11/3/08 at 08:59 AM |
|
|
Hi,
Looking good Thomas. Must be very satisfying doing the major mechanicals yourself!
Back to belts your install looks good and you're thinking about what your doing. Not just slapping it all together and hoping for the best. V
belts will work fine with a good tollerance on alignment so you well within that I would say.
Not quite so straight forward for OMEX unfortunately. I mentioned about their first effort spitting the belt off. Well they had finished the
CNC'd bracket design and had a production run of 10 made ready to get anodised. Only when one of the Rotrex guys paid a visit they pointed out
the belt was not centered on the pulley! What Rotrex don't make clear is the belt must be in the middle of the pulley to balance the loads
otherwise the bearings will fail. I had considered this on mine and so I won't be redesigning mine unlike OMEX 
[Edited on 12/3/08 by bimbleuk]
|
|
|
thomas4age
|
| posted on 11/3/08 at 04:06 PM |
|
|
Thanx for the tip benzine,
I'll try that, I have a canister like thingy that goes on the el cheapo compressor.
but what cleaner/degreeser is that? you used.
is it the soap based stuff or the petrol/thinner/terpentine solvent cleaner? I would not dare to risk the seals in thsi box...
@ Justin, I'm not sure I understand what you're trying to say, how can a belt run over a pully in correct alingment, and not be in the
middle? can you make a drawing maybe? the bearings in the snout of the M45 are supposed to be very good.... though one can never be to sure.
also this box will be instorage for quite some time, what's best, drain the oil or leave it in?
Grtz Thomas
If Lucas made guns, Wars wouldn't start either.
|
|
|
bimbleuk
|
| posted on 12/3/08 at 12:09 PM |
|
|
Thomas,
What I described is a peculiarity of the Rotrex drive pulley. The standard steel pulley can take a 7 v belt but a lot of production engines only use a
5 v belt like mine. So you could align the belt with the v nearest the Rotrex or the v at the outer edge of the drive pulley. Mine has an unsed v
either side of the belt hence its sat in the middle. I believe they also don't sell alluminium pulleys anymore either as they flexed under load,
again causing bearing failure.
The Eaton blowers are robust and proven so don't worry about it!
|
|
|
thomas4age
|
| posted on 13/3/08 at 12:58 AM |
|
|
Ahh like that.
I would never use a combination of different ribbed pulleys in any apllication using eatons because of belt slippage. I'm lucky that I can have
a 6 rib belt since the eaton pulleys are the same as the original lexus ones...
makes sence what you're saying.
thanx
anyway what about the gearbox storage question? should I store it with or without oil in it?
Grtz Thomas
If Lucas made guns, Wars wouldn't start either.
|
|
|
thomas4age
|
| posted on 27/5/08 at 12:31 AM |
|
|
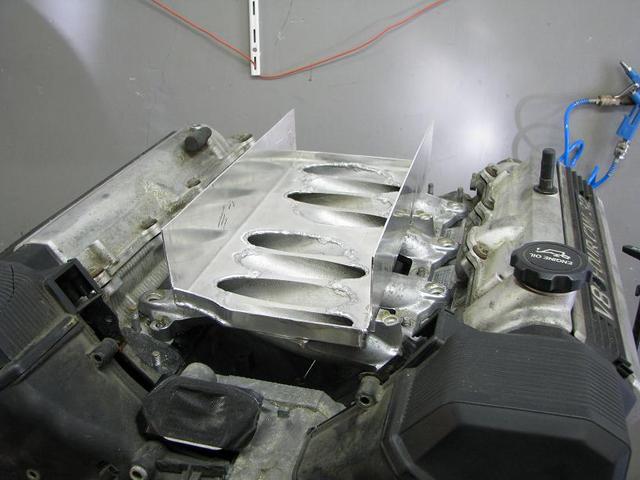
Had some good playtime in the garage making fiddly parts to build up the intercooler system.
The idea is to place the finned core inside a tube, have the airflow over/inbetween the finns and the tube wall, and have coolant flow through the
lentghwise holes in the core. the only thing that hasn't been done yet is to machine lengthwise solts in the tubes for the air to enter and exit
the heat exchanger.
4 of these will sit side by side on top of the milled down lower intake manifold. which was machiened down by a friend of mine.
 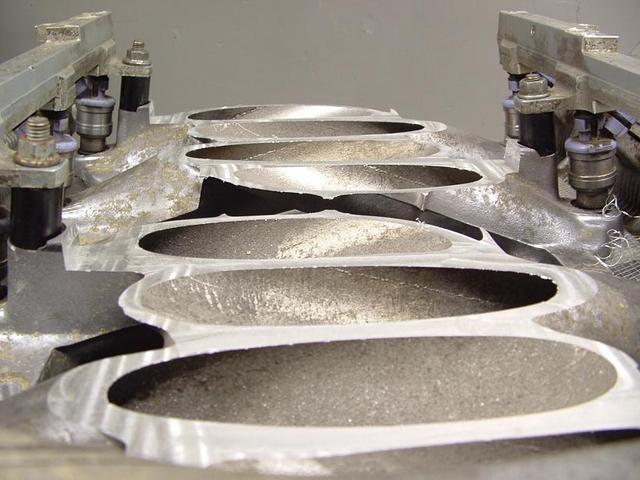
completly flat
Next up: the T6 tubes needed to be cut down in order for 4 of them being able to sit side by side on the intake manifold, and not interfere with the
stock fuel rails, which I would like to keep.
also an 2mm alloy airbox will need to be build around the 4 heat exchangers.
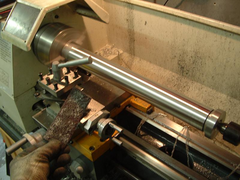
so how do you fit 46cm tubes into a 40cm lentgh lathe? well you can. with some imagination.
I got the overall run out on this: buget lathe with a 5 cm overhung and not so acurate tailstock, fitted with a homebrew semi floating tube center,
down to about 0.1mm over the total length of 460mm, the run out came when I had to take the tube out and swap it around to machine the part that is
clamped in the jaws in this picture. that's close enough for me, as this is my 5th job ever on a lathe.
piccies
tube in lathe (tailstock overhung 5cm)
 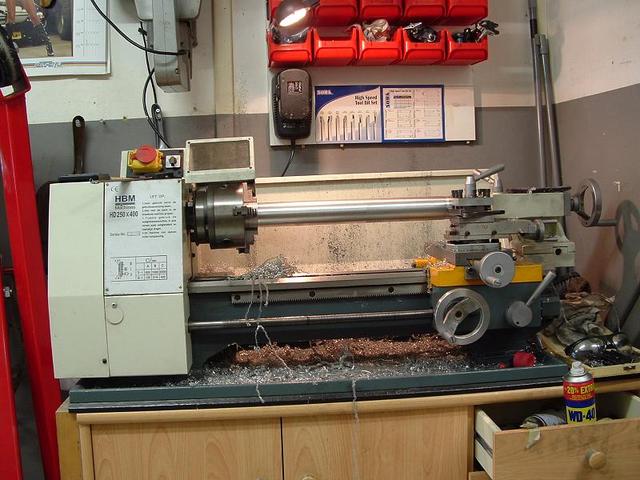
core tube in the Lathe
home made T6 tube center clamped to the normal livecenter.
 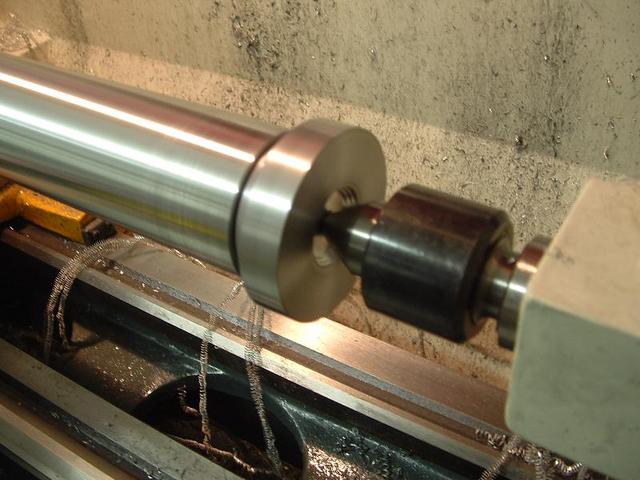
home made live tube center
machining in action, diameter was 48.7mm and had to become 46.0mm made 4 passes on all 4 tubes, and use 2 cans of wd40 to cool everything down during
machining, Auto feed is a MUST for this, but set it slow, the swarf cooming from the toolbit is vibrating so much it doesn;t show in this picture,
it's comming of very steadily without noise which I'm told is good.... ???
 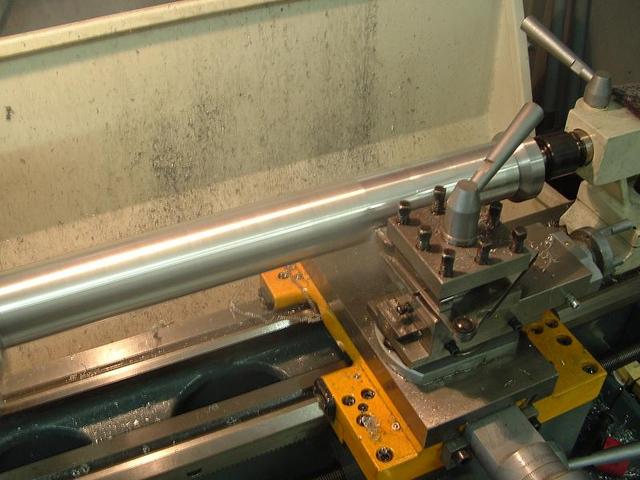
machining core in lathe
quick rub with scotchbrite makes shiny
machining lathe on autofeed
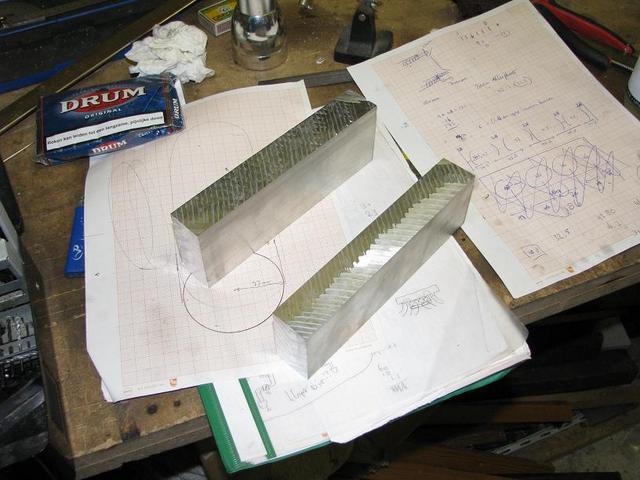
There was end result on both ends, 
saved some weight, had three buckets like this.
 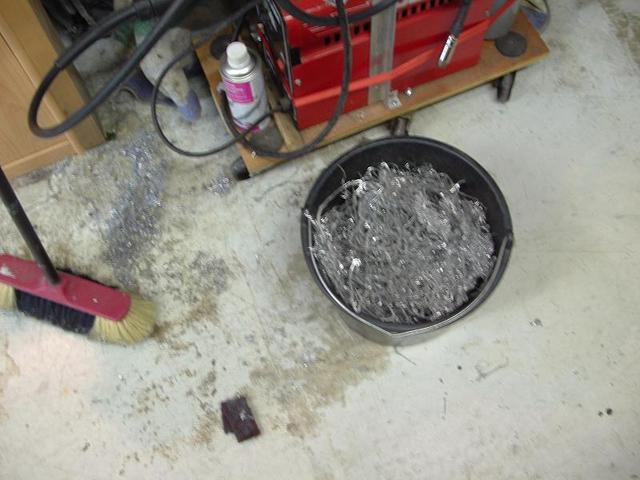
had 3 of these when finnished
but looks the buisness
 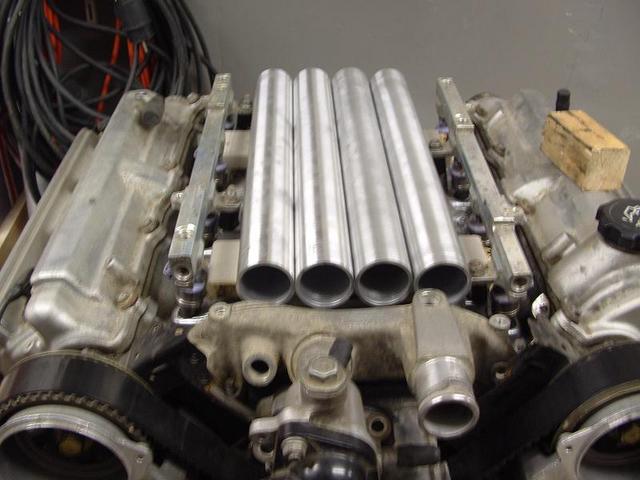
they fit between the fuelrails
after that: the Lamionova cores will be inside the tubes, and need to be sealed of on both air and coolant sides. space is very limited and even a
millimeter is key on the front side of the intercooler, because the front waterbridge is in the way, I would like to build everthing up keeping as
much parts of the engine untouched, so I decided to make the endcap/seals inside the tubes instead of on the ends of it, saves 22mm's in total,
but made a more difficult job. I decided on using 2mm thick Orings as seals. I used an online calculator to decide on the sizes of the Oring grooves.
I sealed of one tube using these and tested it to 7bar of presure from the compressor they didn't leak so I think I'll be ok, I never build
anything like this before so time will tell.......
shamed to say but I'm a little bit proud of myself, very rewarding making such nice looking shiny parts, shame the aren't vissible when in
action.
piccies
hacksaw elbow grease 18tpi blade works wonders compared to 29tpi btw
 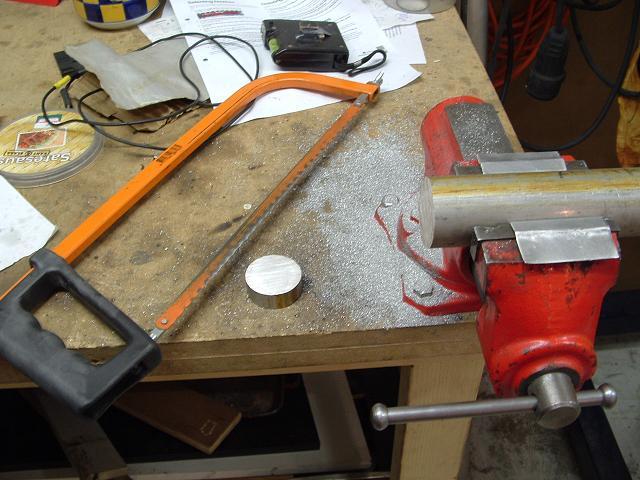
hacksaw Elbow grease
inside of #2 machined to +/-0.02mm of prototype #1. trick is NEVER take it out of the chuck. for outside machining this piece is clamped from inside
out in the 3jaw.
 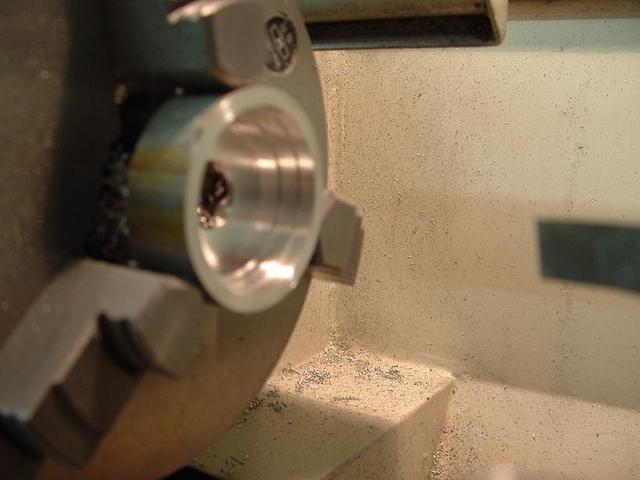
inside of end cap machiening in lathe
#1 & #2 finnished size difference within 0.02mm tollerance is much higher so pleased
 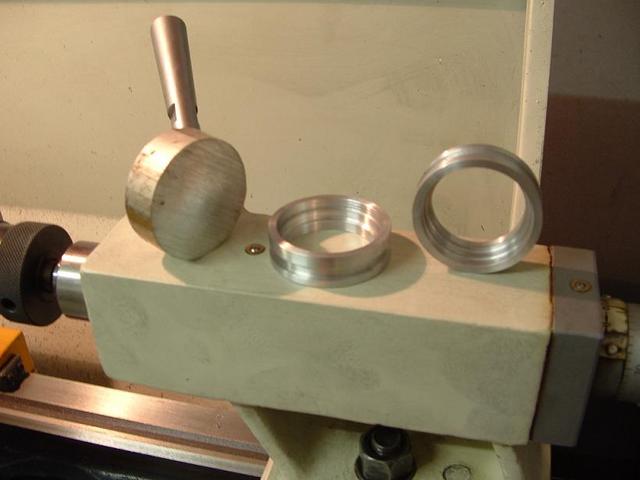
endcaps for cores with Oring grooves
from raw material to finnished part YIPPIE
raw material to final product endcaps for Laminova cored intercooler
here's where the core Oring sits in the end cap/ring
 
Orings in place
here's a complete heatexchanger partly assembeld to show how it fits
partly assembeld heatexchanger
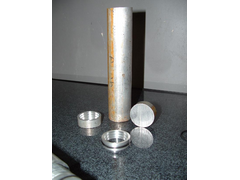
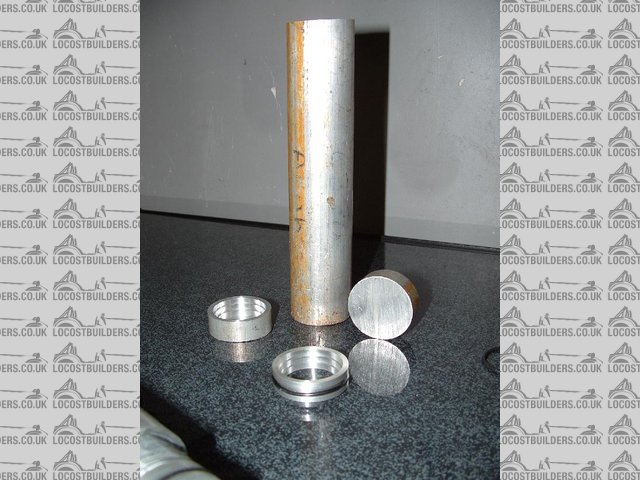
and for the fun of it a fancy display of parts
intercooler parts display
i need to make 4 complete sets as theres 4 cores. the proto endcap took 4 hours to make, getting everything to fit smoothly with destroying the Oring
during assebly.
once all measurements where OK #2 took 1.5 hours from picking up the hacksaw to fitting the Orings. I think with some training of my right arm I can
get that down to 1 hour per piece, so another 6 hours behind the lathe is in order.
One thing is for sure though, the machine has allready payed itself back. and I'm very happy with the quality of it, with some more practice I
think I can get even better matching than the 0.02mm I now get.
next up: getting the airbox/manifold made up from 2 or 3 mm sheet alloy, and getting it welded up.
Grtz Thomas 
[Edited on 27/5/08 by thomas4age]
[Edited on 27/5/08 by thomas4age]
If Lucas made guns, Wars wouldn't start either.
|
|
|
alistairolsen
|
| posted on 27/5/08 at 08:47 PM |
|
|
why a hacksaw? Surely you camp the rod in the 3 jaw, machine out the inside and then the outside and then part it off :S
|
|
|
omega 24 v6
|
| posted on 27/5/08 at 10:00 PM |
|
|
Nice work and very necessity is the mother of invention. But gloves on while workin a lathe??? we'd have got a right b*llicking as apprentices
for that.
If it looks wrong it probably is wrong.
|
|
|
thomas4age
|
| posted on 28/5/08 at 12:36 AM |
|
|
Machining the inside first and then parting of would mean the hole lentgh of rod would be in the lathe, I don't like that, because the toolbit
partoff isn't upto anything over 20mm. I also cannot get over 20mm in the hollow part of the chuck so that would mean machining on an overhang,
I think this way is better considering it's just a hobby lathe.
the gloves are tightfit dynema gloves, which you cannot possibly cut through. I'm not touching anythin while it's spinning but had a peice
of swarf catapulted into my hand twice, so decided that gloves are in order.
these are very safe for this use, the lathe cannot pick them up by any chance, unless i would do something very stupid, and if I'd do that
without gloves the mess would be about the same.
rule one in the book is NEVER touch a spinning part directly.
make sure the spinning part can never catapult your hand into the toolbit
I think I'm quite ok wearing these while working on the machine, do you know what Dynema is?
Grtz Thomas
If Lucas made guns, Wars wouldn't start either.
|
|
|
clairetoo
|
| posted on 27/9/08 at 08:05 PM |
|
|
I'm a bit late to this thread (how did I miss this !) but ..... what I would do is cut the bar long enough to make , say , three + parting off
allowance and enough to hold on , then fully machine each one , and part off .
Holding a ring with a thin wall is not good - it probably wont be dead round.......
Allso - I never wear any kind of gloves while machining - they can easily be pulled into the machine , and rather than a lightly battered
finger you will lose your hand completely.......trust me on this one , I worked as a turner for over ten years , so know what not to do 
Its cuz I is blond , innit
Claire xx
Will weld for food......
|
|
|
thomas4age
|
| posted on 24/1/09 at 06:10 PM |
|
|
Hands still attached to body, took your advise i don;t wear gloves anymore behind the machines!
anyway
Update,
just before christmas, my beloved Sylva Striker finaly got sold, so with the funds in hand I orderd a Gardner Douglas chassis and all the bits to
build it up to rolling chassis stage.
they will need approx 16 weeks to build the chassis, so I have exactly 3 months to complete the engine hardware...
I bought an aditional nice piece of garage lust! and started right away on the intercooler stack.
the new toy, Gosmeta Bf30 drilling milling combo with a deckel crosstable electrics are an Telemechanique Altivar Frequency drive that takes single
phase 230V and puts out 3phase for the machine, it does 1.2KW so torque enough for this little 190cm tall 420kg heavy baby.

I made the flangeplates for the core housing that will hold the 4 alloy tubes. 5mm T6 plate drilled with bi-metal holesaw to 43.5mm diameter, d*mn
that makes a mess! still have ally in my hair after 4 days
boring some more
after that I needed to turn 2 of the tubes further down in oder to get them in there, and make the undercuts from 46mm to 43.5 in order to fit them
tightly into the plates. the undercut length was very important otherwise the laminova cores would not fit length wise, a big hassle withou digital
readout on the machine but it got there.
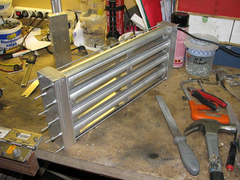
when finnished the result was this,

exploded view of the partial intercooler
After tackwelding the tubes to the flangeplates I was finnaly ready to mill in the 15mm slots in which the air enters and exits. after this side is
done the whole assembly will be turned over and the same thing needs to be done.
thing is I never operated a milling machine before, and I did 15mins of pratice runs on a block of T6 before I took the plunge
10mm 4cutter in the collet the Altivar set at 67hz doing about 500rmp's on the spindle and away it go's
 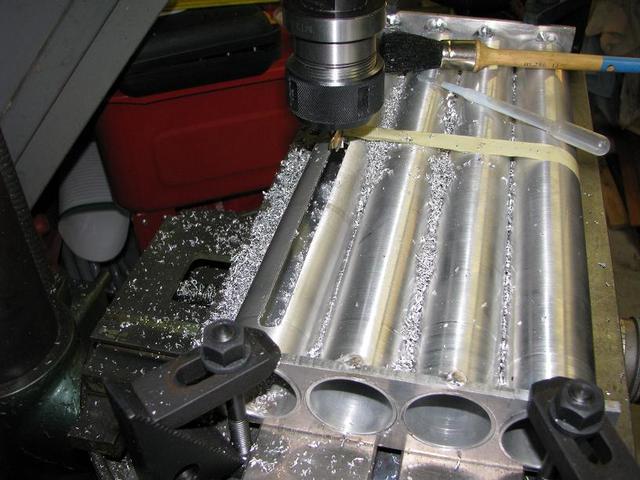
milling slot 1
the mill is not operating to industry standards and it's an old B****rd but it gets there allbeit SLOWLY
2 hours later (measuring takes up most time the actual machining pass is within a minut per slot-length)
 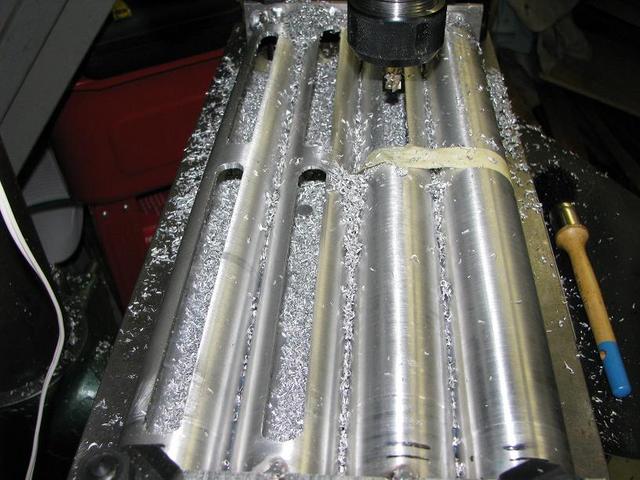
keep on milling
remember that when these 8 are done another 8 are in order..... Anyway the inside of the tube looks clean, no scarfing or chipping so the
Laminova's will probably fit straigh away!
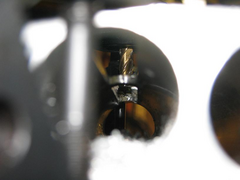 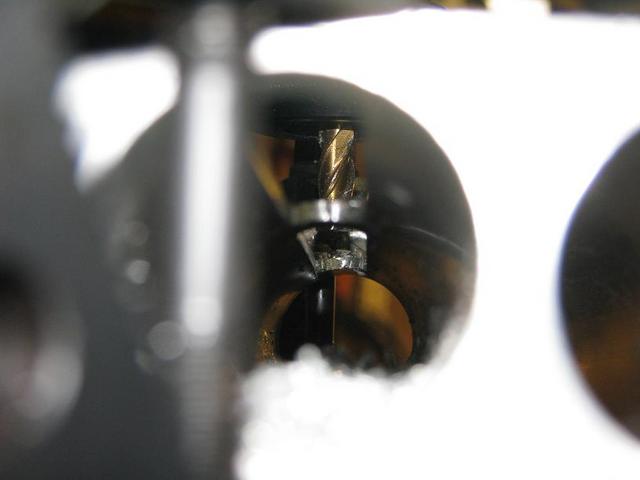
inside the core housing
I'll get a pro to weld the tubes in place completly because when I screw them up I'd be in trouble. remember I ordered the tube from
australia... and I'm in europe + lots of time went into these.....
well that's were it stands so far hope you enjoy reading.
Grtz Thomas
If Lucas made guns, Wars wouldn't start either.
|
|
|
James
|
| posted on 9/3/09 at 11:52 AM |
|
|
quote:
Originally posted by thomas4age
well that's were it stands so far hope you enjoy reading.
Grtz Thomas
Very much so!
Been reading this thread since the beginning but had forgotten about it for quite a while.
Happened across it in my favourites!
Hope all going well, can't be long till the chassis gets to you, how's the engine going?
Cheers,
James
------------------------------------------------------------------------------------------------------------
"The fight is won or lost far away from witnesses, behind the lines, in the gym and out there on the road, long before I dance under those lights."
- Muhammad Ali
|
|
|
thomas4age
|
| posted on 11/5/09 at 09:35 AM |
|
|
Thanx James
well I have been busy for a few days, here's the results
I made the intake collector box out of this 3mm alloy plate got some leftovers wich may be just enough to make a nice 2 liter fuel swirl pot aswell
but that's not the isue right now.
I'm sorry to say that I forgot to make a picture of the box and all it's angle before welding it to the milled down lower intake
manifold,
biggest hurdle to overcome was NOT having a plate bending brake, not wanting to pay for one as it has to go away again because of space issues, so I
made up one with a few old parts I had lying around, it's not fancy but gets the job done.
via this
 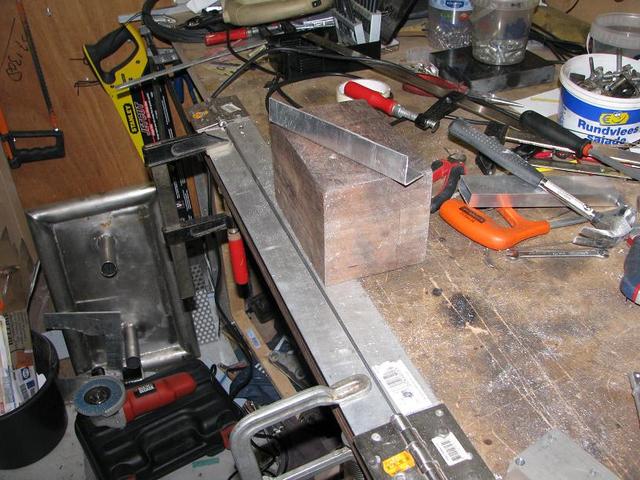
DIY plate bending brake
went into this within a half days work
intake box welded up
next up was getting the final assembly of the laminova housing done, this ment drilling the holes through the flanges where the tubes sit in and
though the 30mm thick collant collectors at once to get a nice fit, first up was a 3,2mm drill so I could tap the flanges to M4, then the blocks got
4.2mm holes to give enough clearance to take the collector of again to fit the gaskets later on, and to fit the laminova cores offcourse.
so this:
T6 bar for coolan collectors
went into this (forgot to take loose piccies again but you get the point)
who can spot the F**kup I made, now be gentle....... WOOT
Lamonia housing complete
after that was the trial fit of the housing into the box, a bit of filing and fun with the dremel got me here:
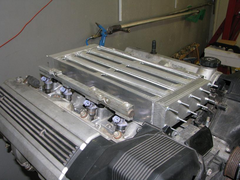 
test fit of housing in box
and the the big welding session was in order, I was not looking forward to this at all, I have the AC tig for only a short while and have not had much
pratice buy any standard, so mixing and matching with the settings payed off, the welds are not all looking very nice, the straight beads are ok but
there's some very nasty angles on the box on which the weldbead cannot be build up to much (stack of dimes rimple) because then the different
parts cannot be dismantled later on. man this gave me the shivers.... one mistake and weeks of work are down the drian!
anyway results
rear:
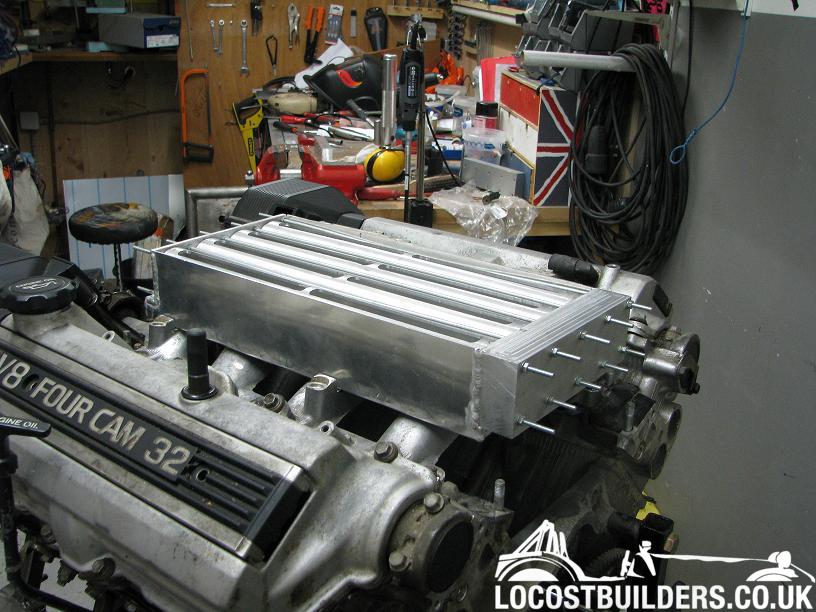
frontview and test whether the coolant collector would still come of the thing, I was worried sick that the heat generated would warp the alloy so
much the 0.2mm play in the M4 threads would be insufficient, and I had to swaw it off. the reason that the threads runn all the way though the box it
that this way even if any of the inside lock-bolts ever decides to come loose it will never be able the enter the combustion chambers of the engine.
anyway it didn't:
next on was the test if the modified front waterbridge was still clearing the intake manifold, well no to be exact it barely touches it but still, a
quick session on the mill solved it nicly.
result:
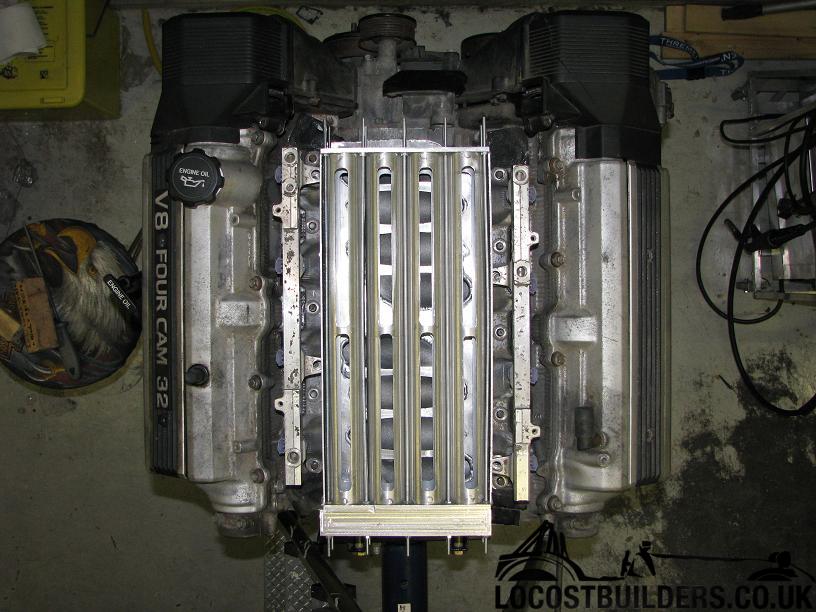
and in the end there where only to things to find out, what about the injector rails. I would like to use the stock ones because they're
cheap!
they fit:
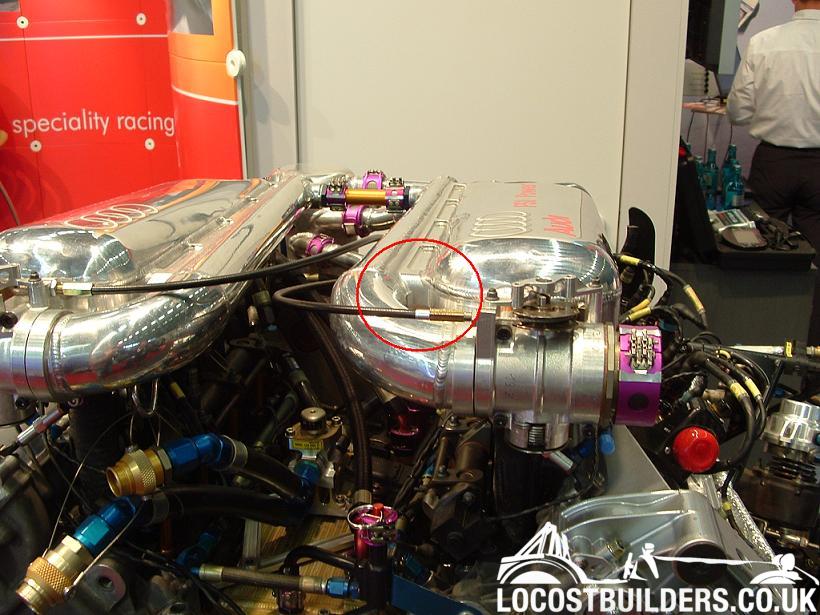
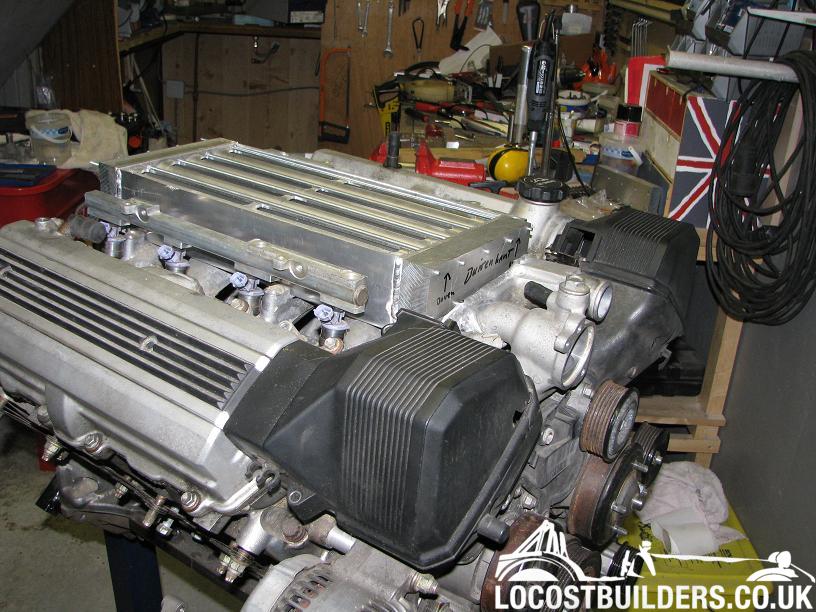
and what about the bonnet clearence, I know the top part of the intake hasn't been build yet but I need at least 17mm to keep in line with the
"audi R8 Lemans 24H twin turbo engine"
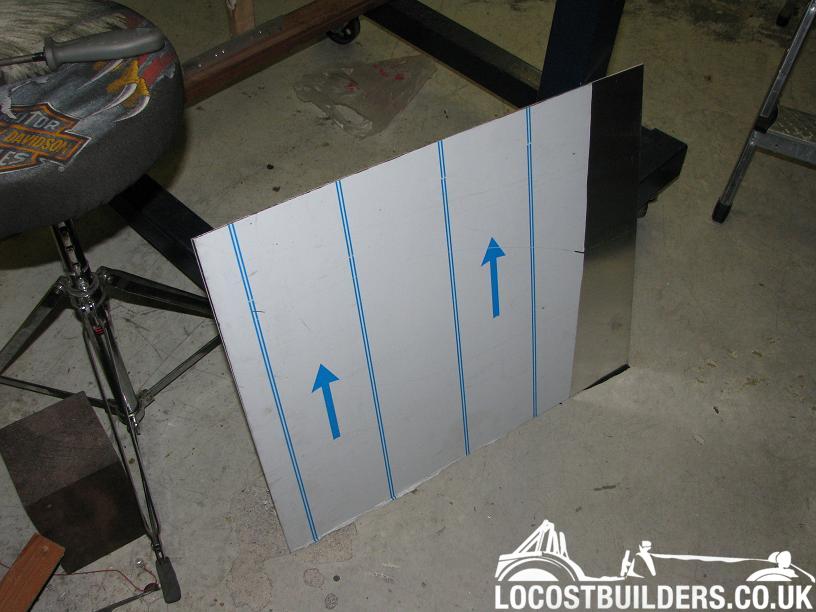
I'm roughly copieng their intake which feeds air in via the side's at the top of the manifold instead of welding a tube straight on it, in
order to build it very low.
look in the red circle:
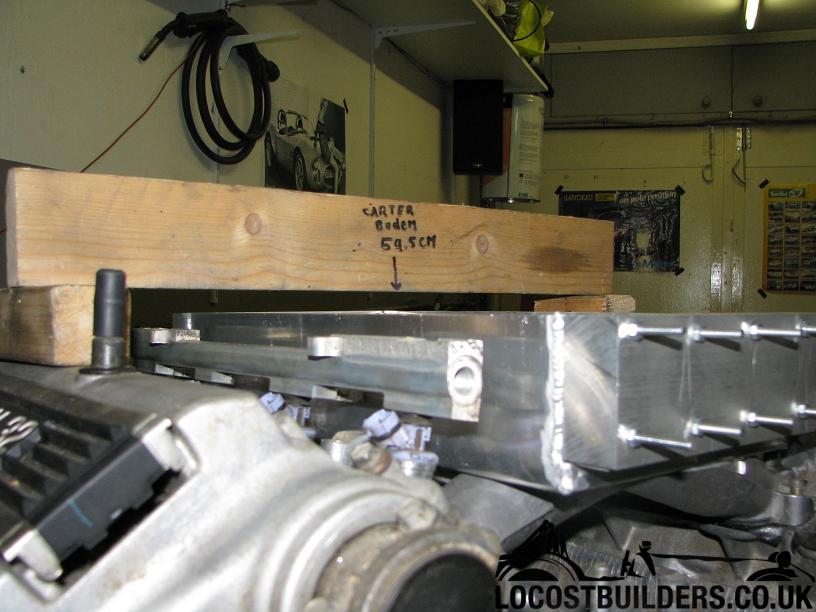
so the air will enter via 15mm high slots over the complete lenght of the stack on both sides. so 15mm times 380mm is 5700mm/sq that times 2 gives a
combined inlet area of 11400mm/sq which is big enough to pass twice the amount of air needed to make the horses I'm shooting for.
I calculated the hight on both sides about 6 months back and worried since if I would make it.
20mm's above the stack, and the stack floats around 35mm above the peer shaped intakes, inside the mani. e voila 20mm's for you sir?
![]()
so that's where I am now, I need to wait till the chassis gets here to diced the final position on the chargers. Maybe the fit maybe the
don't, then I can decide on the piping path and start to build that up.
that's all folks!
Grtz Thomas
[Edited on 11/5/09 by thomas4age]
[Edited on 11/5/09 by thomas4age]
If Lucas made guns, Wars wouldn't start either.
|
|
|
Mave
|
| posted on 11/5/09 at 03:40 PM |
|
|
Very tasty Thomas.
|
|
|
Badger_McLetcher
|
| posted on 11/5/09 at 09:54 PM |
|
|
Very nice! I'm using the same engine as you, but it's gonna be a long old time before I get to play with it! Looking at yours has given me
inspiration to get me arse in gear
If disfunction is a function, then I must be some kind of genius.
|
|
|
thomas4age
|
| posted on 12/5/09 at 06:47 PM |
|
|
Hey Badger,
Are you using the engine stock or are you going to do some prepping aswell?
ps what car is it that you're building? any piccies or something?
Grtz Thomas
If Lucas made guns, Wars wouldn't start either.
|
|
|
Badger_McLetcher
|
| posted on 13/5/09 at 12:24 AM |
|
|
The engine will be stock in that the internals will be left alone (at least initially). Hopefully since I've got one of the older engines it
should be able to handle 400/500 bhp or so (at the fly) with the aid of some suitable turbos or supers and a huuuuuuuge intercooler
The body shell of the car I'm using is a fibreglass Corvette C3 from a kit car called a lightning (I think!). The reason I bought it was I
wanted a bodyshell and I got the car for £400. After I sold off the stuff I wasn't using I got a bodyshell (admittedly shabby) for about £150
No real pics at the moment I'm afraid, but
this is kind of what I'm aiming
for.
How long do you reckon before your chassis arrives mate? Can't wait for your next installment
If disfunction is a function, then I must be some kind of genius.
|
|
|
thomas4age
|
| posted on 13/5/09 at 03:23 PM |
|
|
hey Badger,
funny you asked!
just 15 minutes ago I recieved an e-mail of Mischa at Speedon Carworks, with a piccie of my own chassis in the jig at the Gardner Douglass factory.
we are aiming for 27may for pickup.
man this blurry piccie gave me the shivvers. this is MY chassis YES!!!
 
I've never come acros a kit car manufacturer that provides mid build/welding fotos of a chassis to a custumour, must say I really like this for
an apatiser.
anyway, that Vette seems nice to, american cars are not my cuppa tea, but this one is nice, will it be roadlegal or track only?
grtz Thomas
[Edited on 13/5/09 by thomas4age]
If Lucas made guns, Wars wouldn't start either.
|
|
|
Badger_McLetcher
|
| posted on 13/5/09 at 04:01 PM |
|
|
I must confess I'm not so big on the American cars either, but like I said it was cheap It's going to be a roadlegal trackday style
thingy.
It's really cool that they've sent you mid build pics, as you say I've never come across that before.
If disfunction is a function, then I must be some kind of genius.
|
|
|
Fred W B
|
| posted on 13/5/09 at 04:55 PM |
|
|
quote:
we are aiming for 27may for pickup.
Come oooooooon Thomas, I need more inspiration
Cheers
Fred W B
[Edited on 13/5/09 by Fred W B]
You can do it quickly. You can do it cheap. You can do it right. Pick any two.
|
|
|
thomas4age
|
| posted on 13/5/09 at 06:53 PM |
|
|
Hey Fred,
How are you doing? and the T70?
so euhhmmm more inspiration? what do you want to see
next month is going to be great. start on new build, 24H Le Mans,
grtz thomas
If Lucas made guns, Wars wouldn't start either.
|
|
|
Fred W B
|
| posted on 13/5/09 at 07:10 PM |
|
|
quote:
How are you doing? and the T70?
Okay, progress is slow, but still moving
quote:
what do you want to see
your car going together!
Cheers
Fred W B
[Edited on 13/5/09 by Fred W B]
You can do it quickly. You can do it cheap. You can do it right. Pick any two.
|
|
|