
Making a buck - GRP Mould
Howlor - 17/5/10 at 01:51 PM
Hi,
I am looking at looking to produce a moulding buck so I can take off a GRP mould from it. It is quite a curvy shape and hence I want to form it from
10mm thick sheets, cut to shape then laminated together. This way I can form the curves and shapes quite accurately, a good sanding should then bring
them smooth.
Question is, am I ok using MDF for the mould or is it too fiberous to smooth/sand properly? If not can anyone suggest a better substrate please.
Also if I glue them together will normal wood glue be up to the job. My plan was to sand, then varnish and wax before laying up the grp.
First attempt at this so I may be back for some more pointers!
Thanks,
Steve
tony-devon - 17/5/10 at 01:55 PM
a skim of body filler will allow you to get it ultra smooth and the shape that you require
just remember that you need to get the pattern as perfect as possible, as it will all go downhill from there
if you start with a crap pattern, then theres no going back
also dont forget to think about what way your making it, are you wet cutting or dry cutting the final object?
Howlor - 17/5/10 at 02:03 PM
Thats a question that has been well presented! I think I will dry cut the completed moulding but what are the benefits?
Regards,
Steve
emsfactory - 17/5/10 at 02:09 PM
You can seal the MDF before you sand it to get a good surface finnish without using body filler. Depends how good you want the surface.
You can also get a high build styrene paint that is very hard and takes a good shine but it isnt very cheap.
Swings and roundabouts.
skinned knuckles - 17/5/10 at 02:23 PM
i was tought to treat the buck as though it was a body panel, so thats a skim of body filler, rub back, primer, flat back, contrasting colour coat,
flat it again and a durable top coat. finish off with a good polish and wax. with this in mind, it really doesn't matter what you use to form the
basic shape in the early stages.
what panel are you trying to form? some of the more intricate shapes can be achieved with the use of chicken wire between your MDF "ribs".
I will be starting on a donkervoort lookalike front end next week. i normally cant be bothered to post pics of the progress of these things as its a
good way of killing a camera but i'll post this time if you are interested in seeing the process? (unless you are in a rush, i'm hopelessly
bad at getting distracted by other things)
Howlor - 17/5/10 at 02:38 PM
That would be a great help as I am an absolute beginner at this.
Many thanks,
Steve
sucksqueezebangblow - 17/5/10 at 03:01 PM
This video might give you some ideas and tips. http://www.youtube.com/watch?v=qKrl1PPvliQ
tony-devon - 17/5/10 at 03:07 PM
we always used to dry cut, better finish and some room for adjustment if you should need it, but very dusty and make sure you wear full protection,
mask, eyes hands etc, it aint much fun
patterns need to be different for wet or dry cut
if your wet cutting it then you need the mould to finish exactly where you want the item to finish, but if your dry cutting then you need an extension
lip around the item.
I used to use a sticky backed wax roll material, cant remember the name, but you could use this to create the fence or extension and then build it up
with car body filler
as your building the pattern from scratch this isnt an issue
but as correctly stated already, the pattern should be at the very least, as good as the panel that you would want to fit to the car
remember the 6 P's and you will be ok 
allow the filler time to go off properly as it will shrink back, and make sure the pattern and then the mould are well braced, the heat from the
curing can warp and move things.
clairetoo - 17/5/10 at 03:30 PM
I make a lot of MDF plugs at work - the flat surface is ideal for what I make , and very easy to finish (just coat with a polyester based spray filler
, smooth with 1000 grit wet'n'dry , and wax)
The cut edges tent to `fluff' up a little - any MDF surface thats is shaped/sanded will do this - I seal it with a coat of wood glue , the spray
filler , sand it smooth , then another coat .
Finishing with 1000/1200 grit , wet sanded , will give a smooth semi-matt finish in the mold which will polish to a mirror shine easily .
Steve Hignett - 17/5/10 at 07:36 PM
This isn't finished and doesn't tell as good a story as a video, but should get you started...
http://www.p4nts.co.uk/becairbox
thegodplato - 19/5/10 at 09:33 AM
If we use ribs that are spaced apart, what sort of foam are we talking about to fill in the gaps? Is it the same stuff as builders use for insulation
- comes in sheets that are maybe 6 foot x 4 foot and about 4" thick wrapped in silver foil??
Fred W B - 19/5/10 at 11:10 AM
quote:
what sort of foam are we talking
I used 32 kg/m2 density polyurethane foam, sourced from industrial insulation suppliers
Can see more detail in this thread
Cheers
Fred W B

plug 2 08 07
[Edited on 19/5/10 by Fred W B]
[Edited on 19/5/10 by Fred W B]
Mr Noo - 20/5/10 at 05:20 PM
Hi Steve,
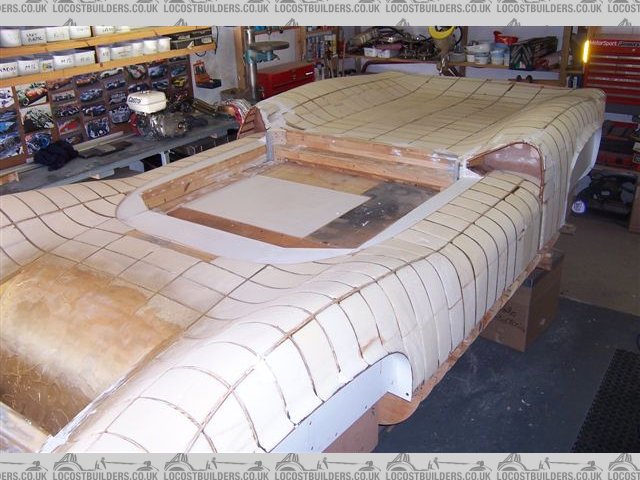
As Fred and others have said, anything will do, I used decent ply to make the the main formers and longerons then just shuttered it in between with
cheaper ply and then used filler, Upol Easysand, cheap and works well, followed with 2k primer. To stick all the wood together I used P38 fibre
filler, strong and goes off quick esp in this hot weather, using this method is quick, and if something is not right it`s easy to just cut/grind it
off and re shutter/fill. Here is a link to some pickies of the buck that I am in the process of doing at the mo, they may explain a little to you, I
have so far spent 3 months on it, eves and w-ends and hope to be getting some moulds done before winter, fingers crossed!
http://www.flickr.com/photos/47153142@N03/sets/72157623861979360/
