Ivan
|
| posted on 3/4/11 at 06:45 PM |

|
|
To my untrained eye looking at it in 2D it looks OK for one part moulding - would think that the air vent shape is the critical factor. But if
something about it is causing you uncertainty go with your gut.
|
|
|
|
|
Steve Hignett
|
| posted on 28/4/11 at 09:34 AM |
|
|
Apart from it being a large area, I also think it looks perfectly fine for a one piece centre. The only worry from my point of view would be the time
it takes Vesus the resin pot-life you use.
With the stuff we have at work, that would take a LOT of prep work and two guys just to make sure we got it down before it exothermed as it goes off
so darn quick 
Still looking great Fred, top notch work...
I can't say that I would have done the front wing flange at that angle, I would have come off the body at an angle to give a slanted plane to
work both moulds into, but some of the world superbike stuff that we mould is tighter than that, so it shouldn't be too big a deal!!!
|
|
|
Fred W B
|
| posted on 28/4/11 at 05:18 PM |
|
|
Thanks Ivan and Steve for your comments, and opportune Steve as I have just finished the first layer (tissue + 300 gram mat) of the centre piece.
I had been putting it off, waxing, rewaxing, making matt templates, cutting the various bits of mat (including the multiple corner fillets) etc etc,
and doubting If I could do it okay single handed. I laid out all the matt pieces in order, and even did a "dress rehearsal" of laying the
bits in. At this stage I cut the surface matt to butt into the flange corners, with separate pieces to fit on the flanges, and fillet corner pieces
then laid into the corner joints. Also did some detail pieces around/in the location bumps. The surface only was 9 separate pieces of matt.
I finally screwed up my courage, started at 9.00 Saturday morning and by 2.30 it was done, with the exception of the corner fillets down into the nose
duct, which I finished yesterday, after sanding the applicable areas. The complete area with flanges is 3.6 m2. I put the 1.8 kg of gell on in three
stages (corners/edges + coat 1 + coat 2) and made up 700 gram batches of resin which I catalysed as I went along, working nonstop.
Thier are a few very small areas where I have chased back into small air bubbles and repaired, deep in the front recess particularly was a pain, but I
thought I did pretty well overall.
Now to finish sanding the surface and cut the 600 matt for the next layers.
Re the front wing flange, I consider that a lesson learned
Cheers
Fred W B


[Edited on 28/4/11 by Fred W B]
You can do it quickly. You can do it cheap. You can do it right. Pick any two.
|
|
|
ceebmoj
|
| posted on 29/4/11 at 06:59 PM |
|
|
Great to see the progress.
are you gong to bond any wood or a core to the center section of the mold?
|
|
|
clairetoo
|
| posted on 29/4/11 at 07:56 PM |
|
|
Frad - I have been following this thread for a long time , and I have to say I am relieved to see you are continuing your work - when I read you were
ready to chuck it all in a skip and give up I was gutted 
I have made moldings of at least as large an area , but with a lot less complex detail - I just mix up 4 or 5 KG's of resin , with a bit less
than the recommended 1% catalyst , and go for it
Its cuz I is blond , innit
Claire xx
Will weld for food......
|
|
|
Mr Whippy
|
| posted on 29/4/11 at 08:22 PM |
|
|
keep going 
This is such a learning experience for everyone following this build just cant wait to see the finished moulding and its soooo amazingly shiny!
Fame is when your old car is plastered all over the internet
|
|
|
Ivan
|
| posted on 30/4/11 at 06:52 AM |
|
|
I continue to be amazed but there is a downside - I always had a dream of making a Porsche 904 or renault Alpine from scratch as Fred has done here
and now realise that there is no way I would ever have the patience and determination to achieve the sort of results he has.
|
|
|
iank
|
| posted on 30/4/11 at 07:09 AM |
|
|
quote:
Originally posted by clairetoo
Frad - I have been following this thread for a long time , and I have to say I am relieved to see you are continuing your work - when I read you were
ready to chuck it all in a skip and give up I was gutted
You might want to check the date of the 'giving up' post 
--
Never argue with an idiot. They drag you down to their level, then beat you with experience.
Anonymous
|
|
|
Fred W B
|
| posted on 1/5/11 at 03:00 PM |
|
|
Thanks for the responses Folks.
Ceeb - I do plan to bond some wood reforcing ribs on once the mold thickness is built up.
Claire - I use 0.75 percent catalyst. As our autumn has started our ambient temps have started to drop (to under 25 deg C)which also helps.
Cheers
Fred W B
[Edited on 1/5/11 by Fred W B]
You can do it quickly. You can do it cheap. You can do it right. Pick any two.
|
|
|
Fred W B
|
| posted on 25/6/11 at 04:23 PM |
|
|
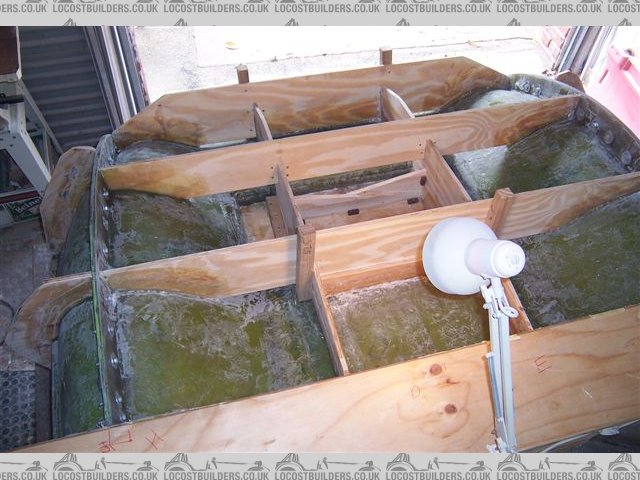
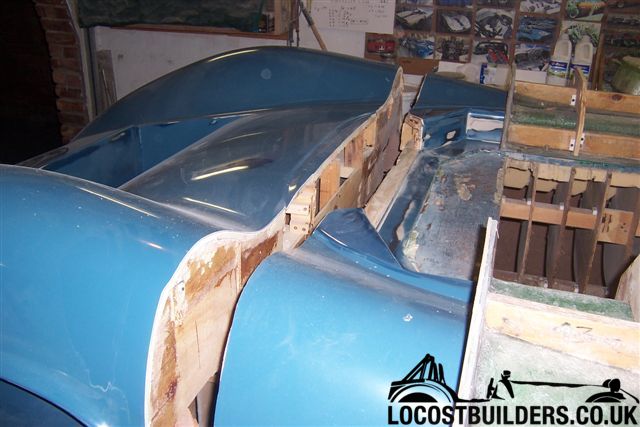
So full thickness is laid up, wood bracing is on, edges are trimmed, and the top surface of the nose mold is finished!

[Edited on 25/6/11 by Fred W B]
You can do it quickly. You can do it cheap. You can do it right. Pick any two.
|
|
|
scootz
|
| posted on 25/6/11 at 04:26 PM |
|
|
I wish I had a tenth of your skills and dedication!
Good work fella!
It's Evolution Baby!
|
|
|
Fred W B
|
| posted on 25/6/11 at 04:27 PM |
|
|
Thanks Scootz
And I've started to remove the nose mold from the pattern
Just tapped some soft wood wedges between the flanges and this popped off nicely!
Very encouraged as I feel that I have got a major step finished
Cheers
Fred W B
[Edited on 25/6/11 by Fred W B]
You can do it quickly. You can do it cheap. You can do it right. Pick any two.
|
|
|
chrsgrain
|
| posted on 25/6/11 at 07:51 PM |
|
|
Go on - take the bit one off, you know you want to !! (and take some pictures so we call all be jealous!)
Chris
Spoing! - the sound of an irony meter breaking...
|
|
|
Fred W B
|
| posted on 26/6/11 at 03:59 PM |
|
|
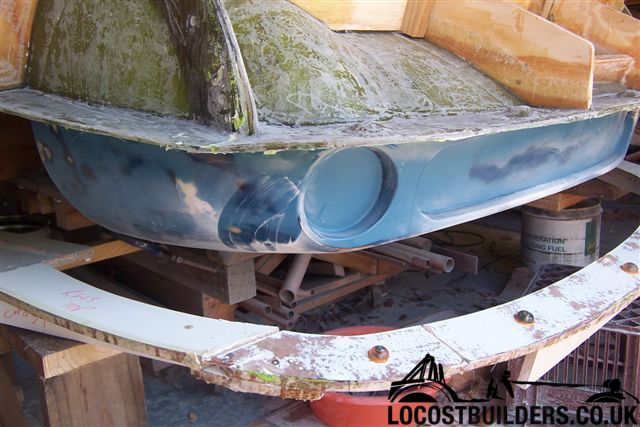
And today I rounded up some mates to help lift off the bigger bits. The scuttle mould came off easily
but the nose upper section put up more of a fight. Judicious use of levers, wedges, ratchet straps, roof rafters, hammers and mallets was necessary to
"crack" it loose. It's a damn big heavy piece but it is off now.
Amazingly all the surface of the pattern stayed behind.

Cheers
Fred W B
[Edited on 26/6/11 by Fred W B]
You can do it quickly. You can do it cheap. You can do it right. Pick any two.
|
|
|
Ivan
|
| posted on 26/6/11 at 04:48 PM |
|
|
Looking good - bet you will sleep well tonight!
|
|
|
smart51
|
| posted on 26/6/11 at 05:21 PM |
|
|
That's fantastic. I always look forward to seeing new pictures of this. The end result is going to be superb.
|
|
|
jabbahutt
|
| posted on 27/6/11 at 06:47 AM |
|
|
truly stunning, I'm off of cry at my complete lack of car skills
|
|
|
HowardB
|
| posted on 27/6/11 at 07:05 AM |
|
|
this thread, it's photographs and all the comments should be made into a
"How to do it properly!" book, and published to great acclaim,..
It is a source of endless awe what skill and patience can achieve,....
Howard
Fisher Fury was 2000 Zetec - now a 1600 (it Lives again and goes zoom)
|
|
|
Fred W B
|
| posted on 27/6/11 at 06:54 PM |
|
|
Thanks for the kind responses Folks
Cheers
Fred W B
[Edited on 27/6/11 by Fred W B]
You can do it quickly. You can do it cheap. You can do it right. Pick any two.
|
|
|
Fred W B
|
| posted on 29/6/11 at 07:48 PM |
|
|
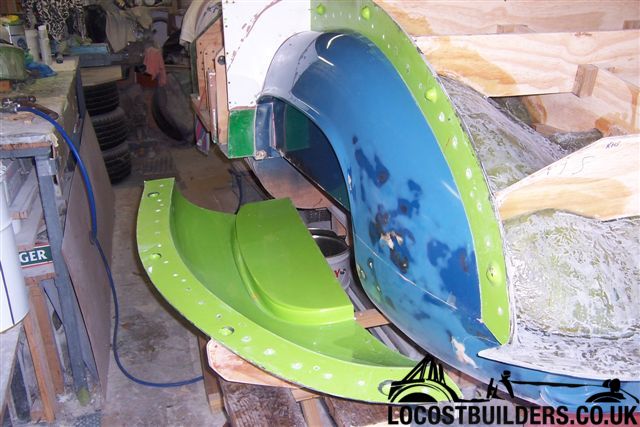
First step of next stage done
and yes, their was a chain saw involved at one point.....
Cheers
Fred W B
[Edited on 29/6/11 by Fred W B]
You can do it quickly. You can do it cheap. You can do it right. Pick any two.
|
|
|
smart51
|
| posted on 30/6/11 at 07:34 AM |
|
|
Did it not feel bad after putting so much work into making it?
|
|
|
Fred W B
|
| posted on 30/6/11 at 11:14 AM |
|
|
Not really actually, it's what I have to do to move on and I'm really focussed on trying to make progress at the moment.
Added motivation is that their is not enough room in the garage for the pattern and the moulds and still be able to work.
Cheers
Fred W B
You can do it quickly. You can do it cheap. You can do it right. Pick any two.
|
|
|
Fred W B
|
| posted on 2/7/11 at 12:01 PM |
|
|
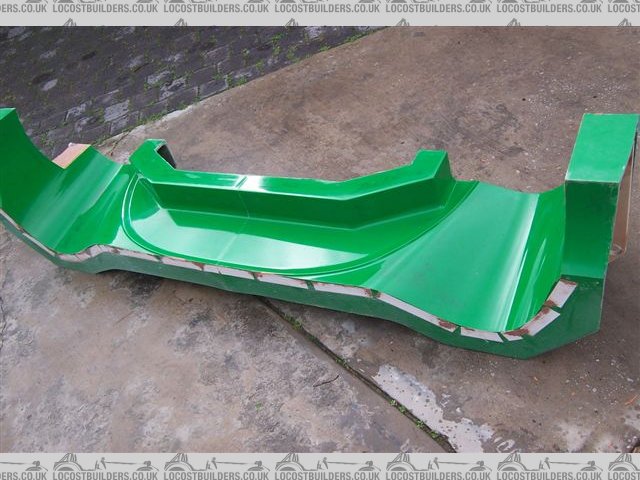
Nose removed
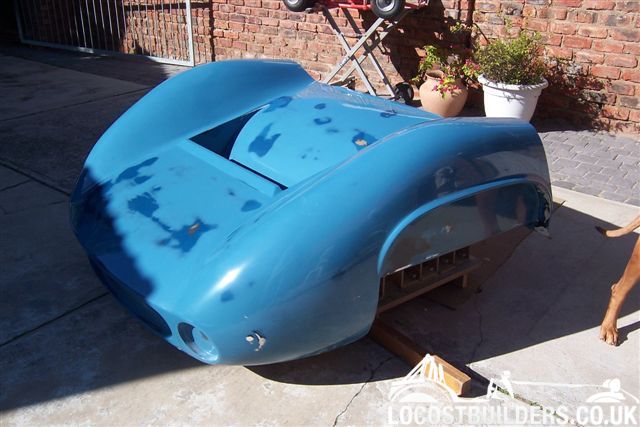
and turned over and replaced in mold. Took 6 of us to do this.

Cheers
Fred W B
You can do it quickly. You can do it cheap. You can do it right. Pick any two.
|
|
|
Alan B
|
| posted on 2/7/11 at 12:33 PM |
|
|
Fred, awesome work...I can't believe I've not seen this thread earlier (unless I did and forgot...which seems unlikely.....)
From someone who has been there and done that a few times (and not anywhere close to your standard....) I can really appreciate what you have
done..
Again...FANTASTIC JOB
Alan
|
|
|
Fred W B
|
| posted on 3/7/11 at 07:07 AM |
|
|
Thanks Alan, when I first started casting about the internet to do with this building a car yourself lark your Meerkat site was one of the first build
sites I found, and I followed it with interest.
So you are partly responsable for getting me started on all this madness, so thanks for that too.
Cheers
Fred W B
[Edited on 3/7/11 by Fred W B]
You can do it quickly. You can do it cheap. You can do it right. Pick any two.
|
|
|