HOL
|
| posted on 26/2/09 at 08:46 PM |

|
|
And I thought you had been lazy 
Have you worked out if the diff will actually fit in the middle of the car?
|
|
|
|
|
djtom
|
| posted on 27/2/09 at 09:19 AM |
|
|
The diff does indeed fit in the middle of the car, and to aid it on its way I've now cut out all of the bracing on the back panel and tacked in
some new diff mounts. Camera battery was flat so no pics yet, but I'll take some tonight.
Now I just need a de-dion tube.... see post in wanted section!
|
|
|
mark chandler
|
| posted on 27/2/09 at 01:20 PM |
|
|
Keep taking the ritalin, you'll be fine!
I wish I had you energy Tom, my new bones have not moved on but my trailer is nearly done now.
Good work BTW, will TB's make much of an improvement over the original setup?
|
|
|
djtom
|
| posted on 27/2/09 at 01:32 PM |
|
|
No idea, but they'll look nice....
Stole the idea from this thread, but I think I can do it for sub £50 rather than the £1k+ that he spent 
http://boardroom.wscc.co.uk/cgi-bin/ikonboard.cgi?act=ST;f=3;t=59215;hl=fw500
Tom
|
|
|
HOL
|
| posted on 27/2/09 at 06:22 PM |
|
|
quote:
Originally posted by djtom
Now I just need a de-dion tube.... see post in wanted section!
I saw that,
Aren't GTS down the M2 in Ramsgate?
http://www.gtscougar.freeserve.co.uk/dedion.htm
I wonder if he would jig and make some DD axles for the S6, if we got 3 or 4 of us together to make it worth his while?
The tube itself would be standard challenger, on the brakets would need to moved.
Just a thought???
|
|
|
djtom
|
| posted on 27/2/09 at 06:37 PM |
|
|
Could do, but from what I've read on here about dealing with GTS I'd be hesitant to order anything from them! Think I may end up making my
own, in which case I'd probably buy enough material to make 2 if you're interested....
|
|
|
HOL
|
| posted on 1/3/09 at 04:31 PM |
|
|
Making one without it losing alignment is not going to be easy!!
[Edited on 1/3/09 by HOL]
|
|
|
djtom
|
| posted on 1/3/09 at 06:19 PM |
|
|
True.... Any bright ideas? I was going to turn something very sturdy into a jig, like an RSJ or something like that!
|
|
|
HOL
|
| posted on 15/3/09 at 10:10 AM |
|
|
Sorry Tom , missed this.
I would be interested in a copy, if you make one.
Yes, I think you would need a jig, based on a stripped cortina axle.
Or, you could weld in a tube first, brace it, and then cut the centre out.
Have you priced up all the bits?
|
|
|
HOL
|
| posted on 2/4/09 at 05:31 PM |
|
|
Any updates????
|
|
|
djtom
|
| posted on 5/4/09 at 10:44 AM |
|
|
Been away for a week, so not much happened, but back in the garage this afternoon when the Kuala Lumpar swimming race is over.....
|
|
|
HOL
|
| posted on 6/4/09 at 07:45 PM |
|
|
Just got my contract extended at work til 2010, so Im cracking on with the more serious rebuild option, now I know the money can be spent.
One of the local S6 owners lent me his build manual, so I could sort my damaged wiring out and it has some good pics of the early DeDion rear end.
The diff looks to almost sit in the tunnel.!!
I did not know how your measurements were shaping out?
|
|
|
djtom
|
| posted on 8/4/09 at 11:01 PM |
|
|
Any chance of some scans of the de-dion pages?
Anyway, time for some updates:
1/3/09
Spent a bit of time welding up the rivet holes left by the removal of all the bodywork and ally panels, as a) whoever built it couldn't drill
holes at even spacings in a straight line, and b) I don't want the chassis filling up with sand when I get it blasted.
It tinkles nicely now with all the old rivet heads in the chassis though... I'll need a noisier exhaust to drown it out!
Welded rivet holes - now you see them:
.jpg)
and with the aid of a flap disc - now you don't!
.jpg)
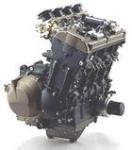
I've also been building a new engine - but I'll start a new thread for that.
|
|
|
djtom
|
| posted on 8/4/09 at 11:08 PM |
|
|
7/3/09
Got a bit distracted when I discovered that the lower chassis rails on each side at the very rear, under the tank, were rotted through. No idea how,
as they tilt up and the rotted part is at the top, so water can't have been collecting, but whatever.
.jpg)
Out with the grinder....
.jpg)
It now has a nice new shiny bit of steel welded in but the camera died, so no pics of that. I've been over the rest of the chassis and
there's no more rot. Good!
|
|
|
djtom
|
| posted on 8/4/09 at 11:29 PM |
|
|
8/4/09
Been a bit distracted by snowboarding, and that travesty of a F1 race (honestly, who plans a race for 5pm in the rainy season in Malaysia? The rain is
so regular that you can set your watch by it!). Anyway, after further distraction from BTCC (brilliant as ever), I finally made it to the garage.
Diff mounts fabricated and welded. That sounds easy but took bloody ages. Still, now done:
.jpg)
Diff, prop and gearbox test fitted:
.jpg)
I've now started triangulating the transmission tunnel, but ran out of welding gas and camera battery (again), so no photos I'm afraid.
Speaking of which, does anyone in the South East have a pub bottle of CO2, empty or full? Any idea where I can get one? The disposables are getting
expensive...
Back to topic, and after a quick camera charge I started hacking up my old lower wishbones in order to make the widetrack versions - I need to use the
plates from the old ones to save some effort. Imagine my surprise when I cut through the nice oval tubing to find that some idiot at Tiger made them
from solid 15mm bar! The oval tubing had only been slid over the top for cosmetic value.
.jpg)
I thought they weighed a ton.....
This is partly why they are being cut up - awful original design meant that there was such a large bending moment under braking that even the 15mm
solid bar bent under the load. The wishbone also cracked, hence the awful repair effected an hour before leaving for a trackday!
.jpg)
Sketch of planned replacement to follow.
That's all for now - engine rebuild thread will be started tomorrow hopefully.
Tom
|
|
|
HOL
|
| posted on 9/4/09 at 09:34 PM |
|
|
Pm your email for those scans.
I also have an empty pub bottle and matching regulator.
It ran out last year and I haven't been able to find anyone to refill it. In fact I just bought two disposable ones and a regulator.
Andy
|
|
|
mark chandler
|
| posted on 9/4/09 at 10:21 PM |
|
|
Tom
Pub bottle here for you, still got gas in it + free.
Regards Mark
[Edited on 9/4/09 by mark chandler]
|
|
|
djtom
|
| posted on 9/4/09 at 11:49 PM |
|
|
Thanks Mark - that's brilliant! I'll give you a call to arrange collection.
New engine build thread started at http://www.locostbuilders.co.uk/viewthread.php?tid=110671
Tom
|
|
|
djtom
|
| posted on 17/4/09 at 11:51 PM |
|
|
Change of plan - I decided I didn't like the MT75 box (not ideal ratios, probably not strong enough for ultimate power goals, remote extension
too wide) so I now own a Cosworth T5 box thanks to ebay. It's pretty big and needs some further tunnel modification, but I'm going to take
the opportunity to move the engine and box backwards by 100mm. Hopefully this will mean more room in the engine bay, better weight distribution and
give me the excuse to only carry short legged passengers....
T5 box 2
Chop chop starts tomorrow.
Tom
|
|
|
HOL
|
| posted on 18/4/09 at 05:34 PM |
|
|
Its a better box, I used to have one in my MK2 escort, when they were 'quite expensive'.
Moving it back is not a problem as you can get a shorter shifter extension thatn the long tiger one.
I got myself a complete 4x4 sierra LSD rear end off the bay, so i'm keen to see how you get on with the de dion???
My car is body-less at the moment whilst I sort out the chassis surface rust - so I can get to the back and make the mods pretty soon.
What have you decided to do about the handbrake?
|
|
|
djtom
|
| posted on 26/5/09 at 10:33 PM |
|
|
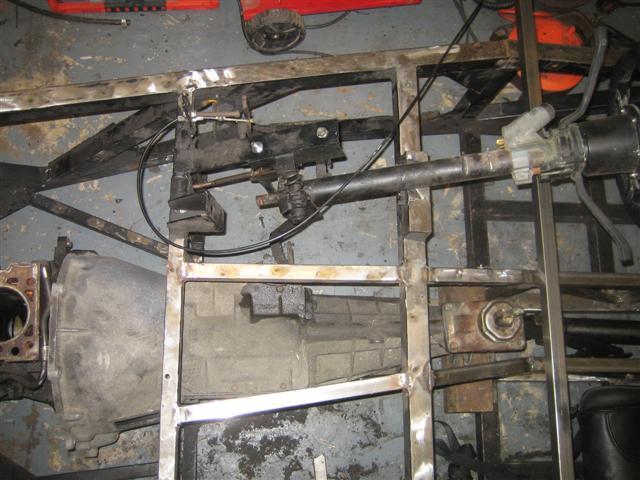
So, as promised, chop chop started the next day. 1 x pack of new cutting discs for the grinder and a trip to Mark's to pick up the gas bottle,
and I was all set for some more chassis modification!
Shortening passenger tunnel
.jpg)
Shortened offset tunnel
.jpg)
Gearbox mounting - this supports the sierra rubber thingy:
.jpg)
Had to take a chunk out of one of the tunnel tubes to clear an annoyingly sticky-outy bit of gearbox:
.jpg)
Made a new gear lever to put gearstick in approximately the right place
.jpg)
New engine mount being made:
.jpg)
Reused the other engine mount - just had to drill another hole:
.jpg)
Tom
|
|
|
djtom
|
| posted on 26/5/09 at 11:03 PM |
|
|
Made some brackets to mount the handbrake on the side of the tunnel. I also welded some captive nuts onto the brackets to make future removal and
replacement easier - when the tunnel is panelled the nuts would be a pig to get at:
.jpg)
.jpg)
The chassis engine mounts were fabbed and welded in place. This sounds easy, but it took bloody ages to get it in the right place - I had a spare
block and head bolted to the gearbox and propped up on bits of 2x4 to try to get the engine and box high enough to give good clearance below the sump,
low enough to only need a hole the size of Lithuania in the bonnet and centralised enough to allow a rizla between the gearbox and the tunnel
uprights. I think it's in about the right place now!
.jpg)
.jpg)
I picked up a new radiator from ebay for silly cheap money - it's a nice little Spec-R aluminium number. God knows if it will be enough to cool
300bhp, but it will be ducted so that all the air passing through it exits via the bonnet, and there will be a nice big oil cooler as well, so
hopefully it will be OK... It is a bit smaller than the Golf rad though, but hopefully more efficient.
.jpg)
Mocking up the nose arrangement - the left side is the chargecooler rad, the right is the oil cooler and the centre is the coolant rad. The
chargecooler and the oil cooler will be ducted so the the air escapes to the side of the coolant rad, as shown (badly) in the second photo below by me
holding a bent bit of ally sheet. The side panelling in these areas will be mesh, and this should exit into a low pressure area as it is shielded by
the nosecone.
I'm trusting that the various reports of radiator air flow that I've read are true - most importantly that at 60mph you only need a
frontal aperture 1/4 the size of the radiator area to provide as much air as can pass through the radiator. We'll see! In the past it only ever
overheated on track at speed, never in traffic, so hopefully an efficient radiator ducted well so that the exhaust actually has somewhere to go should
suffice.
.jpg)
.jpg)
Nose full of cooling gear!
.jpg)
Tom
|
|
|
djtom
|
| posted on 15/7/09 at 09:32 PM |
|
|
I'd always been annoyed by the lack of access to the ECU, fuses, wiring loom, wideband O2 controller and the other goodies under the dashboard,
so I decided to alter the scuttle so that you could remove it but leave the dash in place. To do this I cut out the dash from the scuttle and made
some supports to hold the dash independent of the scuttle.
.jpg)
Trimming scuttle
.jpg)
Dash support bent to fit scuttle
.jpg)
Scuttle supports welded on
.jpg)
Scuttle fitted on supports
I will weld in some bracing bars between the supports to mount the windscreen supports.
Tom
|
|
|
djtom
|
| posted on 15/7/09 at 10:17 PM |
|
|
I used the new scuttle mounts to brace the pedal box more firmly, as I wasn't happy with the lack of rigidity in the main pedal mount. This also
doubles up as the steering column support, so removing flex can only be a good thing.
.jpg)
I also added some windscreen mounts to the scuttle bars - the uprights bolt through the scuttle to these.
.jpg)
Tom
|
|
|
eccsmk
|
| posted on 15/7/09 at 10:21 PM |
|
|
thats alot of work
top marks 
|
|
|