Matt21
|
| posted on 10/2/14 at 07:25 AM |

|
|
blimey!
A few years a go I made a model yacht using the same methods, timber frame, foam, shave into shape then filler over to make a fibre glass mould....
that was just over a meter long and a job i hope to never do again!
to do a whole car?! and to such a good standard! very impressed!
|
|
|
|
|
johnH20
|
| posted on 13/2/14 at 03:26 PM |
|
|
Hi, looking good. What combination of foam and filler do you use? I used to build surf boards using Styrofoam but was warned off polyester based
filler ( not that my shaping ever required filler of course! ) and always laminated with epoxy. When I built my nose cone for my car I used PU foam
cast ' in place' on my wood framework - very messy and I would not do it again. Permitted the use of commercial polyester based body
filler and laminating resin though.
|
|
|
Mistron
|
| posted on 13/2/14 at 11:28 PM |
|
|
I use sheet polyeurethane foam from ECF which is primarily used for surf board making. You can cut, file and sand it to shape, then cover it in
filler, paint it ready for moulding. It does make a lot of dust, but is very easy to use. I ahve probably put a full 3.5 litre tub of fliller onto the
buck so far, gluing the sheets together and building up the surface.
http://www.ecfibreglasssupplies.co.uk/p-556-2-polyurethane-foam-sheets-50mm.aspx
Al
|
|
|
Mistron
|
 posted on 14/2/14 at 10:21 PM posted on 14/2/14 at 10:21 PM |
|
|
Deal done on getting a mould made and the first lift from it
Hope to have it ready for that stage by mid summer
Al
|
|
|
Mistron
|
| posted on 2/3/14 at 06:30 PM |
|
|
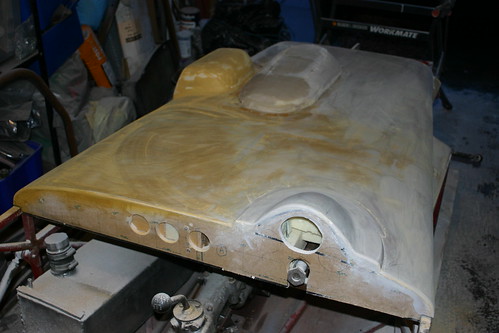
Made some progress - nice to get most of the foam skimmed. It really does feel it's coming together now.
Boring sanding filler though!

[Edited on 2/3/14 by Mistron]
|
|
|
Fred W B
|
| posted on 4/3/14 at 07:13 PM |
|
|
Coming on nicely there
If you didn't see THIS before you might find it usefull
Cheers
Fred
You can do it quickly. You can do it cheap. You can do it right. Pick any two.
|
|
|
Mistron
|
| posted on 4/3/14 at 07:27 PM |
|
|
cheers Fred - will look out for those. The guide coat sounds particularly handy
Al
|
|
|
Mistron
|
| posted on 30/3/14 at 07:00 PM |
|
|
Not had a chance to do anything to the buck for a few weeks, so nice to get a chance to make some decent progress today. Finally seeing it all in one
colour (admittedly only a filler primer guide coat, but still.....)
Lots of tidying still to do to the flutes over the front suspension mounts, but it's just a case of building them up with filler
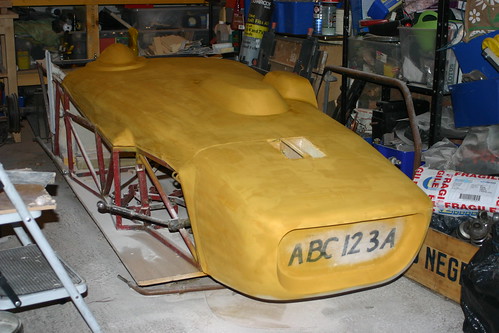
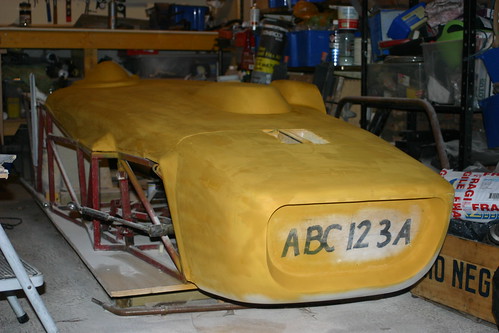
For reasons of cost / time, I think I'm going to put on a 'conventional' '7' rear end in alloy and tube rather than
moulding one similar to the Mink. I may do that in the future, but at this stage I don't think it's the way to go at the moment.
Al
|
|
|
Mistron
|
| posted on 16/4/14 at 08:06 PM |
|
|
No photos of progress, but I'm hopefull I'll have it 'dammed up' ready to go for moulding in a couple of weeks.
It'll have simple 90 degree returns on all edges, so simple dams to set up.
Al
|
|
|
Mistron
|
| posted on 27/4/14 at 06:44 PM |
|
|
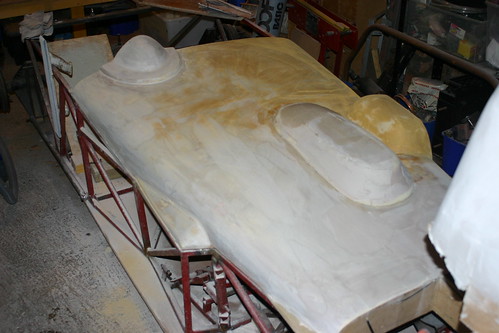
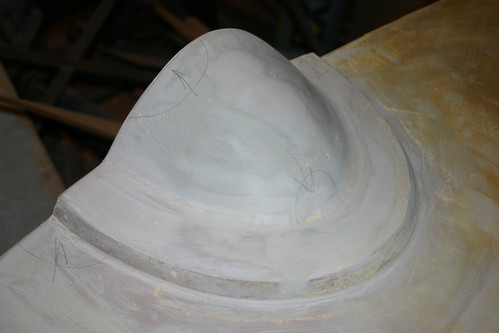
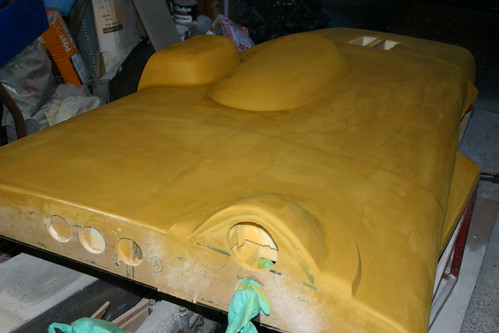
Had one of those days in the garage where you work all day and at the end it doesn't really look like you've made much progress, but in
fact a lot was achieved.
As well as finishing off the bottom of the nose section I made progress with cutting out and fitting the dams which set out the split in the mould and
also the returns on the mould edge to which the flat flanges will then be bolted so the return edges can be formed round the edges of the moulding. I
also built up the wee projections at the edge of the dash to soften the transition from the panel to the chassis as the right angle was a bit
'jarring'


(The final panel will be trimmed to the pencil line in the last photo)
|
|
|
Mistron
|
| posted on 25/5/14 at 04:25 PM |
|
|
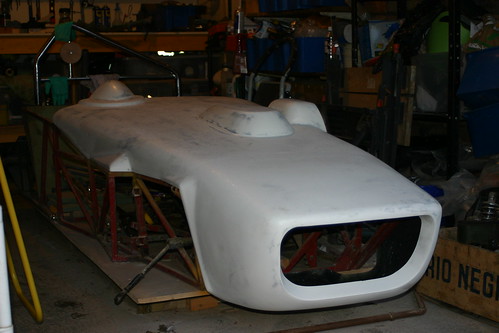
50 shades of Grey?


Nah, Paint it black!


It's a wee bit ripply, but on the whole, I'm pretty chuffed with it. The black will show up any faults, hence the moulding will be in
OEW........
Right, I'm off to ring the moulder
Al
|
|
|
Mistron
|
| posted on 14/8/14 at 09:36 PM |
|
|
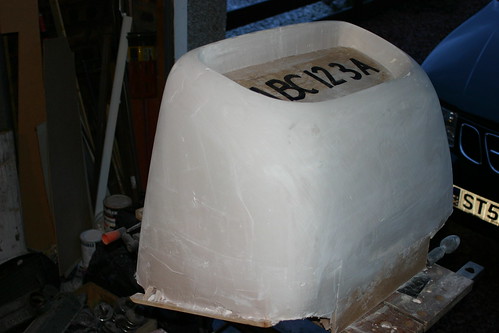
Drum roll, please..............
A wee bit of trimming needed, but it looks pretty good!
It turns out that Halfords aerosol paint has a weird reaction with GRP moulds, so it'll need to be painted, but not bad for what it's cost
me.
Right, on with the rest of it !


Al
|
|
|
Mistron
|
| posted on 29/3/15 at 05:21 PM |
|
|
Been a while since I posted to this, as I've been a wee bit distracted by other projects.
I hope to get the rear frame of the chassis frame bent up in the next few weeks, and then I can get that mounted in place.
I have made a few bits of progress though - check out the funky crackle finish dash!

Just need to resist the urge to sell it as my head keeps gettign turned by other, more sensibe, projects and heaven forbid, working cars! :0)
Al
|
|
|
Mistron
|
| posted on 30/3/15 at 06:39 PM |
|
|
Dilema time.
Do I:
A. Stick on a 'conventional' Lotus seven style rear end for ease / convenience / low cost / speed
B. Make a buck of a unique sculpted tail sort of in the style of the Coldwell which ties in with the front end. This will be messy / expensive / slow
/ may result in the thing never being finished!
My head tells me A, but I know that if I DONT do B, I'll probably wish I had.
Oh, or there is of course:
C. Sell it and get something that I can actually use on the road....
Hmmmm, not sure
Al
|
|
|
02GF74
|
| posted on 7/4/15 at 07:55 PM |
|
|
B. Tbe front is pretty much unique so do the same with the rear. In theory it should be quicker as there is a bit less to sculpt plus you've
done it once already.
Very impressive although the carb bulge on far lh side is either unnecessary ( nothing wrong with exposing air filters to the outside or could have
had a more gradual slope at the front to make the shape more slippery) but thats just me being picky.
|
|
|
Mistron
|
| posted on 7/4/15 at 08:12 PM |
|
|
"aerodynamics is for people who don't know how to build engines" Enzo Ferrari
:0)
Al
|
|
|