rdodger
|
| posted on 12/2/14 at 07:24 PM |

|
|
quote:
Originally posted by John Bonnett
quote:
Originally posted by rdodger
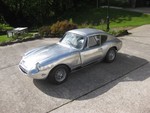
Is that the Alfa TZ one?
Yes it is; well done. Dimensionally it is very close to the GT6 bonnet and I think it is absolutely stunning.
Even I could guess that after looking at the previous page 
I really can't wait to see it finished. It will be glorious!
|
|
|
|
|
John Bonnett
|
| posted on 16/2/14 at 05:42 PM |
|
|
quote:
Originally posted by stevebubs
quote:
Originally posted by John Bonnett
The panel work is still progressing quite well with the left hand rear wing finished apart from forming a return to fit the inner wing and B post.
The rear valence has to be welded to the panel adjacent to the tailgate aperture before the number plate panel can be welded on.
[Edited on 26/1/14 by John Bonnett]
Looking really good; I notice you have the tailgate attached...any pictures of the rear end with it closed?
Here we are Steve. The fit and shut lines leave a lot to be desired but at this stage I'm happy to settle for the fact that it latches.
regards
John

[Edited on 16/2/14 by John Bonnett]
|
|
|
John Bonnett
|
| posted on 27/2/14 at 09:39 PM |
|
|
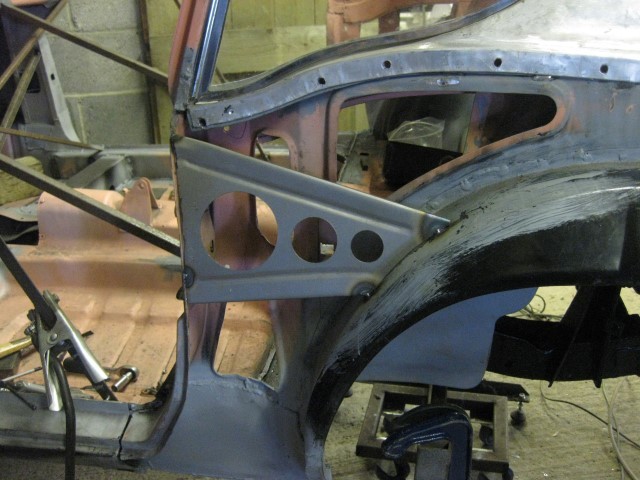
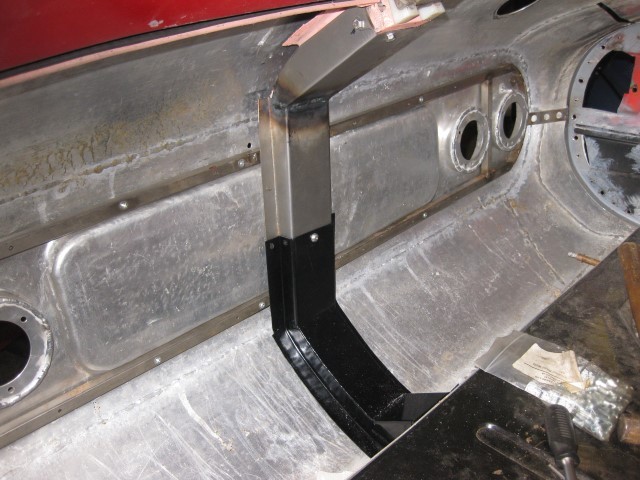
I've spent a bit of time on the passengers door working to achieve a decent shut and panel gap. The gap can be further adjusted during skinning
the doors with aluminium but it's been good to get it as close as I can.
The main problem was the unsupported part of the B post to which the striker plate is fixed. Once I'd put a brace in place, the problem was
solved and the door latched nicely.

[Edited on 27/2/14 by John Bonnett]
|
|
|
ceebmoj
|
| posted on 27/2/14 at 10:47 PM |
|
|
Looks great as all ways. I would be intrested to see how you made the support .
|
|
|
John Bonnett
|
| posted on 28/2/14 at 08:12 AM |
|
|
quote:
Originally posted by ceebmoj
Looks great as all ways. I would be intrested to see how you made the support .
Nothing fancy. 1mm mild steel with three holes using hole saws, a couple of swage lines and the top and bottom edges have a 12mm flange turned at
right angles. I didn't like adding weight but the stay was needed.
|
|
|
ceebmoj
|
| posted on 28/2/14 at 09:45 AM |
|
|
quote:
Originally posted by John Bonnett
quote:
Originally posted by ceebmoj
Looks great as all ways. I would be intrested to see how you made the support .
Nothing fancy. 1mm mild steel with three holes using hole saws, a couple of swage lines and the top and bottom edges have a 12mm flange turned at
right angles. I didn't like adding weight but the stay was needed.
For the swage lines do you beat the steel over a bit of rod or do you have a wheel to form it.
|
|
|
John Bonnett
|
| posted on 28/2/14 at 10:18 AM |
|
|
quote:
Originally posted by ceebmoj
quote:
Originally posted by John Bonnett
quote:
Originally posted by ceebmoj
Looks great as all ways. I would be intrested to see how you made the support .
Nothing fancy. 1mm mild steel with three holes using hole saws, a couple of swage lines and the top and bottom edges have a 12mm flange turned at
right angles. I didn't like adding weight but the stay was needed.
For the swage lines do you beat the steel over a bit of rod or do you have a wheel to form it.
I've got a Jenny with the tooling to form a swage line and that's what I used. But it would be quite easy to sit the job on two pieces of
plate with the correct separation and using a bit of round bar hammered from the top to form the trough will achieve just a good a job.
If you are interested in metal shaping using just hand tools David Gardiner's CD is excellent and you could also have a look at 2cv's
tutorials on this forum.
|
|
|
John Bonnett
|
| posted on 5/3/14 at 09:30 AM |
|
|
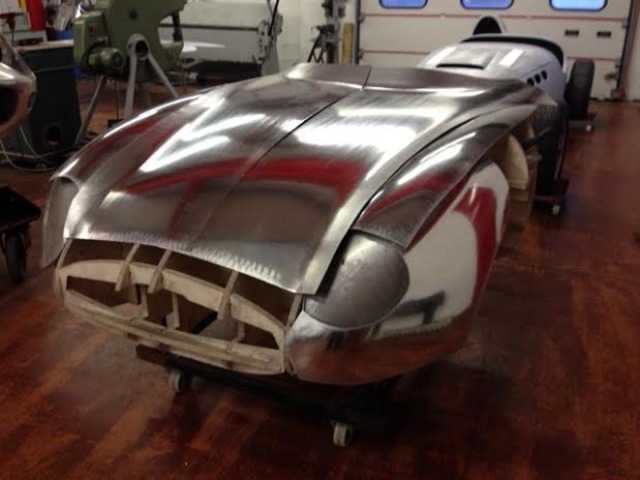
The right hand rear quarter light panel wasn't quite right so I re-made it and I'm very pleased i did. It is much better this time and
I'm happy with the result
Meanwhile Martin, Trev D's colleague has made good progress with the Alfa bonnet and he has just sent me these two pictures.

|
|
|
rdodger
|
| posted on 5/3/14 at 12:10 PM |
|
|
WOW! That's going to look soooooo good!
|
|
|
stevebubs
|
| posted on 5/3/14 at 12:59 PM |
|
|
John,
Nice - that rear end is starting to look fantastic...
[Edited on 5/3/14 by stevebubs]
|
|
|
rdodger
|
| posted on 9/4/14 at 08:36 PM |
|
|
Any news John?
|
|
|
John Bonnett
|
| posted on 10/4/14 at 07:45 AM |
|
|
quote:
Originally posted by rdodger
Any news John?
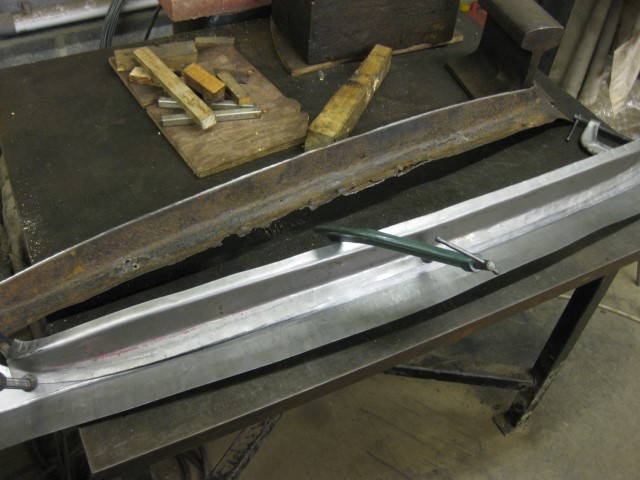
Nothing spectacular to report but work is still going ahead. I spent a bit of time fabricating a section that mates the windscreen frame to the roof
and that was an interesting exercise in steel. In the end it all fitted quite nicely and puts a lot of strength into that area.

I have also fabricated a stiffening section to fit in the boot which has made a huge difference to the way the tailgate shuts
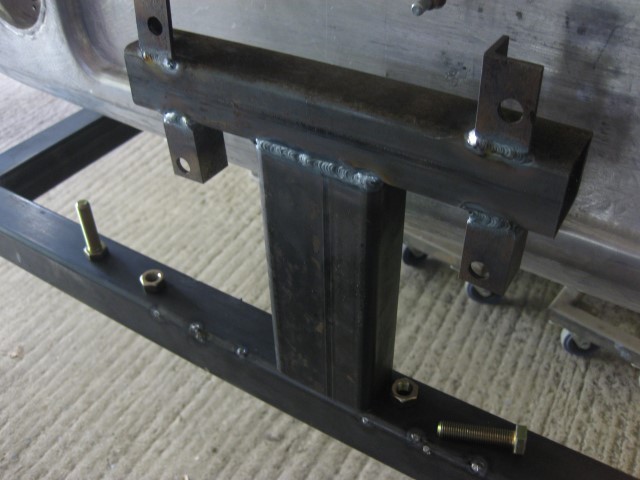
I've been thinking about pick up points for the rotisserie and have started making a frame at the rear. as a basis I'm using two engine
stands which I bought new for the amazing value of £33 each.
No further news on the bonnet but most of the work is done with just the welding to complete the two halves. At this point I'll have to mark it
up where it needs trimming (so that the width is correct) and then Martin will have it back to finish it.
So all progressing well but never as fast as I wish.
|
|
|
Not Anumber
|
| posted on 10/4/14 at 07:57 AM |
|
|
This thread just goes from good to even better with every post. Have you ever thought of training people in these remarkable skills that you have ?
|
|
|
John Bonnett
|
| posted on 10/4/14 at 08:39 AM |
|
|
quote:
Originally posted by Not Anumber
This thread just goes from good to even better with every post. Have you ever thought of training people in these remarkable skills that you have ?
You really are very kind and the support I receive does give me a lot of encouragement and a tremendous boost. However, I don't really have much
in the way of skill to impart. I didn't take up metal shaping until I was sixty and I'm totally self-taught. I'm now in my seventies
and thoroughly enjoy what I'm doing. I really do wish I'd taken it up earlier in life because I can think of nothing more satisfying than
creating a beautiful shape from a flat piece of metal.
Thank you once again for your kind words.
regards
John
|
|
|
John Bonnett
|
| posted on 12/5/14 at 06:10 AM |
|
|
The shell is now at a stage when it can be removed from the chassis without any worries about stability and distortion. This is now allowing me to
start on the dummy build up of the chassis. Dummy because it will all have to be dismantled so that the chassis can be shot blasted and powder
coated.
Some of you may be interested in the rotisserie I made quite simply and cheaply so that the body can be rolled over. The video is all very amateurish
I'm afraid but here's the link:
https://www.youtube.com/watch?v=JNlp6Vsc0Qw
I'll put some more pictures up once the engine and gearbox are in the chassis.
[Edited on 12/5/14 by John Bonnett]
|
|
|
rdodger
|
| posted on 7/8/14 at 05:46 PM |
|
|
Any updates John?
|
|
|
nick205
|
| posted on 7/8/14 at 06:06 PM |
|
|
Fantastic work as always John!
Really enjoy seeing the updates on this.
|
|
|
John Bonnett
|
| posted on 8/8/14 at 06:38 AM |
|
|
Thank you for your interest chaps. Holidays have slowed the progress but the steel shell is finished now and ready to go back onto the chassis. The
underside and insides have been seam sealed and the underneath sprayed with Stonechip.
I've changed my mind for the final colour which was going to be Rosso Red but will now be French Blue. The only reason is that although I love
the red there are just too many red cars (in my opinion). Colour is very subjective and very much a personal choice. I really liked French Blue on my
GT6 and am very happy with the choice of colour. I've used an enamel tractor paint for the inside which is fairly close to colour the body will
be. In any event it will be covered by either carpet or upholstery.
Petrol tank is now modified and ready for powder coating. The GT6 MK2 tank has the filler neck in the place I need for my set up but the tank was
badly corroded so I cut the piece out of the MK2 tank and welded it to a MK3 tank which is in very good condition. I'm going to use the
redundant neck for a breather.
[img]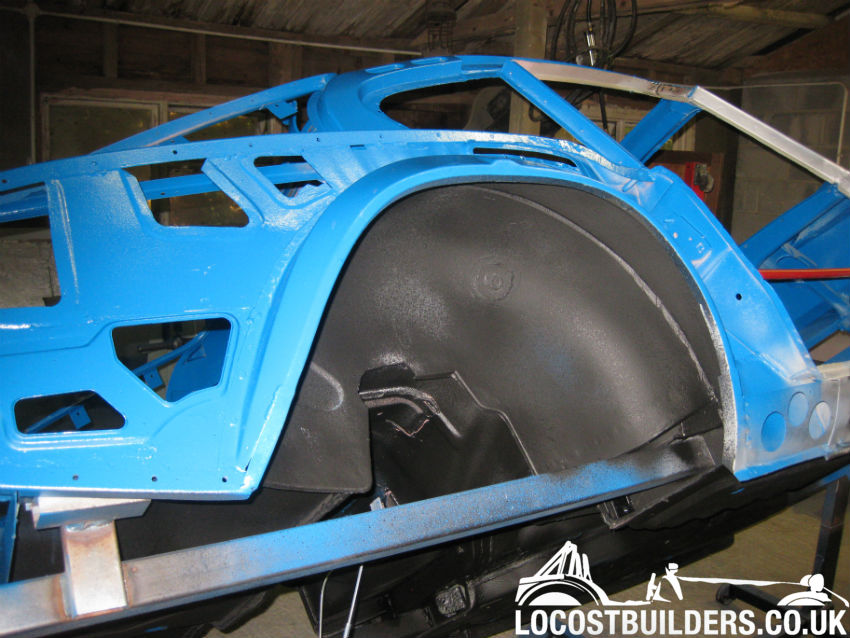 [/img] [/img]
[img] [/img] [/img]
[img] [/img] [/img]
[Edited on 8/8/14 by John Bonnett]
[img]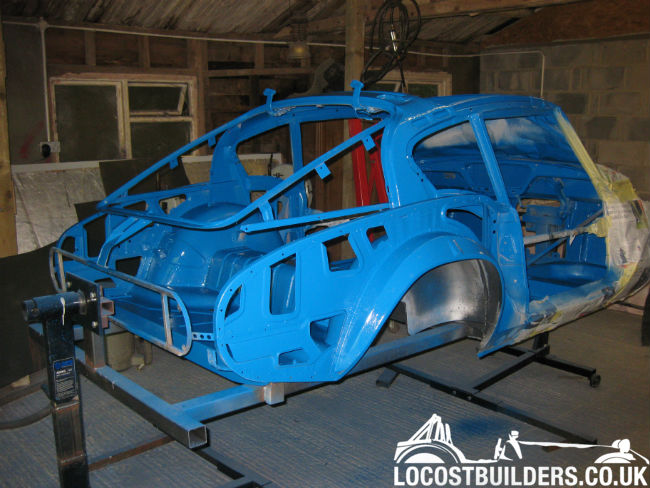 [/img] [/img]
[Edited on 8/8/14 by John Bonnett]
[Edited on 8/8/14 by John Bonnett]
|
|
|
John Bonnett
|
| posted on 10/8/14 at 04:43 PM |
|
|
Looking back through my posts I realise that I've been quite liberal with the pictures but perhaps a bit short on text so hopefully the
following will tie everything together and bring things up to date.
The initial aim was and still is to build a lightweight GT6 where the steel panels are substituted for aluminium. The standard car has a nice skeleton
steel frame that I'm using to underpin my build. I have taken a few liberties with the shape of some of the panels partly to make things easier
for me to form and partly because I'm aiming for a more rounded look with the absence of external seams.
Building the shell was a huge task because, not wishing to butcher a perfectly good shell and risk the wrath of many I started with sections from
three different vehicles which were joined together and many new repair panels fitted. This was a very costly and time consuming exercise but at the
end of the day we have a very solid and rustfree body as the basis of the build.
In the interests of handling and sheer driving enjoyment I am using a four cylinder Spitfire engine rather than the much heavier six. Powerwise we
should have a similar output to the six although granted not as torquey but coupled with a lightweight body the car should be nimble and actually want
to turn in to a corner. I'm using GT6 brakes and suspension including Rotoflex at the rear which eliminates virtually all camber change.
Adjustable dampers all round. The very much cheaper option would for sure have been to fit a Zetec or other lightweight modern engine but I really
want to keep the car as a Triumph.
I've built up a rolling chassis and during this coming week the body will be transferred from the rotisserie onto the chassis for the panels to
be fitted. All are made except one rear wing which having made the reversible buck and the wing for the other side should be fairly
straightforward.
Once the panelling is finished the body will come off the chassis so that the chassis can be shot blasted and powder coated.
So that brings everything up to date. My thanks to all of you who have expressed an interest in my project and have taken the trouble to read the
write ups.
John
|
|
|
John Bonnett
|
| posted on 18/8/14 at 07:19 PM |
|
|
The body is now back on the chassis and pleasingly every mounting bolt hole on the body lined up perfectly with its opposite number on the chassis.
The doors were trial fitted and much to my relief, they still fit their apertures.
I'm spending a lot of time trying to achieve a decent shut line between the tailgate and its surround. This is proving difficult but not
impossible. I need sufficient gap to allow for the thickness of the paint. the next phase of the job is going to be slow and painstaking I feel but
this is the bit that everyone will see and so it does have to be as good as I can make it.
[img]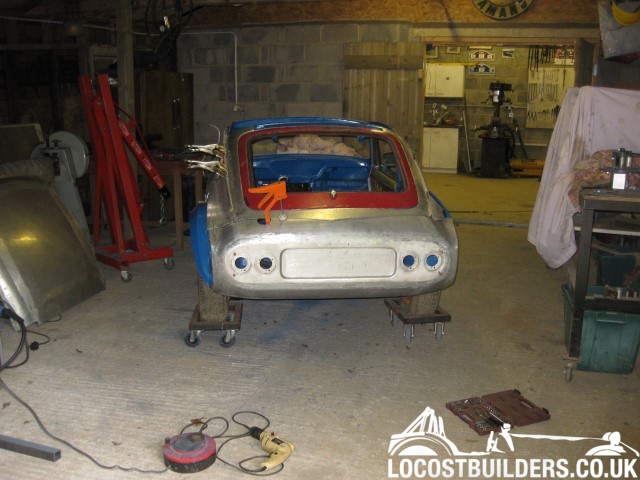 [/img] [/img]
[img] [/img] [/img]
[img]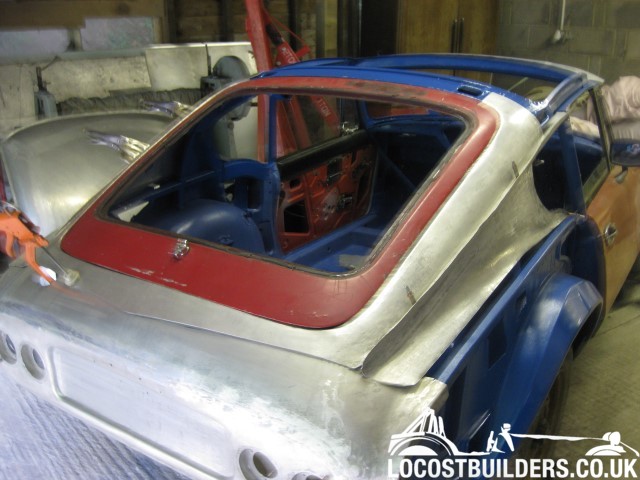 [/img] [/img]
|
|
|
whitestu
|
| posted on 18/8/14 at 08:30 PM |
|
|
French blue is a great choice
|
|
|
John Bonnett
|
| posted on 23/8/14 at 05:17 PM |
|
|
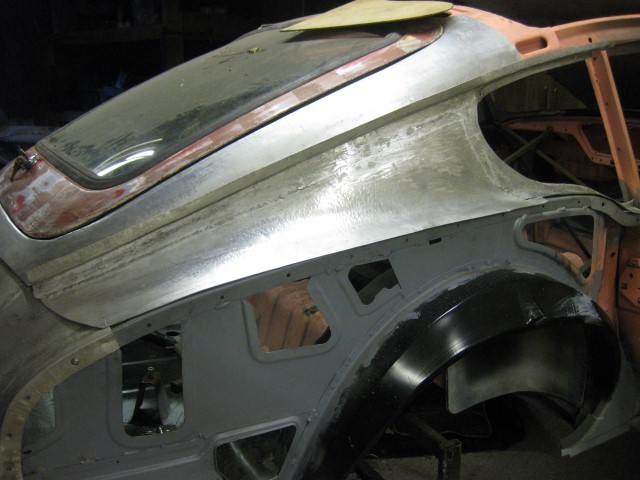
A bit more progress made over the last few days. The roof is now sitting nicely in place and to my eye is symmetrical. I found this a very difficult
panel to make and I have to say how pleased I am with how it has turned out. The tailgate surround is now in place and ready for welding to the
roof.
A couple of pictures attached to bring things up to date.
[img] [/img] [/img]
[img] [/img] [/img]
[img]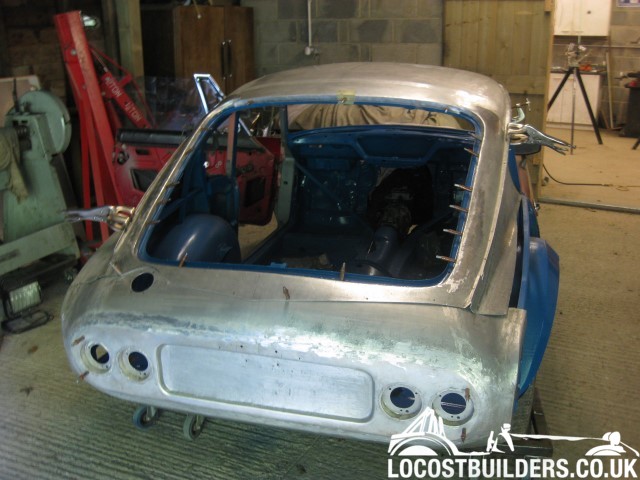 [/img] [/img]
|
|
|
mark chandler
|
| posted on 23/8/14 at 06:39 PM |
|
|
Pictures paint a thousand words John, I'm in awe and looking forward to retiring when I can try something along this theme myself !
|
|
|
John Bonnett
|
| posted on 23/8/14 at 08:30 PM |
|
|
quote:
Originally posted by mark chandler
Pictures paint a thousand words John, I'm in awe and looking forward to retiring when I can try something along this theme myself !
Mark, I can tell you that apart from the old sand running through the hour glass at an alarming rate, retirement is the very best time of my life. I
can just play every day. I've been retired sixteen years now and it just gets better. But having said that, don't wish your time away. No
time is better than the present.
|
|
|
mark chandler
|
| posted on 23/8/14 at 08:43 PM |
|
|
I had my 40 year crisis and got a big bike, now enjoying my early 50's  spent the last few weeks building my project shed for hopefully a good
few years of tinkering 10 tons of concrete and two pallets of bricks later and I am awaiting my oak frame to arrive spent the last few weeks building my project shed for hopefully a good
few years of tinkering 10 tons of concrete and two pallets of bricks later and I am awaiting my oak frame to arrive
Also purchased my sprinting clothes today, I have finally reached the point that I can start spending on myself.
|
|
|