adithorp
|
| posted on 19/9/10 at 01:39 PM |

|
|
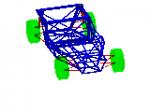
That looks fantastic!... but I'm not surpised given the attention to detail so far.
adrian
"A witty saying proves nothing" Voltaire
http://jpsc.org.uk/forum/
|
|
|
|
|
Dave Ashurst
|
| posted on 20/9/10 at 12:49 AM |
|
|
Looks gorgeous, Fred.
Are you working to a target weight for the finished car?
best
Dave
|
|
|
irvined
|
| posted on 20/9/10 at 02:35 PM |
|
|
Looks fantastic!!!
http://irvined.blogspot.com
|
|
|
chrsgrain
|
| posted on 20/9/10 at 04:45 PM |
|
|
Wow! Are you planning on painting the car, rather than having a gel finish - I'm sure you are with the work that has gone into it.... looks like
that could go straight to paint now...
Awesome work
Chris
PS - when you come to more complex bits that will take longer, have you thought of UV activated resin, it means you can take your time to get
everything right, then open the garage door / wheel the thing outside, and it goes off.... makes things much easier!
[Edited on 20/9/10 by chrsgrain]
Spoing! - the sound of an irony meter breaking...
|
|
|
Fred W B
|
| posted on 20/9/10 at 07:54 PM |
|
|
Thanks for all the encouraging replies guys
quote:
Are you working to a target weight for the finished car?
Dave - the original cars weighed about 725 kg. That is with an ally mono chassis, but a larger heaver engine than the RV8 I am using. I am hoping
that I might end up at say 850 kg or less?
I am weighing the parts as am trying to get a handle on the optimum amount of resin to mix for each layup. I can now calculate I am getting a resin to
matt mix ratio of about 2.3.
As an example, to put two layers of 600 matt on 1 square meter, which the door + flanges is, I prepare 5 cut open plastic milk 2 L containers, the
contents will be resin:
800 gram
800 gram
800 gram
500 gram
to give me a bit of excess,
plus another 300 gram standing by, in case!
Then I make up the first mix and start, adding hardener to the second mix only when the first one is used up, and so on.
I use a 10 cc syringe to measure out the hardener, works well. The resin is weighed on a cling wrap covered digital kitchen scale ( did you know cut
open plastic milk 2 L containers weight 45 grams?)
I use a roller thoroughly between each layer.
I just did this layup tonight on the next door mold, and it took me two hours start to finish, just the actual layup, not including the prep and
cleanup. That includes 4 layers on all the flanges.
quote:
Are you planning on painting the car,
Chris - Yes, eventually, but I can see myself running it for in the gel coat finish for quite a while as I debug it (and save up for the red
paint.....)
quote:
when you come to more complex bits
In fact, considering all the returns and recesses on the door, seems I chose the most complex bits to start with! - It can only get easier?
Cheers
Fred W B
[Edited on 20/9/10 by Fred W B]
You can do it quickly. You can do it cheap. You can do it right. Pick any two.
|
|
|
suparuss
|
| posted on 21/9/10 at 06:47 PM |
|
|
That looks stunning that does! i bet that deep recess was a right PITA to lay up!
Im wondering why you are not using woven cloth though? it gives much higher strength to weight than chopped strand.
ive found if i slightly over wet 300gram chopped strand and then overlay this with twill weave cloth it will soak up all the excess resin giving about
as good a result as possible with hand layup. if you do a single 300 gram csm onto the gelcoat as usual to make sure you dont get any airpockets
against the gel, and then on the next layup do a 300gram csm/ twillweave cloth combo, and then the same again it should come out much stronger than
what you have with a bit of weight saving.
|
|
|
Fred W B
|
| posted on 21/9/10 at 07:26 PM |
|
|
Thanks Russ, I found the worst bit was the long top and bottom returns, as it was difficult to see in around the corners.
As for different materails, I went this way to keep it simple and cheap for a first attempt, but as you say maybe I should have been a bit more
ambitious.
Is woven cloth more difficult to lay up?
Cheers
Fred W B
[Edited on 21/9/10 by Fred W B]
You can do it quickly. You can do it cheap. You can do it right. Pick any two.
|
|
|
suparuss
|
| posted on 21/9/10 at 08:38 PM |
|
|
it can be a bit difficult sometimes but wets out really easy. main concern is that it wont conform as easily as csm and you need to be carefull not to
fold it over, and anywhere this needs to happen you need to cut it and let it over lap other wise the fold may lift up during curing and forn an air
pocket.
other problem is getting long strands tangled up in your roller!
worth the extra effort thoguh by a long way. but i agree if you havent done much fibreglassing it is best to keep it simple to start with.
|
|
|
Fred W B
|
| posted on 1/11/10 at 07:31 PM |
|
|
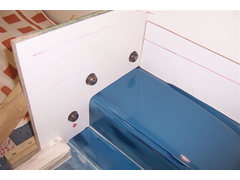
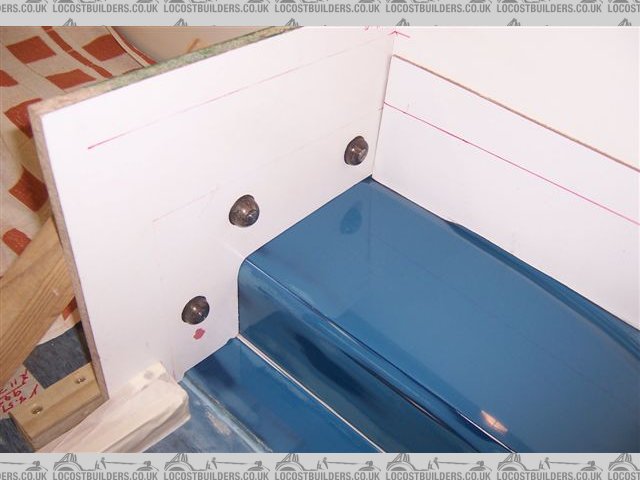
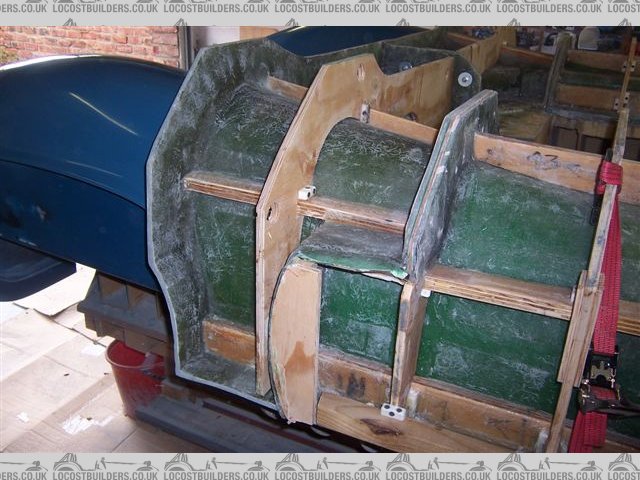
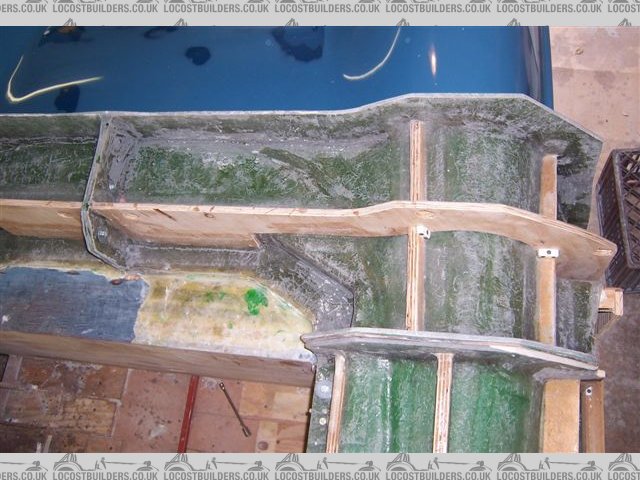
Now almost ready to start laying up the "scuttle" section mold. The parting fences are installed (with 3mm hardboard spacers against the
door molds to create the panel gaps) and the surface waxed. Just need to plastacine the remaining small edge gaps and finish cutting all the matt
pieces and I can then get on with it.
I decided to do this mold in two parts, hence the locating "bumps" at the centre split line. These were made by casting resin around bolts
stood upright in the sections of a plastic tray from a box of chocolates, and then finishing them smooth.
Cheers
Fred W B
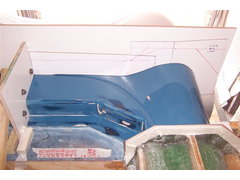 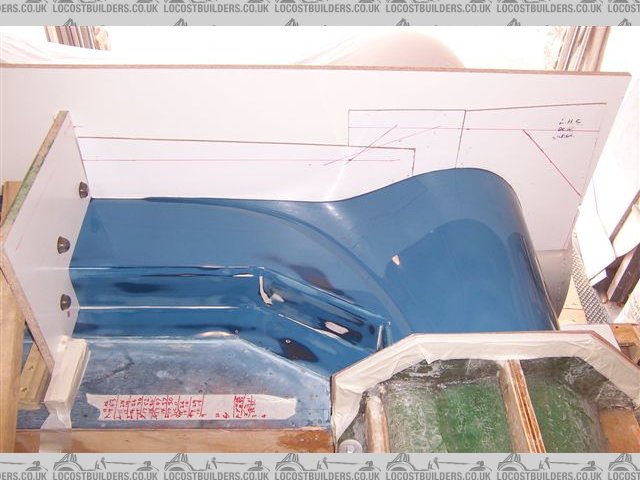
scuttle mold prep 001
scuttle mold prep 004
scuttle mold prep 003
[Edited on 1/11/10 by Fred W B]
[Edited on 1/11/10 by Fred W B]
You can do it quickly. You can do it cheap. You can do it right. Pick any two.
|
|
|
ceebmoj
|
| posted on 4/11/10 at 01:41 PM |
|
|
one again amassing work. I love looking at the reflection of the line in the plug
|
|
|
scootz
|
| posted on 4/11/10 at 01:44 PM |
|
|
Fantastic! I wish I had 1/10th of your skill and dedication to the task!
It's Evolution Baby!
|
|
|
Fred W B
|
| posted on 31/12/10 at 11:10 AM |
|
|
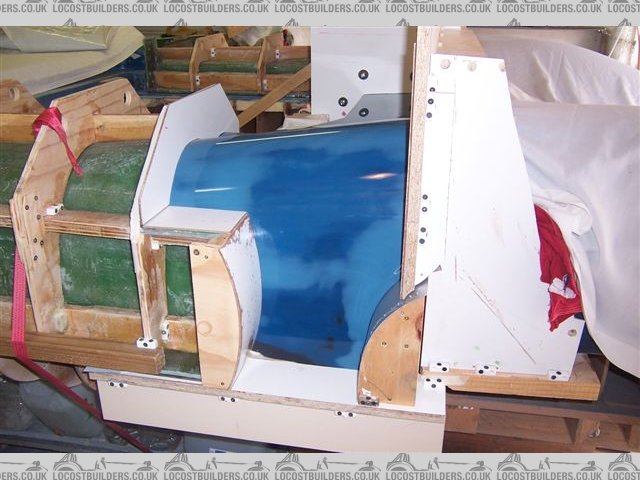
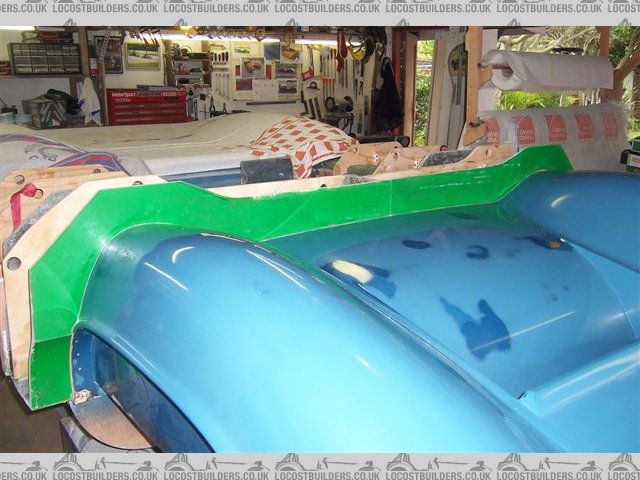
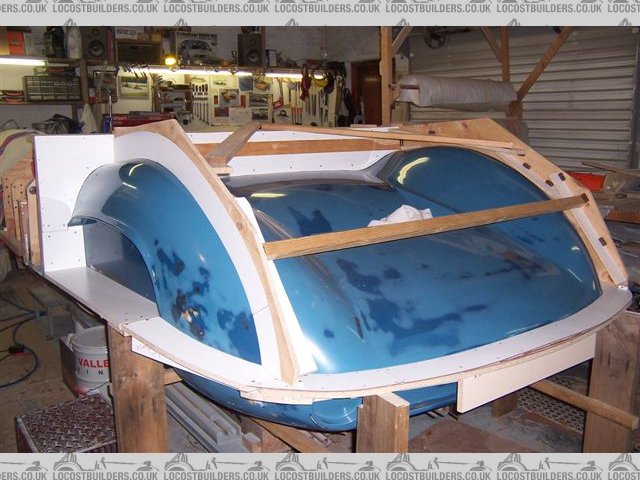
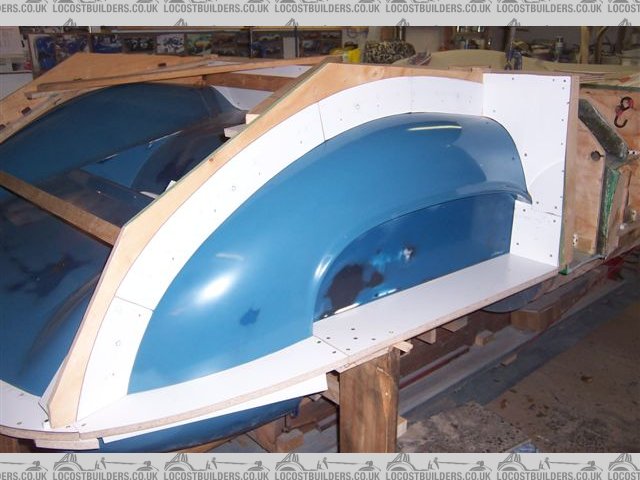
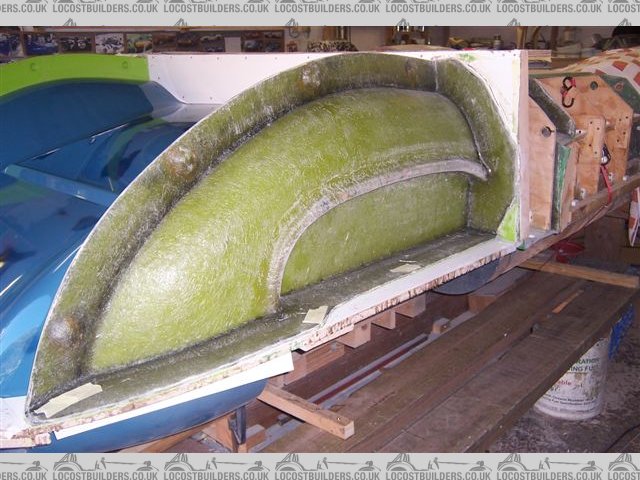
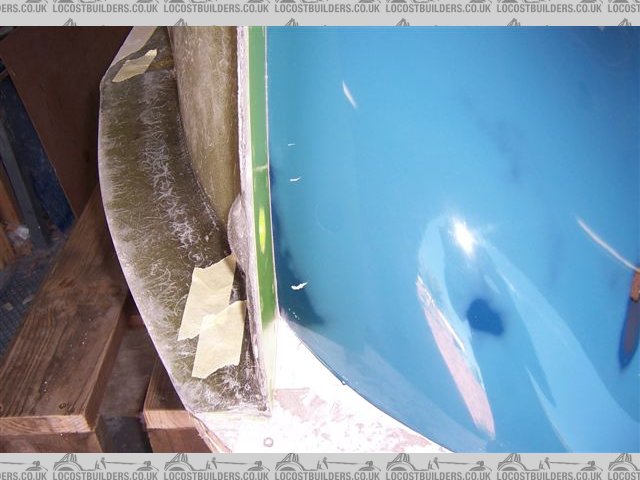
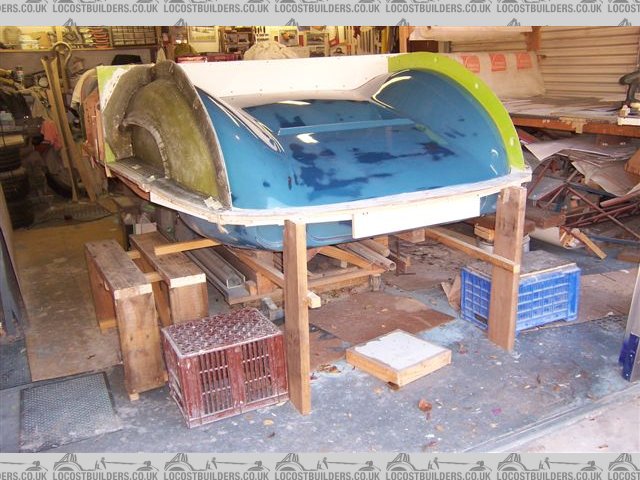
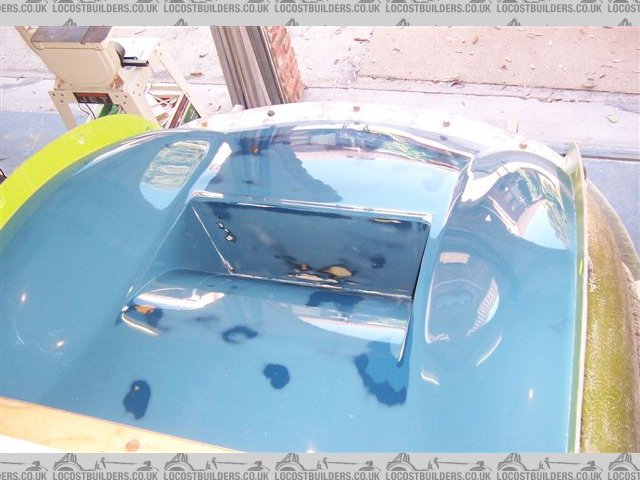
Some pics of the finished two part scuttle mold.
Cheers
Fred W B
You can do it quickly. You can do it cheap. You can do it right. Pick any two.
|
|
|
ceebmoj
|
| posted on 4/1/11 at 01:43 PM |
|
|
great update as always and I find it very interesting watching the whole project move forwards.
|
|
|
ceebmoj
|
| posted on 4/1/11 at 01:43 PM |
|
|
great update as always and I find it very interesting watching the whole project move forwards.
|
|
|
Fred W B
|
| posted on 12/1/11 at 08:23 PM |
|
|
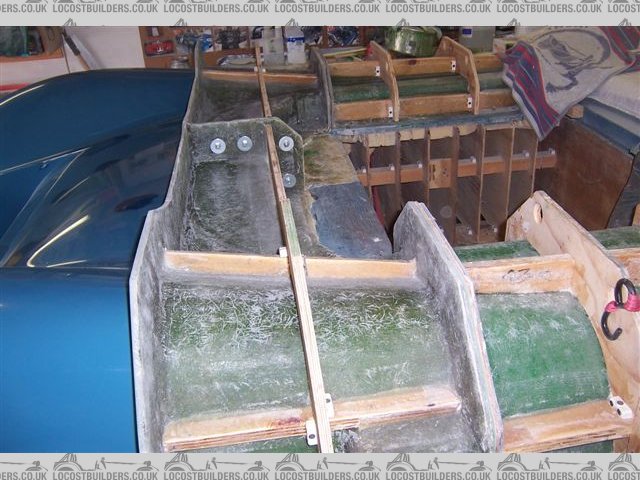
Just finished constructing the parting fences to make the first sections of the nose mould.
Now to take them off again, so I can get on with the favourite job - Waxing!
Cheers
Fred W B
[Edited on 12/1/11 by Fred W B]
You can do it quickly. You can do it cheap. You can do it right. Pick any two.
|
|
|
speedy123
|
| posted on 12/1/11 at 09:00 PM |
|
|
coming on great mate really admire the attention to detail, and your ability absolutely brilliant
an inspiration to us all
keep the postings
Beg, Borrow and Steal, But always get a reciept 
|
|
|
ceebmoj
|
| posted on 17/1/11 at 10:23 PM |
|
|
What are your plans for lights?
|
|
|
Fred W B
|
| posted on 18/1/11 at 07:08 PM |
|
|
Plan for lights..
Rear
Use generic 1960's landrover style lucas assemblies, as on the original T70's. I have the actual part number somewhere.
Front
I haven't yet got up the nerve to mark out the cutouts in the nose , so I plan to make the nose mold without them, make the nose, assemble the
car and then position the lights in the real nose, using mounting rings to mount 7" lenses.
Once the holes are cut in the nose, put it back into the mold and scribe witness marks of the cutouts in the mold that will then appear on future
parts.
Then finish up the internal surfaces of the light recesses, make moulds of the recesses, to then make parts to eventually bond to the nose.
Meantime, save the front corners of the plug, and send them to a friend who does vacuum forming professionally to use them as the basis to make vacuum
forming molds for the light covers.
Whew!
Cheers
Fred W B
You can do it quickly. You can do it cheap. You can do it right. Pick any two.
|
|
|
ceebmoj
|
| posted on 19/1/11 at 01:49 PM |
|
|
Thanks for the info. sounds like a good way of getting everything to look right.
|
|
|
Fred W B
|
| posted on 1/4/11 at 04:53 AM |
|
|
It's been a while. I've been battling on with the outside sections of the front nose mold.
Hassles included:
I took a chance with some old tooling gel coat, and had to scrap two weeks work when it became apparent the stuff would not harden properly.
Finding a local supplier who would sell less than 20kg of tooling gell took a while.
Removing the parting fences was problematic.
I managed to put some dings in the pattern.
Turns out my parting fence placing is less than optimal in some areas.
to the extent that I have finally had enough of this, so I've given up. This has taken far too much time and money to be sensible and I
don't have the strength to carry on.
I have not yet decided if I am going to sell all the running gear bits and pieces I have collected/made or put them into something else. I'll
let you know in due course. Must just get over scrapping and disposing of the pattern first.
Thanks all for all the support in the past.
Cheers
Fred W B
You can do it quickly. You can do it cheap. You can do it right. Pick any two.
|
|
|
TheGecko
|
| posted on 1/4/11 at 06:14 AM |
|
|
Errr - please tell me this is a date related post ?!
|
|
|
Ivan
|
| posted on 1/4/11 at 07:40 AM |
|
|
Oh no - for a moment there you totally shocked me 
I do hope this isn't true
|
|
|
Mr Whippy
|
| posted on 1/4/11 at 08:16 AM |
|
|
I think you need a break, you may have just exhausted yourself with the sheer scale of this project.
From what I have seen you are very very skilled and I have no doubt that with some more cunning you can get over these hurdles. Your only human mind
and pace yourself, if this project takes 5 more years so what?! I have spent 6 on just one little car and I'm still enjoying working on it but
do need to leave it sometimes and come back refreshed.
If you've really had all you can take just now, wrap it up and put it away for a while, don't do anything rash and wait till you feel like
working on it again. I find going to car shows always helps and gives me bursts of enthusiasm.
You owe it to yourself for all the hard dedicated work you have put in so far, you will finish it and you'll be all the more proud of what you
have achieved knowing what a struggle it has been.
Fame is when your old car is plastered all over the internet
|
|
|
Fred W B
|
| posted on 1/4/11 at 06:56 PM |
|
|
Thanks for the responses and enthusiastic support. As suspected, the last part of my post was a leg pull, I am still very determined to finish this
damn thing.
Cheers
Fred W B
You can do it quickly. You can do it cheap. You can do it right. Pick any two.
|
|
|
Fred W B
|
| posted on 3/4/11 at 05:35 PM |
|
|
Current status.
Here you can see the difficult acute angle I've given myself at the front edges of the parting detail, and 2 small scars I've put into
pattern. Wil just plastacine these up and poiish the marks out the mold. They might even be in the headlight cutout.
Ive built some benches to stand on to ease access to the upper surface, and down into the nose duct.
Trying to decide that I CAN lay this up in one hit.
Cheers
Fred W B
[Edited on 3/4/11 by Fred W B]
You can do it quickly. You can do it cheap. You can do it right. Pick any two.
|
|
|