Fred W B
|
| posted on 23/2/10 at 06:23 PM |

|
|
Hi Nev/Syd
Thought I recognized the posting style on the other recent Neville posts.
I have spent a lot of time looking at light reflections in the surface, and thanks again for the original post of yours that got me started on all
this, a long time ago.
Cheers
Fred W B
You can do it quickly. You can do it cheap. You can do it right. Pick any two.
|
|
|
|
|
Neville Jones
|
| posted on 24/2/10 at 12:09 PM |
|
|
quote:
Originally posted by Fred W B
Hi Nev/Syd
I have spent a lot of time looking at light reflections in the surface, and thanks again for the original post of yours that got me
started on all this, a long time ago.
Cheers
Fred W B
But you haven't looked at it in polished black, have you? Black will magnify the wobbles many fold.
Take the time to do this step, you won't regret it, and it's time well spent, and insignificant compared to the whole project length, but
the most important.
Cheers,
Nev.
Who's Syd?
|
|
|
Browser
|
| posted on 10/3/10 at 10:03 AM |
|
|
Consider my gob well and truly smacked 
Awesome job sir, you must have the patience of several saints.
|
|
|
Fred W B
|
| posted on 24/5/10 at 04:55 PM |
|
|
So the next steps were to get the parting lines and fences done for the door perimeters . These were laid out with the aid of dimensions and pictures
supplied by the very helpful owner of an original T70 in America.
Then 10 repeats with wax on both doors.
Small gaps between the fences and the pattern were filled with kids plasticine
 
door fences 2
door fences 3
[Edited on 24/5/10 by Fred W B]
You can do it quickly. You can do it cheap. You can do it right. Pick any two.
|
|
|
Fred W B
|
| posted on 24/5/10 at 05:03 PM |
|
|
Then on with the first door mould. I put on two coats of tooling gel and laid up 1 x surface tissue, 1 x 300 gram and 5 x 600 gram layers. Double
thickness on the flanges.
Took me a while to get the "knack" of laying up. I put on two layers at a time. I let it rest for a good few days or a week between each
session. The trick is to get all the bits of mat tailored exactly to fit prior to catalyzing the resin. I also prepared two or three small mixes, to
use in one session, rather than mixing all the resin at once and rushing to get the whole thing done before it went off. The surface area of the door
is 0.8m2. The flat bits are easy to do, its the fiddly bits on the returns that take time.
 
door lay up 2
 
door layup 3
[Edited on 24/5/10 by Fred W B]
You can do it quickly. You can do it cheap. You can do it right. Pick any two.
|
|
|
Fred W B
|
| posted on 24/5/10 at 05:04 PM |
|
|
I then added some plywood bracing. I bonded only the longitudinal pieces to the mould, the transverse pieces were secured together and to the
longitudinals with screws to hopefully eliminate "print through" of the transverse ribs.
[img][/img]
You can do it quickly. You can do it cheap. You can do it right. Pick any two.
|
|
|
Fred W B
|
| posted on 24/5/10 at 05:07 PM |
|
|
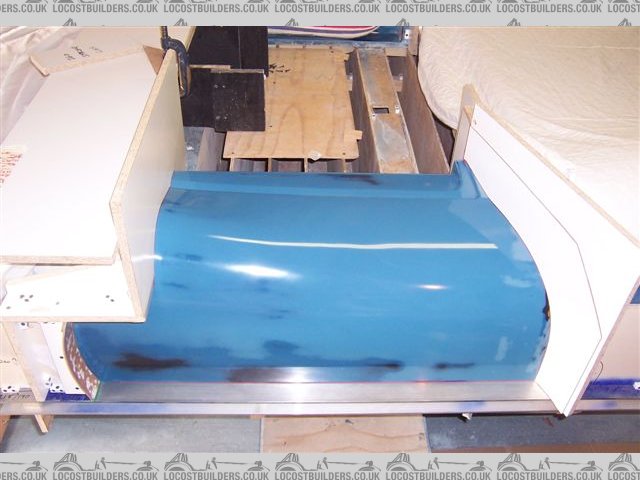
And now this past weekend I released the first door mould. Took some determined pulling with the aid of some friends but it eventually released
cleanly, with no damage to the gel coat.The mould surface looks good enough to make parts (that will be painted) straight away with no further
finishing. Lines are true and it appears "print through " is not a problem. The rough looking edges in the pic is just where some
plasticine is still adhering.
Now to make up the wooden flanges for the door inner returns and the insert box that makes the return where the hinges are and I can then actually
make a part!
I have removed this mould now as I want to cut the door sections out of the pattern once the doors are made to permit easier access to the top
sections of the front and rear clips as I make those moulds. The forward facing sections of the rear section will have wood inserted to enable me to
make the mould section for the return on the rear clip that is "in the door gap".
Cheers
Fred W B
 
door mold 1
door mold 2
[img][/img]
You can do it quickly. You can do it cheap. You can do it right. Pick any two.
|
|
|
smart51
|
| posted on 24/5/10 at 05:35 PM |
|
|
now that's a glossy mould. First class work as always Fred.
|
|
|
sgraber
|
| posted on 24/5/10 at 10:41 PM |
|
|
Well done, well done indeed Fred! Wow seeing you go through this step does bring back some great memories for me. I've always told people that
the hardest part of a scratch build is the bodywork. But it can also be the most rewarding when it turns out well.
Steve Graber
http://www.grabercars.com/
"Quickness through lightness"
|
|
|
chrsgrain
|
| posted on 25/5/10 at 08:38 AM |
|
|
Wow - cool.... must really feel like you're getting somewhere now. The mould looks awesome.
If you're going to chop the plug about, would it be worth taking a spare mould (or two) from it before you start the dismantling... never know
when it would come in handy, or who might be prepared to pay for it?
Chris
Spoing! - the sound of an irony meter breaking...
|
|
|
seansverige
|
| posted on 25/5/10 at 10:11 AM |
|
|
Fred - just caught up on the latest, and continue to be amazed by your diligence and craftsmanship.
I'm sure the sanding phase seemed to go on forever but looking at photos of the polished buck, it seems to have been worth it - and I think I
may have to check back a little more frequently as it looks like the next stages will fly by in comparison.
all the best, sean
|
|
|
Fred W B
|
| posted on 26/5/10 at 05:01 PM |
|
|
Thanks for the kind responses guys.
quote:
worth taking a spare mould (or two)?
As for making spare moulds, while they would be nice to have, extra sets would be a considerable investment in materials (the moulds are 3 or so times
thicker than an actual body would be), not to mention time. Also moulds are extremely bulky to store. Another consideration is that once the first car
is built up and standing out in the open on wheels, some aspect of the shape might look completely wrong, and will require rework/mods to a mould.
Provided you have a panel, you could always make another mould from that panel, if it should be necessary.
As for selling moulds, the hope would be that I might be able to sell a few shells, and if I was to sell a set of moulds I would be cutting down any
potential market.
I've already had an enquiry to buy a shell from a concern that makes other fiberglass cars, so do I sell one to them, knowing they might splash
their own set of moulds off the parts?
With half a mind to that, my body does have some distinguishing features that although I did them that way because I preferred the way they looked, I
also liked the idea that I would be able to recognize one of my shells from a mile off. Two obvious ones are that the radiator outlet duct in the
nose is a blend of styles between the coupe and spyder, and I have done the centre "window in the rear a little different to an original.
Cheers
Fred W B
[Edited on 26/5/10 by Fred W B]
You can do it quickly. You can do it cheap. You can do it right. Pick any two.
|
|
|
chrsgrain
|
| posted on 27/5/10 at 11:19 PM |
|
|
Fair enough, thought I'd mention it - though to be honest, you've given everything on this project far more thought than I ever could!
Keep us up to date!
Chris
Spoing! - the sound of an irony meter breaking...
|
|
|
violentblue
|
| posted on 15/6/10 at 12:13 AM |
|
|
quote:
Originally posted by Fred W B
I've already had an enquiry to buy a shell from a concern that makes other fiberglass cars, so do I sell one to them, knowing they might splash
their own set of moulds off the parts?
just make sure you get it in writing, if they do pull moulds off it that you're due a royalty, or any work derrived from the shell you sell
them, you also retain ownership of.
a few pics of my other projects
|
|
|
Fred W B
|
| posted on 20/7/10 at 03:15 PM |
|
|
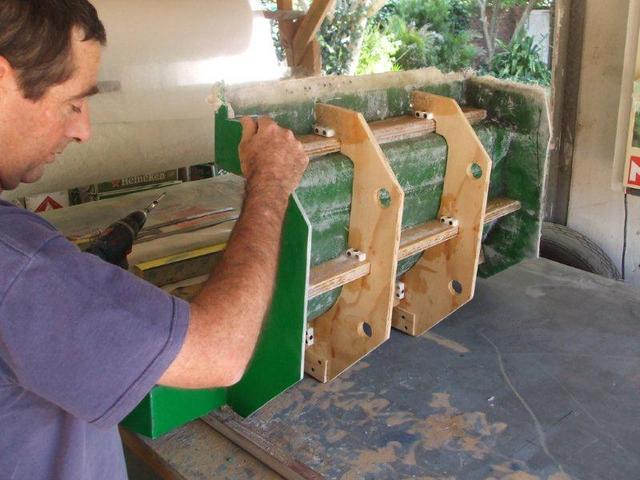
Small update, but not much progress to report, have been otherwise occupied quite a bit over the last few weeks.
I attach some pictures of the left door mold buttoned up with all the return flanges (including hinge recess) and edges radiused.
I then had a bit of a set back, when I went to make the first part I flat lost my Mojo. I had spent hours getting the return flanges and plastacine
radiuses to the edges sorted and matt cut for the first door part. I applied the gell coat and then rushed starting the lay up (something to do with
getting to a social function to watch some soccer match). Didn't let the gell coat go off enough, it started to move around under the first
layers of matt so no gell coat on some edges was the result.
So scrapped that attempt and pulled it all out once the surface tissue and first matt layer had gone off. Chalk it up to experience, and at least I
proved that my edge radius prep worked well. I then found that my clumsy effort had left a slight texture on some areas of the the mold, so I have had
to refinish the mould by sanding with 1200, and then bring the finish back with rubbing compound. Now I have to rewax, reradius and make a start on
another attempt on the door.
Cheers
Fred W B
 
lh door mold 1
 
lh door mold 2
 
lh door mold 3
 
lh door mold 4
[Edited on 20/7/10 by Fred W B]
You can do it quickly. You can do it cheap. You can do it right. Pick any two.
|
|
|
smart51
|
| posted on 20/7/10 at 03:20 PM |
|
|
That is a beautiful piece of work. Hearty congratulations.
|
|
|
scootz
|
| posted on 20/7/10 at 04:01 PM |
|
|
Good work fella!

It's Evolution Baby!
|
|
|
Neville Jones
|
| posted on 20/7/10 at 04:45 PM |
|
|
You can't hope to short cut the system Fred, and get away with it.
You need to make proper patterns and moulds for the door inners. The melamine surfaced chipboard is ok for one offs, but not for the high quality
stuff you're doing.
Just my 2p worth. 
Cheers,
Nev.
|
|
|
Fred W B
|
| posted on 20/7/10 at 07:25 PM |
|
|
Hi Guys
Thanks for responses, and kind compliments.
Nev - To to be honest, I am not sure how well the hinge point surfaces etc I have assumed (from pictures) will work. I hope to get the doors working
in the scuttle openings to sort this once that outer mold is made and I can develop the inner detail required in the scuttle. So these inner return
provisions are probably really protoypes at this stage.
Although the originals had what looks to be a double sided molding to make the doors, I am currently planning to finish the open piece of my door
inners with an ally panel.
Cheers
Fred W B
You can do it quickly. You can do it cheap. You can do it right. Pick any two.
|
|
|
andygtt
|
| posted on 21/7/10 at 08:12 PM |
|
|
wow Fred you really have been motoring on, cant wait to see some finished panels coming from all your hard work 
Andy
please redefine your limits.
|
|
|
suparuss
|
| posted on 24/7/10 at 04:53 AM |
|
|
freds moulds look better than my finihsed panels anyway! my panels usually take a bit of elbow grease to pop out of the mould but looking at the shine
on that door mould yours are gonna fall out onto the floor when unbolt the side bits!
|
|
|
Fred W B
|
| posted on 25/7/10 at 06:01 PM |
|
|
Thanks Russ
I have had a question about the tools I used to make the plastacine radiuses.
Taking advice, I made my own not so professional tools, by welding balls (from ball bearings) to a bar.
The smaller tools in the pic are made from stainless steel welding rods with the ends rounded by a power file applied while the rod was rotated in a
drill chuck.
Cheers
Fred W B
 
rad tools
[Edited on 25/7/10 by Fred W B]
You can do it quickly. You can do it cheap. You can do it right. Pick any two.
|
|
|
iank
|
| posted on 25/7/10 at 07:26 PM |
|
|
Not a million miles away from the ones you can buy, and certainly will work just as well - since they're all just a ball bearing
on'a'stick.

http://www.cfsnet.co.uk/acatalog/CFS_Catalogue__Filleting_Tools_471.html
--
Never argue with an idiot. They drag you down to their level, then beat you with experience.
Anonymous
|
|
|
Fred W B
|
| posted on 18/9/10 at 05:00 PM |
|
|
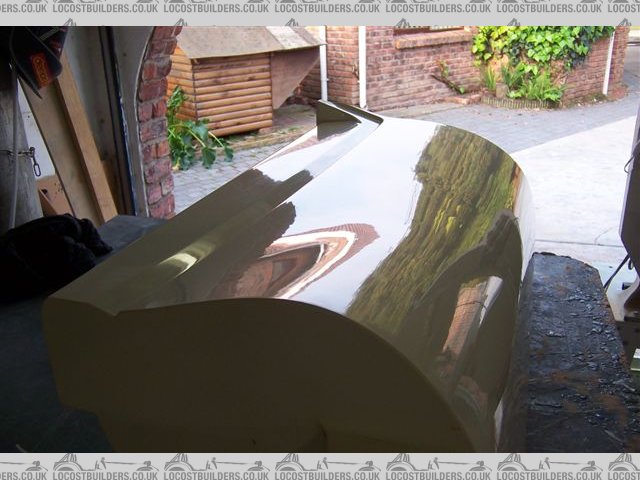
Behold, a door!
Finally finished making up the first real part. I left it in the mold for two weeks. The lay-up I used is:
Gel coat (I first stripe coated all the corners/edges, then two more applications).
1 layer 300 gram CSM.
2 layers 600 gram CSM.
This gave me a final thickness of between 3 and 3.5 mm.
I added extra thickness on the edges, and in the forward part of the door and hinge recess.
The final part weighs 5.5 KG.
The pics are as the part came out the mould, with just the edges cleaned up a bit.
My skills with applying the gel coat and laying up are improving, but still some way to go. I have to keep telling myself "Don't Panic"
as I try to get it all done neatly before the resin goes off.
Cheers
Fred W B
 
door 1
 
door 2
door 3
 
door 4
[Edited on 18/9/10 by Fred W B]
You can do it quickly. You can do it cheap. You can do it right. Pick any two.
|
|
|
scootz
|
| posted on 18/9/10 at 05:08 PM |
|
|
Fabulous! You must be really pleased with that... I would!
It's Evolution Baby!
|
|
|