scudderfish
|
| posted on 12/1/12 at 03:14 PM |

|
|
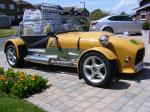
4.3L TVR Rover V8 into a Fisher Fury
I thought I'd start a thread to document my folly, mistakes, and idiotic ideas to forewarn anyone else who thinks this is a good idea. I bought
my car a few years back already fitted with a 3.5 Rover V8. Over time, I ditched the carbs and dizzy and went Megasquirt and EDIS.
At the back of my mind though, it never felt as fast as it looks and sounds. I got it onto some rollers last summer and it was measured at 160bhp. A
perfectly respectable number, but I wanted more! I went fishing for info over at http://www.v8forum.co.uk It boiled down to that to get 210-220 out
of my 3.5, I'd need new heads (£1.2k+) and a new cam (£150-£400). All a bit pricey for me. Whilst glumly browsing that forum, I saw advertised
a 4.3L V8 from an 1992 Griffith. For £600. Much nearer my budget!
Today after faffing with incompetent pallet shippers, it's sat in my garage.

It needs a new cam, rings, bearings and a bunch of parts from my current engine (alternator, bell housing, inlet manifold etc), but it seems sound. I
may throw in a lightened flywheel whilst I'm at it. I should still end up spending less than upgrading my 3.5.
Now the closest I've come to getting inside an engine before was changing the oil. This is going to be a learning experience, and probably a
comedy of errors. I comfort myself with the idea that if I completely screw up, I've still got the original engine. I'm going to update
this thread as I make progress.
Wish me luck!
|
|
|
|
|
tegwin
|
| posted on 12/1/12 at 03:32 PM |
|
|
Nice project!!! And plenty of space between the cylinder banks for a supercharger!
------------------------------------------------------------------------------------------------------------------------
Would the last person who leaves the country please switch off the lights and close the door!
www.verticalhorizonsmedia.tv
|
|
|
BigMac
|
| posted on 12/1/12 at 04:24 PM |
|
|
Will be following this thread with great interest!
I'm sure there's plenty of people on here that would be more than willing to chip in with advice and help if you get stuck!
Good luck with the project!
|
|
|
MakeEverything
|
| posted on 12/1/12 at 07:05 PM |
|
|
Good effort. It does need a supercharger though!!
Stay away from JB weld too!!!
Kindest Regards,
Richard.
...You can make it foolProof, but youll never make it Idiot Proof!...
|
|
|
dlatch
|
| posted on 12/1/12 at 07:10 PM |
|
|
good luck with the engine swap it should indeed give you some more ponies to play with 
|
|
|
scudderfish
|
| posted on 13/1/12 at 09:12 AM |
|
|
Plan for today is get it up on the engine stand and whip the heads off. I would have got it on the stand yesterday, but all the mounting points are
imperial and I've had to order some in, hopefully turning up at lunch time. I need to get the heads off as I've got conflicting info as
to the size of the pistons and I need to order some new rings. The previous owner threw in a ring compressor tool with the engine, but unfortunately
it got crushed.
Once the heads are off, I'll flip it over, get the sump off and then get the crank and pistons out. Then I'll look at the big pile of
parts and think "what the f*ck am I going to do with that lot!"
Photos to follow.
|
|
|
Irony
|
| posted on 13/1/12 at 09:31 AM |
|
|
Best of luck with the build mate. I feel for you as my car has a untested engine built by me in it (unstarted as yet). I am worried about all sorts
of things with it.
Hopefully you should see somewhere up to 280bhp with that little beauty. Great engine swap really as literally everything should fit back together
perfectly.
|
|
|
scudderfish
|
| posted on 13/1/12 at 10:38 AM |
|
|
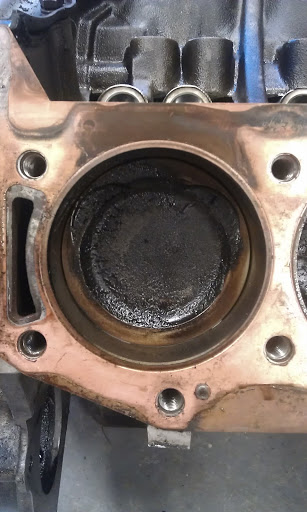
First look at the innards
I took the head off, and this is what I found.

Pistons!
The crud on the top is soft, I can push it around with my finger, so I assume (a phrase I'll be using a lot) that it should just clean off.
Surprise number one was that the bore is 94mm, the same as 3.9/4.0/4.2/4.6 engines. I had read elsewhere that the 4.3 used 89mm pistons from a 3.5
and had an unusual crank to up the displacement. I guess you can't trust everything you read on the net 
Facing the pistons we have :-

Valves!
Anybody care to interpret the colours of them? Again, more crud to clean. What's the best/easiest/cheapest way to do that without buggering it
up?

It looks like some work as been done porting the head, which is nice.
The engine now looks very lopsided

|
|
|
Chippy
|
| posted on 13/1/12 at 10:47 AM |
|
|
Looks like a new set of rings are a definate, bit too much oil in the heads. For the cleaning I would suggest using either Gunk or Jizer as after
washing off leaves a thin oily film so things dont go rusty so quickly. HTH Ray
To make a car go faster, just add lightness. Colin Chapman - OR - fit a bigger engine. Chippy
|
|
|
scudderfish
|
| posted on 13/1/12 at 02:58 PM |
|
|
Well, I've made my first cock up. It turns out I need 3/8 UNC bolts to fit it to the stand, not 5/16. It's staying on the floor until
next week now 
The previous owner noted it's thirst for oil so I expected that I would be fitting new rings.
Anyone near Harpenden with a set of 4 3"+ 3/8UNC bolts?
|
|
|
MakeEverything
|
| posted on 13/1/12 at 08:07 PM |
|
|
Aah mate, nightmare! Looks good though. Some nice soda blasting should clean that up lovely.
Kindest Regards,
Richard.
...You can make it foolProof, but youll never make it Idiot Proof!...
|
|
|
scudderfish
|
| posted on 14/1/12 at 06:48 PM |
|
|
It looks like the engine has suffered from the 14 bolt head problem. Until '95, the heads were held down with 14 bolts, after 95 the four
nearest the exhaust were deleted. They caused a slight distortion which would let a small amount of combustion gases to vent into the central valley.
You can see it clearly on the gasket here :-
The solution is simple though, don't torque down the outer 4 bolts so much!
I got the other head off (looks much the same as it's partner), and the water pump. The water pump has signs of scoring inside, so I may
replace it rather than refurb.


I'm now stumped. I can't get the oil pump off to get at the timing gear without removing the sump, and I can't get that off until
it's off the floor. I'm off to my favourite bolt shop on Monday.
|
|
|
Xtreme Kermit
|
| posted on 14/1/12 at 07:46 PM |
|
|
Keep it up David!
Looks like great fun!
It's a long time since I saw the inside of a V8. The only advice I would give is to ensure you know where each part came from eg valves,
springs, caps bearing caps, etc so you can get 'em back in the right place.
Also, don't just lay things in a tray on the floor and assume you're not going to kick it all over the shop... 
|
|
|
scudderfish
|
| posted on 17/1/12 at 06:53 PM |
|
|
Must resist!
eBay Item
|
|
|
deltron63
|
| posted on 17/1/12 at 07:25 PM |
|
|
Go on , you know you NEED it
|
|
|
Xtreme Kermit
|
| posted on 18/1/12 at 06:36 PM |
|
|
quote:
Originally posted by deltron63
Go on , you know you NEED it
+1
|
|
|
scudderfish
|
| posted on 20/1/12 at 06:25 PM |
|
|
More progress!
My flywheel is looking a little rusty

After a lot of faffing (and incompetence on my part), I finally managed to get hold of some 3/8" threaded rod to make up some fixings to get it
up on my stand :-

I've also made a good start at cleaning the heads

I originally bought some Gunk, but it didn't touch the stuff burnt on. I was browsing Amazon and came across
this stuff and
it worked a treat. £1.68 for 750ml is not bad VFM.
All the pistons are now out, and today I planned on getting the crank & cam out. To do that I needed to get the front cover off. To do that, I
needed to get the oil pump cover off. To do that, I needed to get this bolt out.
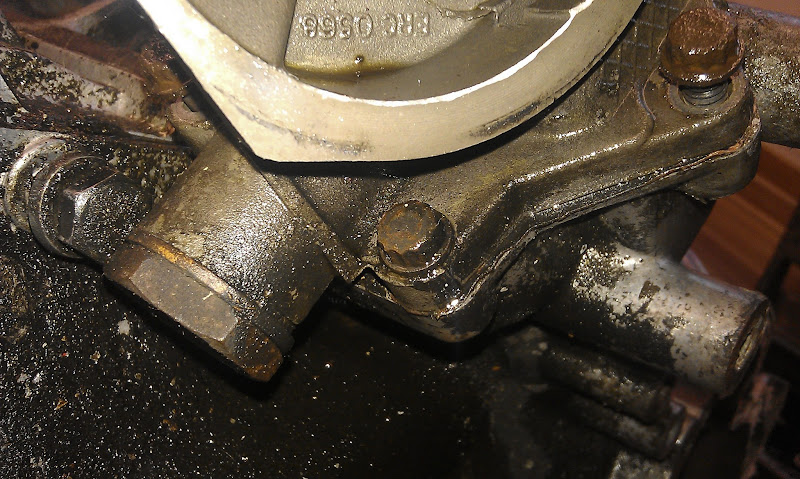
Unfortunately, my I couldn't get my 5/16" socket on it because of the filter fitting, and my 5/16" spanner had gone AWOL After
visiting a load of places (thanks Richard) and hearing a lot of teeth being sucked, I gave up and assumed I'd have to get one by mail order. I
rang a few places and found one in Hemel Hempstead who not only had one, but pointed out that 8mm is only 2 thou different to 5/16". With a
little persuasion (mainly clearing off the accumulated crap), I got an 8mm spanner on and whipped it off. The cam is now out (and in a very sorry
state), but the crank is still there as the bolts holding it down are soaking in WD40 overnight. Crank out tomorrow.
|
|
|
Irony
|
| posted on 20/1/12 at 06:54 PM |
|
|
Looks like your having some serious fun with that. What is the flywheel compatible with? The flywheels that use the SD1 bellhousing are not cheap (I
know I bought one from RPI) so I would look at reusing the old one. I am assuming from memory your mating to a LT77 or R380. I think you can get
them skimmed but don't quote me on that. I must admit I have never seen one with as many balancing holes as yours.
This will transform your car - I am quite excited for you!
|
|
|
craig1410
|
| posted on 20/1/12 at 08:05 PM |
|
|
Hi,
Looks like good fun. A few suggestions from me:
1. Cleanliness is essential when engine building. Wrap up any parts in clean plastic after removal, especially when they are still covered in oil etc
which will make dirt stick to it. Extremely important to put a big bag over the engine when not working on it and use masking tape to seal up the
bores. Anything you can do to stop dirt getting in is really important.
2. Be very careful with any mating faces such as cylinder heads and block faces. This is an all alloy engine so it's very easy to damage them.
Put the heads down on clean corrugated cardboard, don't leave them face up ready for you to drop a spanner or bolt on them. You would be well
advised to get a minimal skim done on the heads to true them up. Be aware that there is a thin gasket and a composite gasket for the RV8. The
composite is thicker but more reliable so if you are going from the thin one to the composite then you can take more material off the head when
skimming to retain the same comp ratio.
3. There are a number of possible reasons for oil consumption. Don't assume it is the piston rings. If replacing the rings though, ensure that
you get the bores honed with a cross hatch pattern to help 'cut' in the new rings. Otherwise they won't bed in and will seal very
poorly. You *can* do this honing yourself but I'd suggest getting it done professionally. Check bore wear before deciding on a hone versus a
rebore though. Note a rebore will require new pistons so figure out the clearances before ordering new piston rings as you might need larger pistons
too.
4. Check crank journals carefully and get new bearings to suit. When measuring, check from several angles to see if they are actually round. You can
expect the existing bearings to be badly worn. RV8's usually have worn bearings but due to the high flow, low pressure oil system they can
tolerate worn bearings very well.
5. Mark every part for orientation and where it came from and put them all back. Bearing caps are very important, as are piston positions, valves etc.
Take lots of photos as you disassemble too. Store all the parts methodically in bags and tubs etc along with nuts and bolts etc.
6. Get a good book on RV8 rebuilding and read it thoroughly. It's a forgiving engine in many ways but if you build it well it will purr like a
kitten! Worth taking extra care to achieve this. Consider blueprinting techniques as you build. You can gain some extra power for not much effort. See
ISBN 1-884089-26-7 and 1-557-88245-2 and 1-855-20528-9
Have fun!
Jealous!
C.
|
|
|
scudderfish
|
| posted on 21/1/12 at 11:09 AM |
|
|
This is why I started this thread so people could point out areas I could screw up, or things I had already screwed up On the head gasket front,
this engine actually takes a third route. TVR fitted them with copper gaskets which are supposedly reusable. However as you can see, they are
showing signs of blow by from being 115,000 miles old and 14 bolt heads. I'm going to replace them with new, but it's going to hurt at
£60 each.
What are the other reasons for oil consumption? I assumed the rings given the amount of burnt oil in the combustion chamber, but I'm not
knowledgeable about details. I'm going to get a local company to hone my cylinders for me and give it a look see.
The crank bearings looked OK to me, no sign of copper to my eye. However the engine came with a new set of bearings anyway so I'll replace them
anyway. I've cocked up on the positioning though as I have no idea which piston is which
Thanks for the book recommendations. I've got the last one, and I've just ordered the second one from Amazon.
I'll post some photos of the camshaft later, I think it's a testament to what these engines will put up with.
|
|
|
scudderfish
|
| posted on 21/1/12 at 12:55 PM |
|
|
One of these lobes in not like the others....

|
|
|
Xtreme Kermit
|
| posted on 21/1/12 at 09:46 PM |
|
|
What's the problem scud?
It's got some lumpy bits on it...
|
|
|
scudderfish
|
| posted on 23/1/12 at 08:23 PM |
|
|
I'm glad I wasn't planning on reusing the oil filter housing.

|
|
|
Xtreme Kermit
|
| posted on 23/1/12 at 09:09 PM |
|
|
Something not quite right there
Is that a normal area of wear?
|
|
|
scudderfish
|
| posted on 23/1/12 at 09:12 PM |
|
|
quote:
Originally posted by Xtreme Kermit
Something not quite right there
Is that a normal area of wear?
It's not unexpected, but it's worse than I thought it would be. The part was always going to be junk as it won't fit in my car;
I'll be using the remote housing fitted to my current engine. I just hope that is in better condition.
|
|
|