Xtreme Kermit
|
| posted on 7/7/12 at 06:10 PM |

|
|
Top job Dave. You got the bu99er out!
Do you have to take the front back off the new lump to help it fit back in?
|
|
|
|
|
scudderfish
|
| posted on 7/7/12 at 06:14 PM |
|
|
Oh cock, I hadn't thought of that!  New engine already has front cover & water pump fitted. They'll probably have to come off. New engine already has front cover & water pump fitted. They'll probably have to come off.
|
|
|
matt_gsxr
|
| posted on 7/7/12 at 06:15 PM |
|
|
Well done.
Sunday is going to be busy getting the new one in.
Matt
|
|
|
scudderfish
|
| posted on 7/7/12 at 06:16 PM |
|
|
Sunday is Wimbledon, GP, torch relay, pub and lunch with friends & family. Maybe next weekend
|
|
|
se7ensport
|
| posted on 8/7/12 at 08:40 AM |
|
|
Remove the front shocks and possibly the rockers, I had to drop the shocks to get a Duratec in and out of my Stylus which has a near identical front
end. It will make things easier and possibly not need to remove front cover and pump etc...
|
|
|
scudderfish
|
| posted on 8/7/12 at 08:54 AM |
|
|
Yep, my plan for getting the next one in is to remove the wheels, shocks and chock the front wishbones up to drop the rockers down. Now I've
had a bit of practice I think that will be sufficient to get the new one in with the front cover in place. If not, whipping the rockers off whilst
dangling the engine should be quite easy.
|
|
|
scudderfish
|
| posted on 21/7/12 at 03:06 PM |
|
|
More filth. I took the valley gasket off the old engine for a nosey and found this:-


Nice bit of wear on the cam and followers there.
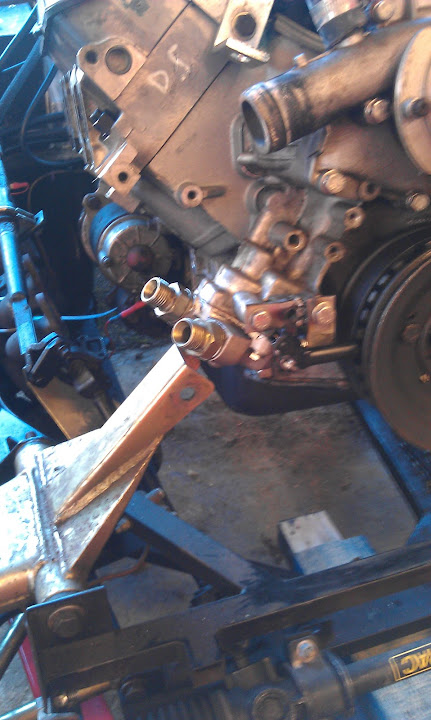
So now I have to get this off that

I got the bolts out but it wasn't shifting. I thought I needed to take the starter off and discovered the most awkward bolt so far. It's
an allen head and by the time I took this photo I'd already removed the sump and oil pickup

I couldn't get any swing with the allen key (5/16th inch) so I chopped about an inch off, and put it in a socket. A sort of female to female
adaptor. And with a suitably long piece I got my ratchet on it. I then discovered, the bell housing is also attached by this plate here which covers
the lower part of the flywheel

At this point, I got some help

So now the bellhousing is disconnected from the engine
but I haven't got them apart. I'm probably not applying enough violence....
|
|
|
scudderfish
|
| posted on 22/7/12 at 04:01 PM |
|
|
As the song goes....
Wiggle it, just a little bit.

|
|
|
Xtreme Kermit
|
| posted on 22/7/12 at 05:07 PM |
|
|
Woohoo!
Cam wear seems a common thing on the RV8. Wonder if they don't get enough oil after a while.
|
|
|
scudderfish
|
| posted on 8/9/12 at 03:31 PM |
|
|
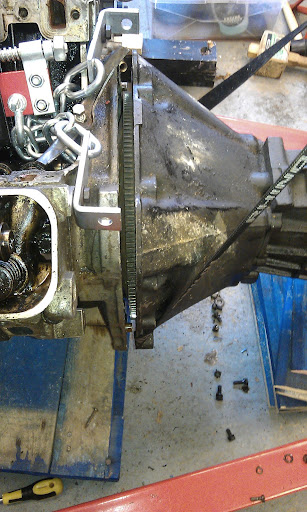
Right. Finally managed to shuffle the lumps around, but getting the gearbox on is proving to be complete arse. I'm struggling to get the input
shaft correctly aligned with the clutch plate.
This is as far as I've got :-

The input shaft appears to be engaging the with the clutch as I can't turn the gearbox over anymore. However if I try to do the nuts up
further, the bellhousing gets no closer and I fear I'm going to strip a thread in the block or crack the bellhousing 
Bugger.
|
|
|
stevebubs
|
| posted on 8/9/12 at 04:25 PM |
|
|
Undo the bolts and keep wiggling it...my gearbox mounted straight up to my engine first time. Second time it took nearly an hour of wiggling to get
everything aligned..
|
|
|
DIY Si
|
| posted on 8/9/12 at 08:57 PM |
|
|
If you have a helper, put the box in gear and have someone with a socket and bar wiggle the crank pulley back and forth as you try to slide the box on
fully. Pulling it on with bolts is just asking to pop something.
Otherwise, it really is a case of on/off/on/off/on/off until it goes on just right.
Let your plans be dark and as impenetratable as night, and when you move, fall like a thunderbolt.
Sun Tzu, The Art of War
My new blog: http://spritecave.blogspot.co.uk/
|
|
|
scudderfish
|
| posted on 13/9/12 at 10:49 AM |
|
|
Success!

A bit of wiggling up and down an it just slid straight on.
Now to put the bugger in the car......
|
|
|
AllWeatherDan
|
| posted on 13/9/12 at 01:28 PM |
|
|
BRILLIANT!
I have been watching this with baited breath for the big unveil!!
Nearly there.....
Hurry up the suspence is killing me. :-)
Dan
There is no such thing as a stupid question.
Just the ones I ask!
|
|
|
scudderfish
|
| posted on 29/10/12 at 03:06 PM |
|
|
And so the day began....

I got the car up on some wood so the crane legs would fit underneath it, and took the front shocks out

It starts to go in....

Cock! Is the front cover going to have to come off?
Shaking it around dodged the problem

Houston! The engine has landed!

Of course it wasn't that simple. The drivers side engine mount was a complete arse. I had real trouble getting the bolts lined up and in, so I
undid the nut on the underside. Out with it came this particulary thick washer.
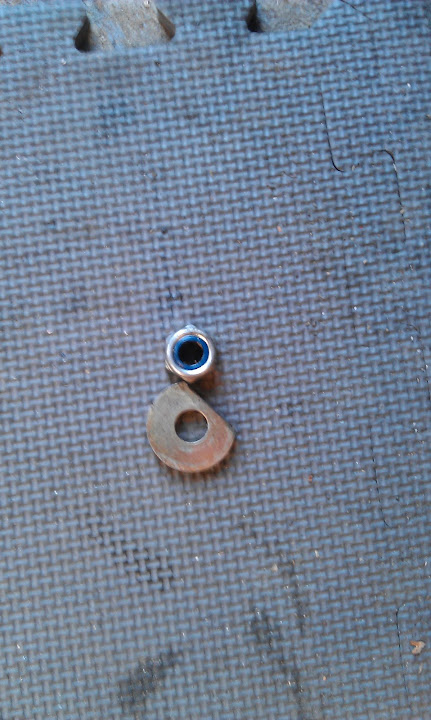
Whoever built my car boxed in the bottom of the engine mount so the bolt that protrudes from it is accessed through a socket sized hole in a piece of
sheet. Rattling around in this boxed off section are a couple more washers and I don't have the access to get them lined up with the engine
mount bolt so right now the engine isn't secure on the drivers side. I'll probably drill out the rivets and drop the sheet off, retrieve
the washers and then rivet it back up.
All in all though a good day.
|
|
|
scudderfish
|
| posted on 5/11/12 at 01:24 PM |
|
|
Well the sheet was larger than I first thought, so I just enlarged the hole enough to get the blockage out and got the washer and nut back on. All I
need to do now it bolt up the gearbox mount and the propshaft and the engine will be officially fitted to the car. Then starts the plumbing and
wiring...........
|
|
|
Xtreme Kermit
|
| posted on 5/11/12 at 09:33 PM |
|
|
Good effort Dave
Back on the road for Christmas? 
|
|
|
scudderfish
|
| posted on 5/11/12 at 10:29 PM |
|
|
quote:
Originally posted by Xtreme Kermit
Good effort Dave
Back on the road for Christmas?
Definitely*
* I'm not specifying which one though....
|
|
|
scudderfish
|
| posted on 3/1/13 at 12:55 PM |
|
|
When filling the cooling system, always remember to fit temperature sensors to the manifold BEFORE you wee antifreeze all over the garage....
|
|
|
MakeEverything
|
| posted on 3/1/13 at 07:18 PM |
|
|
Are you planning on starting it up tomorrow? Can i come and watch??
Kindest Regards,
Richard.
...You can make it foolProof, but youll never make it Idiot Proof!...
|
|
|
scudderfish
|
| posted on 3/1/13 at 08:10 PM |
|
|
Off the top of my head my to do is :-
- Attach prop
- Refit ECU
- Remove resistors from injectors
- Fit injectors
- Fit fuel pipes
- Fit oil sensors
- Fit temp sensors
- Fit new oil filter
- Fill with oil
- Prime oil pump
- Fit distributor
- Wire up starter
- Bleed clutch
- Bleed brakes
- Fit alternator
- Fit exhaust manifold
- Fit steering column
- Fit fan
- Fit dash
- Fit engine crankcase breather
[Edited on 4/1/13 by scudderfish]
|
|
|
Xtreme Kermit
|
| posted on 3/1/13 at 08:50 PM |
|
|
So, by 3pm then
|
|
|
Furyous
|
| posted on 3/1/13 at 11:10 PM |
|
|
Blimey! I've been going quicker than you and I've been on the other side of the world for most of the last year. We both started at
about the same time.
|
|
|
scudderfish
|
| posted on 4/1/13 at 10:08 AM |
|
|
quote:
Originally posted by Furyous
Blimey! I've been going quicker than you and I've been on the other side of the world for most of the last year. We both started at
about the same time.
I'm willing to bet you're more competent than me though. Everything takes me so long and motivation can be a struggle. There have been
many times where I just haven't been able to face going into the garage.
|
|
|
Furyous
|
| posted on 5/1/13 at 08:15 PM |
|
|
quote:
Originally posted by scudderfish
I'm willing to bet you're more competent than me though.
I'd be very worried about your car in that case.  I didn't know much about engines before I started the swap but I've learnt a lot
by doing it. I didn't know much about engines before I started the swap but I've learnt a lot
by doing it.
To be fair, when I've been back in the UK I've pretty much done nothing other than work on the car. Fingers crossed, it's tomorrow
for me. Still lots to polish off once the engine's going, though.
|
|
|